Welcome to MedITEX Scheduler
From MedITEX - Wiki
| Line 30: | Line 30: | ||
<p>This editor lets you create, edit, copy and save appointments.</p> | <p>This editor lets you create, edit, copy and save appointments.</p> | ||
<p> </p> | <p> </p> | ||
| − | <h2><span id="Resource_administration_.E2.80.93_tab_sheet_.E2.80.9EResources.E2.80.9C" class="mw-headline"> | + | <h2><span id="Resource_administration_.E2.80.93_tab_sheet_.E2.80.9EResources.E2.80.9C" class="mw-headline">Resources</span></h2> |
| − | < | + | <p><span class="mw-headline">MedITEX Scheduler was developed around resources. It comprehends three distinct types:</span><span class="mw-headline"> staff, rooms and devices.</span></p> |
| − | + | <ul> | |
| − | <p> | + | <li><span class="mw-headline">Staff is the personnel working with patients. That can be: embryologists, assistants, doctors, etc.</span></li> |
| − | < | + | <li><span class="mw-headline">Rooms are the facilities in which patients can be allocated. For instance: operation room, labor room, consultation room, etc.</span></li> |
| − | + | <li><span class="mw-headline">Devices are the utensils used by the staff. If it is a big device, like an X-ray machine, it will also be linked to a room. But it could also be smaller devices such as: ultrasound, catheter, incubator, etc.<br /></span></li> | |
| − | + | </ul> | |
| − | < | + | <p style="text-align: left;"><strong>Managing </strong>these <strong>resources </strong>is the main goal of MedITEX Scheduler.</p> |
| − | < | + | <p style="text-align: left;">MedITEX Scheduler creates appointments for selected resources with starting and finishing times. For instance, it is possible to know when a device is being used, when a room is occupied and when a doctor is consulting a patient. This helps you optimize processes and planning, but above all, it is totally integrated with MedITEX IVF.</p> |
| − | + | ||
| − | + | ||
| − | + | ||
| − | + | ||
| − | + | ||
| − | </ | + | |
| − | < | + | |
| − | < | + | |
| − | + | ||
| − | + | ||
| − | + | ||
| − | + | ||
| − | + | ||
| − | </ | + | |
| − | </ | + | |
| − | </ | + | |
| − | + | ||
| − | <p | + | |
| − | + | ||
| − | + | ||
| − | + | ||
| − | + | ||
| − | + | ||
| − | + | ||
| − | + | ||
| − | + | ||
| − | + | ||
| − | + | ||
| − | + | ||
| − | + | ||
| − | + | ||
| − | + | ||
| − | < | + | |
| − | < | + | |
| − | + | ||
| − | + | ||
| − | < | + | |
| − | </ | + | |
| − | + | ||
| − | + | ||
| − | + | ||
| − | + | ||
| − | + | ||
| − | + | ||
| − | + | ||
| − | <p style="text-align: left;"> | + | |
<p style="text-align: left;"> </p> | <p style="text-align: left;"> </p> | ||
| − | < | + | <h2>Managing Lists</h2> |
| − | + | ||
| − | + | ||
| − | + | ||
| − | + | ||
| − | + | ||
| − | + | ||
| − | + | ||
| − | + | ||
| − | + | ||
| − | + | ||
| − | + | ||
| − | + | ||
| − | + | ||
| − | + | ||
| − | + | ||
| − | + | ||
| − | + | ||
| − | + | ||
| − | + | ||
| − | + | ||
| − | + | ||
| − | + | ||
| − | + | ||
| − | + | ||
| − | + | ||
| − | + | ||
| − | + | ||
| − | + | ||
| − | + | ||
| − | + | ||
| − | + | ||
| − | + | ||
| − | + | ||
| − | + | ||
| − | + | ||
| − | + | ||
| − | + | ||
| − | + | ||
<p> </p> | <p> </p> | ||
| − | |||
| − | |||
| − | |||
| − | |||
| − | |||
| − | |||
| − | |||
| − | |||
| − | |||
| − | |||
| − | |||
| − | |||
<p> </p> | <p> </p> | ||
<table style="margin-left: auto; margin-right: auto;" border="0" width="754" height="168"> | <table style="margin-left: auto; margin-right: auto;" border="0" width="754" height="168"> | ||
Revision as of 17:06, 8 November 2012
MedITEX Scheduler is an ideal tool to manage your time and clearly plan your appointments – for your team, your patients, your medical counselling and treatment. As an organisation, planning and coordination tool, the MedITEX Scheduler is exactly tailored to medical treatments and the progress of therapy.
Contents |
Interface
MedITEX Scheduler has a very simple and straight forward interface. We will divide this interface into smaller sections that have specific functionalities.
Hint: click on images throughout pages to enlarge them.
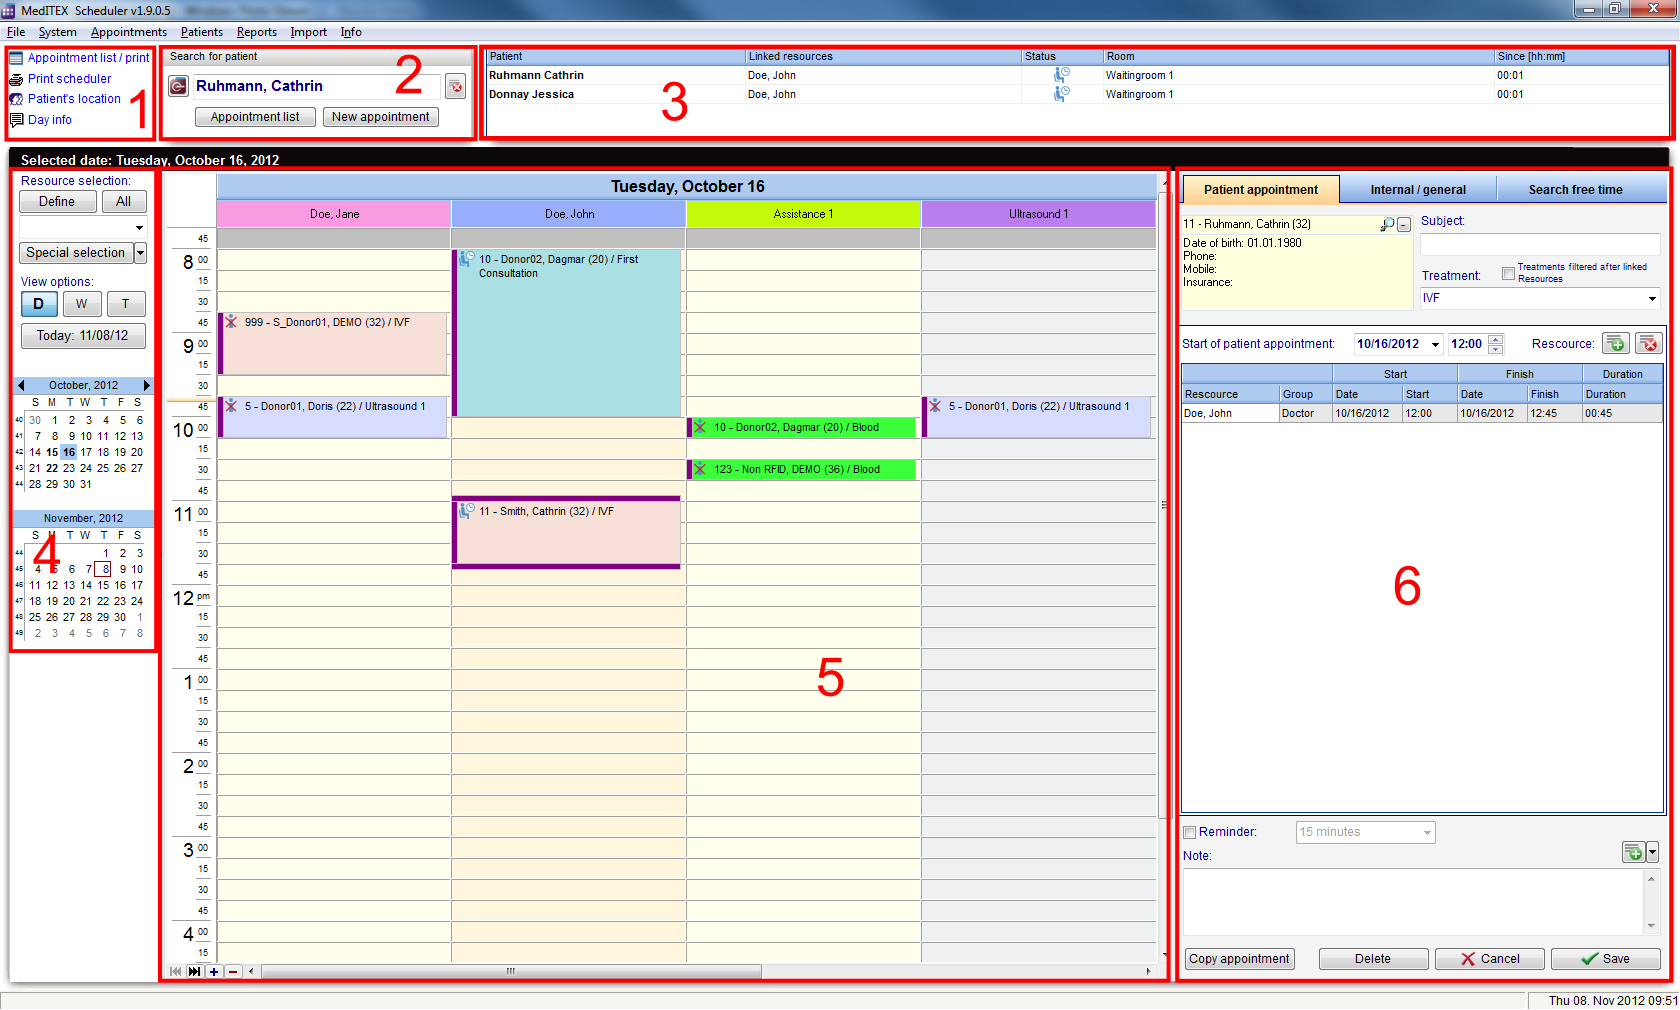 |
1. Supporting links
These are special links used most frequently in Scheduler. From here, you can have easy and fast access to printing lists, finding the location of patients and other functionalities.
2. Search for patient
This is the search bar for patients. Type the name of the patient or click on the arrow at the end of the bar to have the full list of available patients.
If you have a license of MedITEX IVF, you can open the selected patient right from Scheduler in IVF by clicking on the IVF button on the left.
You can also create a new appointment for the searched patient or view a list of future and past appointments clicking on the buttons at the bottom of the search bar.
3. Waiting room
This is where patients in the waiting room are displayed. In this section, you have information of resources allocated to this patient, status and the elapsed time since the patient has arrived.
This section will also have a tab for internal communication called "Day info". If there is any kind of warnings or notifications that all staff members must know, it is possible to spread this information here.
4. Resource, view and calendar
This section provides extended functionalities for the schedule of the clinic. Here, you can change the format of visualization, sort by certain resources and navigate between days with the help of the calendar.
5. Schedule
The schedule is the main section of MedITEX Scheduler. Here you can view all appointments.
Each employee can set their preferred visualization method, so the next time they log in, their preferences will be kept the same.
6. Appointment editor
The appointment editor is only displayed when creating a new appointment or by double-clicking an appointment in the schedule. This second option can be altered in the settings menu, so instead of the appointment editor, a list of all appointments from the selected patient will open.
This editor lets you create, edit, copy and save appointments.
Resources
MedITEX Scheduler was developed around resources. It comprehends three distinct types: staff, rooms and devices.
- Staff is the personnel working with patients. That can be: embryologists, assistants, doctors, etc.
- Rooms are the facilities in which patients can be allocated. For instance: operation room, labor room, consultation room, etc.
- Devices are the utensils used by the staff. If it is a big device, like an X-ray machine, it will also be linked to a room. But it could also be smaller devices such as: ultrasound, catheter, incubator, etc.
Managing these resources is the main goal of MedITEX Scheduler.
MedITEX Scheduler creates appointments for selected resources with starting and finishing times. For instance, it is possible to know when a device is being used, when a room is occupied and when a doctor is consulting a patient. This helps you optimize processes and planning, but above all, it is totally integrated with MedITEX IVF.
Managing Lists
|
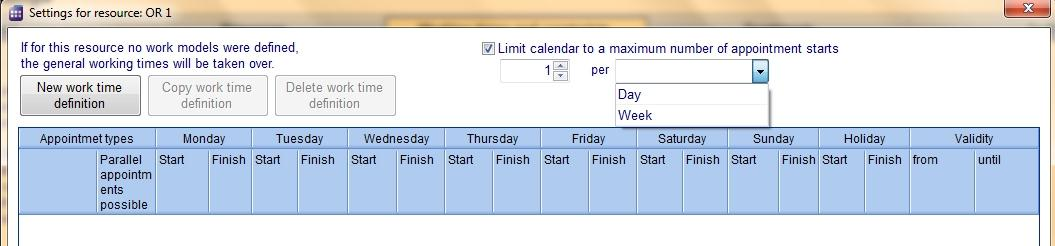
In the drop down list you can choose the appointment type(s) allowed for the selected work model – selected line. (Information: the conflict messages for not suitable appointment types, while scheduling appointments, will only work if you have also assigned the types to the related treatments. Please see the section – “<a href="/index.php?title=Welcome_to_MedITEX_Scheduler#Treatments">Treatments</a>”). If you do not make a special selection (all boxes checked), “all appointments” will be displayed in the scheduler. In this way there will be no constraints on appointment type. |
<img src="/images/Settings_WorkingTimeNewDetail.png" alt="" /> |
For each day you can define the time of start and end. If you like to define a break, like e. g. a lunch break, insert a further row (button “New work time definition”). In one row you apply the times UNTIL the break, in the row bellow you apply the times beginning FROM the break. If you have more rows for a day and there are overlapping times, the summary of the appointment types of the intersection are valid for the overlapping time.
Column “Validity”: If you don’t fill something out, the row with that working time definition will always be valid. But you can also fill out “from” or/and “until”. The scheduler will accordingly show the work times for that resource.
Limitation of resources to a maximum number of assigned appointments
Resources can be limited to accept up to a maximum number of appointment starts per day. The limitation can be defined for each day or for whole week.
Example:
In a clinic there are four beds available. Every day one bed can be assigned only once, to one patient. A resource „Beds“ has been defined. In order not to reserve more beds then beds available, a maximum number of starts of appointments for the resource „Beds“ is limited to four.
 |
 |
|
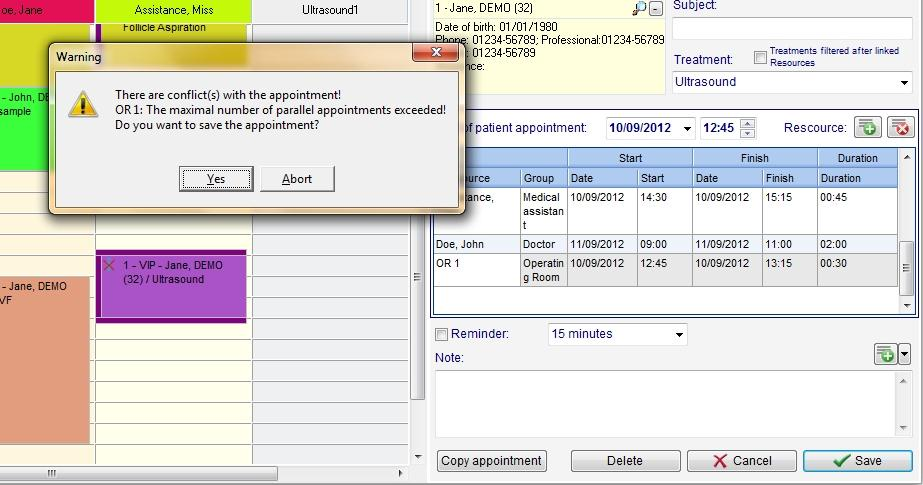
If at the assignment of an appointment the maximum number is exceeded, a warning will be displayed. |
Treatments
Reason for an appointment
Treatments are suggested as reasons for appointments.
Example: An appointment is made with a patient who should come for an embryo transfer. In the appointment details to the right, you should select “Embryo transfer” from the list of possible treatments.
 |
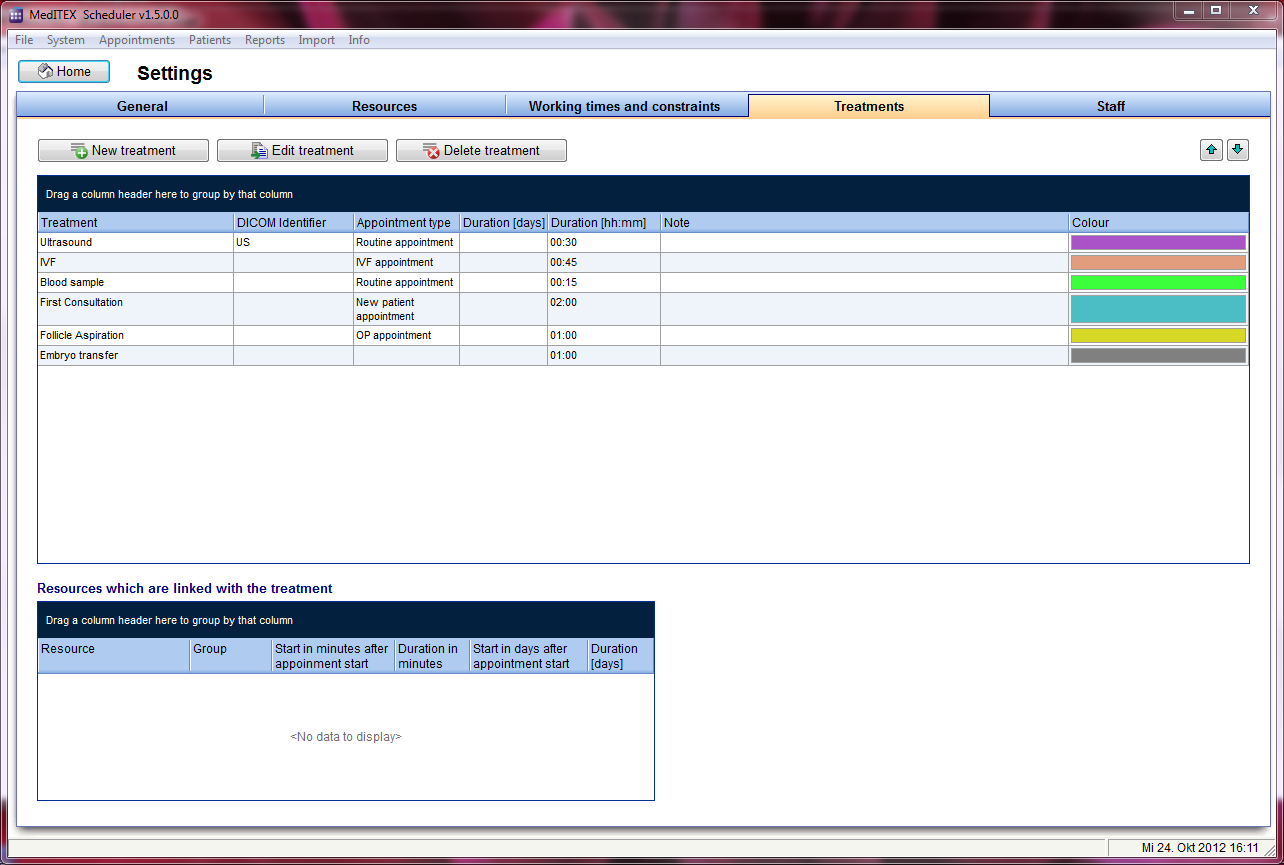 |
| In order to edit a treatment you can double click on the desired treatment (line), or select the line and click the button „Edit treatment“. You can create a new treatment template with the button “New treatment”. |
 |
| If you have defined appointment types in tab „Working times and limitations“, you should assign the corresponding appointment types to the treatments. In this way the warning system will be active while scheduling appointments. If a treatment has no appointment type assigned, this treatment will always be allowed and no warning will appear if an appointment including this treatment is scheduled at a time that is actually reserved for other appointment types. |
Treatments as appointment templates
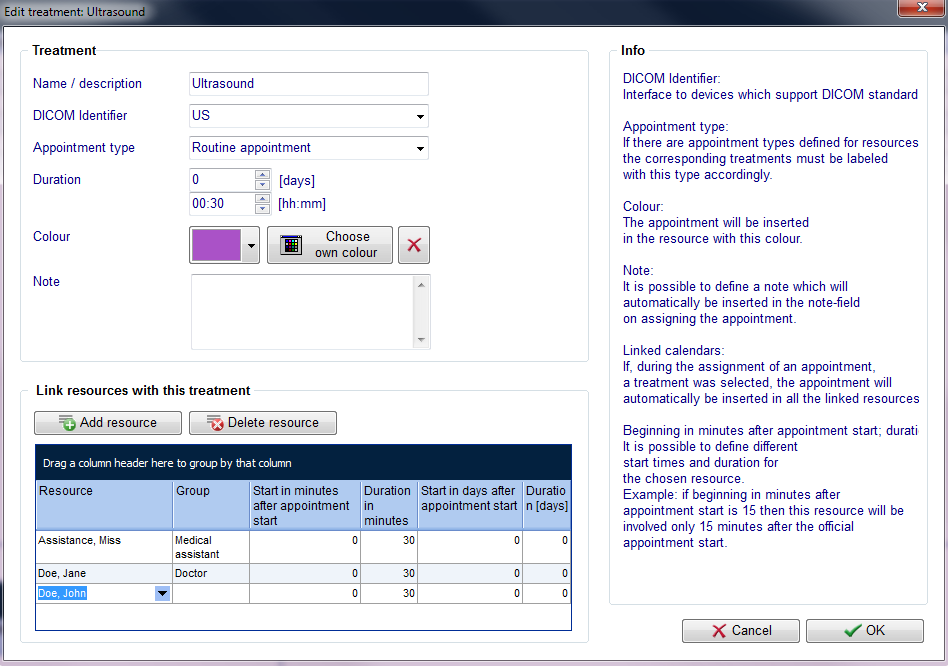
For a treatment it is possible not only to define the duration and colour which the appointment will have if this treatment is selected, but also all involved resources.
In order to link a resource with the treatment, please click on button “Add resource” and select the resource in column 1. For each linked resource, it is possible to define a different start time and duration. If you select this treatment while scheduling an appointment, all linked resources with their corresponding times will automatically be assigned to the appointment.
| <img src="/images/Resource_TreatmentsRed.png" alt="" width="486" height="285" /> |
Example:
The treatment „Follow-up examination” is always executed by doctor John Doe and an assistant. We have the resource „Doe, John“ and a resource „Assistance“, which in this case stands commonly for all assistances as for the person who is on duty at the moment. If an appointment “Follow-up examination” is assigned, it will appear in both resources. In order not to select each resource manually every time when assigning that appointment, we previously have linked these resources with the treatment in the settings. So if we choose this treatment for an appointment, the appointment will automatically be inserted in all linked resources.
In our example the follow-up examination is not only performed by Dr. John Doe, but also by Dr. Smith and the corresponding assistance. Therefore we apply a second treatment with the description “follow-up examination” and we add the resource “Dr. Smith” and “Assistance”.
| <img src="/images/EditTreatmentRed.png" alt="" width="653" height="377" /> |
|
To assign a new appointment you usually double click in one of the resources that is involved in that kind of appointment. If you do so, this resource is already inserted in the appointment editor. The checkbox “Treatments filtered after linked resource” will be active, so you will have only treatments as choice, which are linked with the already selected resource, or those treatments that have no link to a resource at all. Hint: In order to distinguish in the overview more easily between treatments with the same description, you may place the initials or the abbreviation of the doctor whose resource is linked with the treatment. |
You may have a treatment with more resources that does not start at the same time for every linked resource. In the table with the linked resources in column „Start in minutes after appointment start“ you can define for the resource, which is involved later in that appointment, how many minutes after the official appointment start, this appointment actually begins for that resource. Please consider that you may have to change the “Duration in minutes” too.
| <img src="/images/LinkResourcesRed.png" alt="" width="526" height="711" /> |
Staff
The staff administration is only accessible for administrators in the new module. Click on the icon to go to MedITEX Administration manual.
| <a href="/index.php?title=Administration Manual"><img style="display: block; margin-left: auto; margin-right: auto;" src="/images/MedITEX_Administration_129x129.png" alt="" width="129" height="129" /></a> |
| MedITEX Administration |
| <a href="/index.php?title=MedITEX_Scheduler_manual">Back to the MedITEX Scheduler menu </a> | <a href="#top">Back to top</a> |