Welcome to MedITEX Administration
From MedITEX - Wiki
| (9 intermediate revisions by 2 users not shown) | |||
| Line 1: | Line 1: | ||
| − | <p> | + | <p><strong>MedITEX Administration</strong> is an extra module of the solutions developed by MedITEX. This tool centralizes the <strong>management of users, data and maintenance of the database</strong>.</p> |
| + | <p>This module allows administrators to <strong>create, delete and edit users, set their permissions</strong> and <strong>put them into groups</strong>. Additionally, it is possible to <strong>lock data</strong> from being edited by users, as well as <strong>run maintenance procedures</strong> on the database to increase performance.</p> | ||
<p>This funcionality is accessable at the menu bar.</p> | <p>This funcionality is accessable at the menu bar.</p> | ||
| − | <p>Go to System -> Configuration -> MedITEX Administration.</p> | + | <p>Go to <strong>System -> Configuration -> MedITEX Administration</strong>.</p> |
<table style="margin-left: auto; margin-right: auto;" border="0"> | <table style="margin-left: auto; margin-right: auto;" border="0"> | ||
<tbody> | <tbody> | ||
<tr> | <tr> | ||
| − | <td><img src="/images/AdmSystemRed.png" alt=" | + | <td><img src="/images/AdmSystemRed.png" alt="" /></td> |
</tr> | </tr> | ||
</tbody> | </tbody> | ||
| Line 16: | Line 17: | ||
<tbody> | <tbody> | ||
<tr> | <tr> | ||
| − | <td>[[Image:MainAdmRed.png|none|740px|thumb|left|link=http://wiki.meditex-software.com/images/MainAdmRed.png]]</td> | + | <td>[[Image:MainAdmRed.png|none|740px|thumb|left|link=http://wiki.meditex-software.com/images/MainAdmRed.png| Overview.]]</td> |
</tr> | </tr> | ||
</tbody> | </tbody> | ||
</table> | </table> | ||
<p> </p> | <p> </p> | ||
| − | <h3> | + | <h3>Navigation (1)</h3> |
| − | <p>Here you can navigate through all options available for management. Clicking on the links at the bottom of the navigation bar, changes the content at the upper section and also, the Management view. These bottom links works as folders that hold similar functions and the upper links are specific management options.</p> | + | <p>Here you can <strong>navigate through all options available for management</strong>. Clicking on the links at the bottom of the navigation bar, changes the content at the upper section and also, the Management view. These bottom links works as folders that hold similar functions and the upper links are specific management options.</p> |
<table style="margin-left: auto; margin-right: auto;" border="0" width="606" height="154"> | <table style="margin-left: auto; margin-right: auto;" border="0" width="606" height="154"> | ||
<tbody> | <tbody> | ||
| Line 32: | Line 33: | ||
</table> | </table> | ||
<p> </p> | <p> </p> | ||
| − | <h3>2 | + | <h3>Management (2)</h3> |
| − | <p>The right side of MedITEX Administration is where you can manage all information. Here you have access to managing user rights and permissions, data and maintenance of the database.</p> | + | <p>The right side of MedITEX Administration is where you can <strong>manage all information</strong>. Here you have access to<strong> managing user rights and permissions, data and maintenance of the database</strong>.</p> |
<p>The content on this section will change according to the selected link of the navigation bar.</p> | <p>The content on this section will change according to the selected link of the navigation bar.</p> | ||
<p> </p> | <p> </p> | ||
<h2>Managing Lists</h2> | <h2>Managing Lists</h2> | ||
| − | <p>Some lists in MedITEX Administrator<em> </em>have several important features:</p> | + | <p><strong>Some lists in MedITEX Administrator<em> </em>have several important features:</strong></p> |
<p> </p> | <p> </p> | ||
<h3>Sort and filter</h3> | <h3>Sort and filter</h3> | ||
| − | <p>Clicking on the arrow next to the column header, you can filter the table content by the information contained in that row. Therefore, only the information that was checked will be displayed.</p> | + | <p>Clicking on the arrow next to the column header, you can <strong>filter the table content</strong> by the information contained in that row. Therefore, only the information that was checked will be displayed.</p> |
<p>To sort the list ascending or descending, simply click on the blue header of the desired column.</p> | <p>To sort the list ascending or descending, simply click on the blue header of the desired column.</p> | ||
| − | <p>For this example, the list is sorted ascending by Username (red circle) and is filtered by Section so it only shows the information that is checked.</p> | + | <p><strong>For this example</strong>, the list is sorted ascending by Username (red circle) and is filtered by Section so it only shows the information that is checked.</p> |
<table style="margin-left: auto; margin-right: auto;" border="0"> | <table style="margin-left: auto; margin-right: auto;" border="0"> | ||
<tbody> | <tbody> | ||
| Line 52: | Line 53: | ||
<p> </p> | <p> </p> | ||
<h3>Arrange columns</h3> | <h3>Arrange columns</h3> | ||
| − | <p>It is also possible to move columns around the list simply by clicking and dragging. Two green arrows will help positioning the column in place.</p> | + | <p>It is also possible to <strong>move columns around the list</strong> simply by clicking and dragging. Two green arrows will help positioning the column in place.</p> |
<table style="margin-left: auto; margin-right: auto;" border="0"> | <table style="margin-left: auto; margin-right: auto;" border="0"> | ||
<tbody> | <tbody> | ||
| Line 62: | Line 63: | ||
<p> </p> | <p> </p> | ||
<h3>Group</h3> | <h3>Group</h3> | ||
| − | <p>It is also possible to group the content of lists in MedITEX Administrator. In order to do that, simply drag a column to the dark gray area on the top of the list. It is also possible to group by more than one column.</p> | + | <p>It is also possible to <strong>group the content of lists</strong> in MedITEX Administrator. In order to do that, simply drag a column to the dark gray area on the top of the list. It is also possible to group by more than one column.</p> |
<p>To revert the list to its original form, simply drag the column back in place.</p> | <p>To revert the list to its original form, simply drag the column back in place.</p> | ||
<p>For this example, the table was grouped by the column Locked.</p> | <p>For this example, the table was grouped by the column Locked.</p> | ||
| Line 68: | Line 69: | ||
<tbody> | <tbody> | ||
<tr> | <tr> | ||
| − | <td>[[Image:ListSortGroupRedAdm.png|none|740px|thumb|left|link=http://wiki.meditex-software.com/images/ListSortGroupRedAdm.png]]</td> | + | <td>[[Image:ListSortGroupRedAdm.png|none|740px|thumb|left|link=http://wiki.meditex-software.com/images/ListSortGroupRedAdm.png|Group the content of lists.]]</td> |
</tr> | </tr> | ||
</tbody> | </tbody> | ||
</table> | </table> | ||
<p> </p> | <p> </p> | ||
| − | <h3> | + | <h3>Persistence</h3> |
| − | <p>One of the biggest advantages of managing lists is that each one is saved individually for a user. So next time you log in, MedITEX | + | <p>One of the biggest advantages of managing lists is that <strong>each one is saved individually for a user</strong>. So next time you log in, MedITEX Administration will display your lists just the way you left them.</p> |
<p> </p> | <p> </p> | ||
| + | <h2>Navigation</h2> | ||
| + | <p>Some images and buttons throughtout this Wiki have links that, once clicked, will open another page with more information.</p> | ||
| + | <p>This links are identified by blue dots around images.</p> | ||
| + | <table style="margin-left: auto; margin-right: auto;" border="0"> | ||
| + | <tbody> | ||
| + | <tr> | ||
| + | <td><a href="/index.php?title=MedITEX_Administration_manual"><img style="display: block; margin-left: auto; margin-right: auto; border: 2px dotted blue;" src="/images/MedITEX_Administration_129x129.png" alt="" width="129" height="129" /></a></td> | ||
| + | </tr> | ||
| + | <tr> | ||
| + | <td>Click on images with blue dots around it to have further information</td> | ||
| + | </tr> | ||
| + | </tbody> | ||
| + | </table> | ||
<table style="float: right;" border="0"> | <table style="float: right;" border="0"> | ||
<tbody> | <tbody> | ||
Latest revision as of 09:01, 23 April 2020
MedITEX Administration is an extra module of the solutions developed by MedITEX. This tool centralizes the management of users, data and maintenance of the database.
This module allows administrators to create, delete and edit users, set their permissions and put them into groups. Additionally, it is possible to lock data from being edited by users, as well as run maintenance procedures on the database to increase performance.
This funcionality is accessable at the menu bar.
Go to System -> Configuration -> MedITEX Administration.
| <img src="/images/AdmSystemRed.png" alt="" /> |
Contents |
Interface
Together with all MedITEX solutions, MedITEX Administration has a very straightforward interface. We will divide this interface in two sections that have specific functionalities.
Hint: click on images throughout pages to enlarge them.
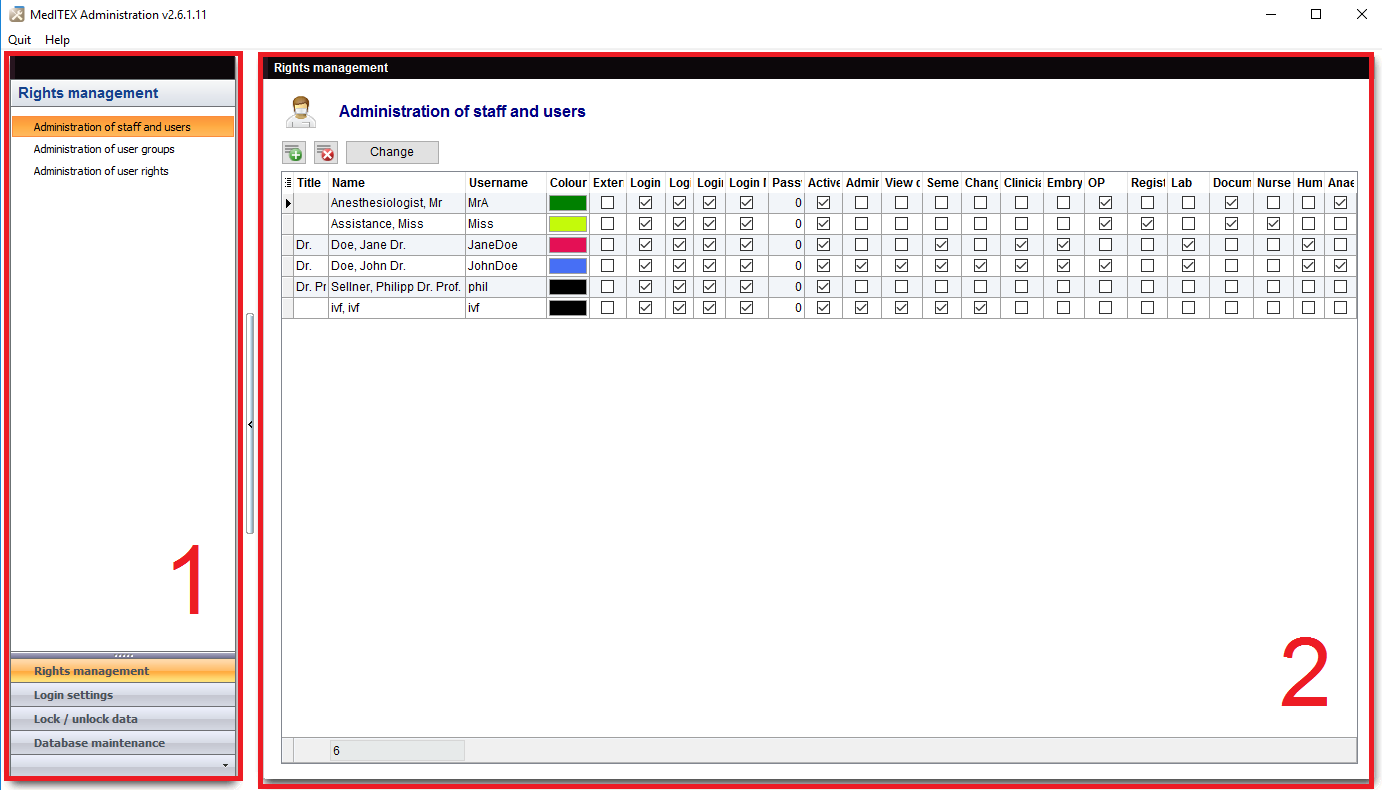 |
Here you can navigate through all options available for management. Clicking on the links at the bottom of the navigation bar, changes the content at the upper section and also, the Management view. These bottom links works as folders that hold similar functions and the upper links are specific management options.
| <img src="/images/ShowButtonsRedAdm.png" alt="" width="398" height="94" /> | Clicking on the arrow at the bottom of the navigation, you can change the number of links being displayed. |
Management (2)
The right side of MedITEX Administration is where you can manage all information. Here you have access to managing user rights and permissions, data and maintenance of the database.
The content on this section will change according to the selected link of the navigation bar.
Managing Lists
Some lists in MedITEX Administrator have several important features:
Sort and filter
Clicking on the arrow next to the column header, you can filter the table content by the information contained in that row. Therefore, only the information that was checked will be displayed.
To sort the list ascending or descending, simply click on the blue header of the desired column.
For this example, the list is sorted ascending by Username (red circle) and is filtered by Section so it only shows the information that is checked.
| <img src="/images/ListSortFilterRedAdm.png" alt="" width="665" height="220" /> |
Arrange columns
It is also possible to move columns around the list simply by clicking and dragging. Two green arrows will help positioning the column in place.
| <img src="/images/ListMoveRedAdm.png" alt="" width="593" height="160" /> |
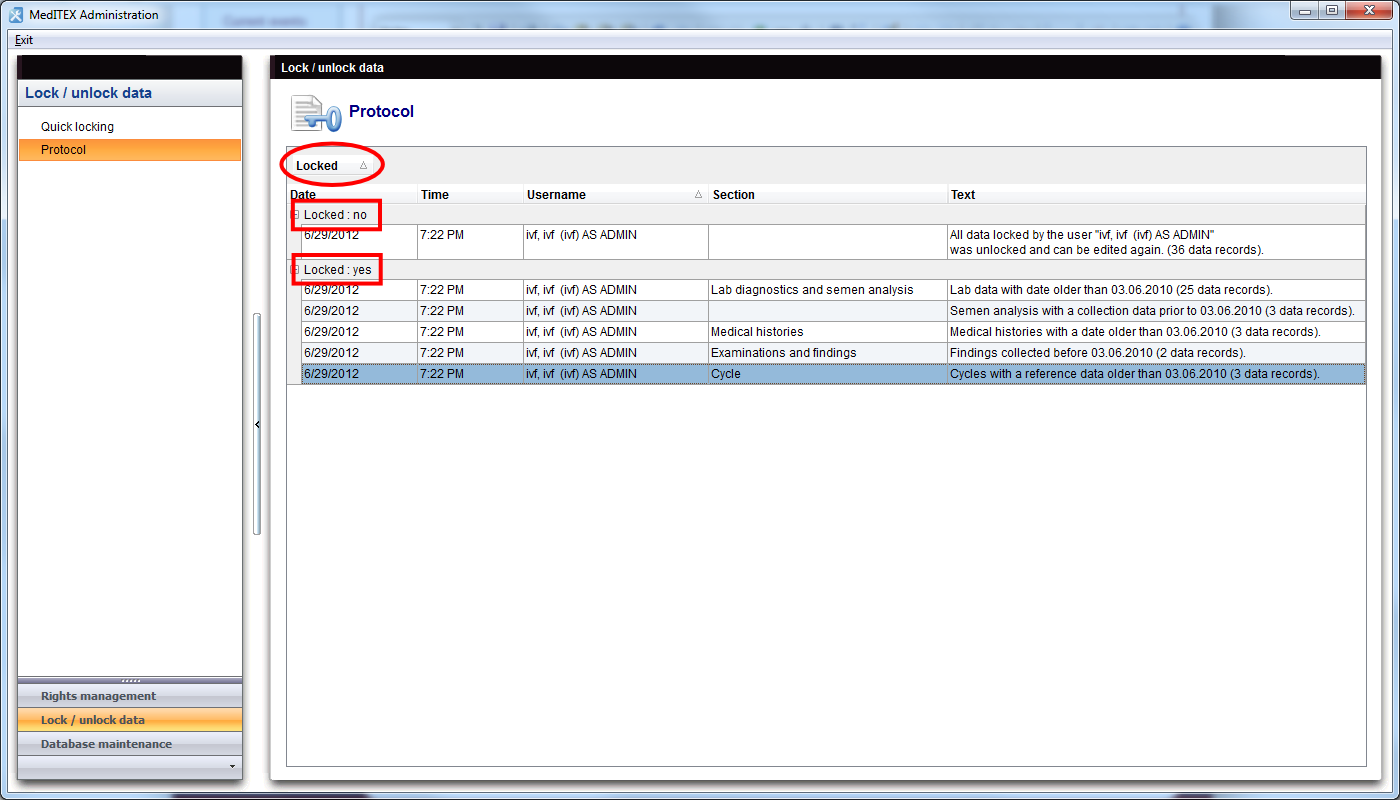
Group
It is also possible to group the content of lists in MedITEX Administrator. In order to do that, simply drag a column to the dark gray area on the top of the list. It is also possible to group by more than one column.
To revert the list to its original form, simply drag the column back in place.
For this example, the table was grouped by the column Locked.
 |
Persistence
One of the biggest advantages of managing lists is that each one is saved individually for a user. So next time you log in, MedITEX Administration will display your lists just the way you left them.
Some images and buttons throughtout this Wiki have links that, once clicked, will open another page with more information.
This links are identified by blue dots around images.
| <a href="/index.php?title=MedITEX_Administration_manual"><img style="display: block; margin-left: auto; margin-right: auto; border: 2px dotted blue;" src="/images/MedITEX_Administration_129x129.png" alt="" width="129" height="129" /></a> |
| Click on images with blue dots around it to have further information |
| <a href="/index.php?title=MedITEX_Administration_manual">Back to the MedITEX Administration manual </a> | <a href="#top">Back to top</a> |