Pagina principale di Scheduler
From MedITEX - Wiki
| Line 72: | Line 72: | ||
</tr> | </tr> | ||
<tr> | <tr> | ||
| − | <td style="text-align: left;"><a href=" | + | <td style="text-align: left;"><a href="/index.php?title=Pagina_principale_di_Scheduler#Messaggio_del_giorno"><img style="display: block; margin-left: auto; margin-right: auto; border: 2px dotted blue;" src="/images/DayInfo.png" alt="" width="135" height="22" /></a> <br /></td> |
<td style="text-align: justify;"><strong>Messaggi importanti per un dato giorno</strong>. I messaggi relativi alla data corrente sono visualizzati nella pagina principale. <br /></td> | <td style="text-align: justify;"><strong>Messaggi importanti per un dato giorno</strong>. I messaggi relativi alla data corrente sono visualizzati nella pagina principale. <br /></td> | ||
</tr> | </tr> | ||
| Line 82: | Line 82: | ||
</table> | </table> | ||
<p> </p> | <p> </p> | ||
| − | <h2> | + | <h2>Schede nella parte alta di scheduler</h2> |
| − | <p> | + | <p>Le schede contengono informazioni utili. Fare click su di esse per saperne di più.</p> |
<table style="margin-left: auto; margin-right: auto;" border="0" width="581" height="144"> | <table style="margin-left: auto; margin-right: auto;" border="0" width="581" height="144"> | ||
<tbody> | <tbody> | ||
<tr> | <tr> | ||
| − | <td style="text-align: center;"><a href="/index.php?title= | + | <td style="text-align: center;"><a href="/index.php?title=Posizione_del_paziente"><img style="display: block; margin-left: auto; margin-right: auto; border: 2px dotted blue;" src="/images/PatientsLShortRed.png" alt="" width="556" height="100" /></a></td> |
</tr> | </tr> | ||
<tr> | <tr> | ||
| − | <td> | + | <td>Pazienti in sala d'attesa. E' possibile vedere il nome del paziente e del dottore, lo status, il numero della stanza e il tempo di attesa.</td> |
</tr> | </tr> | ||
</tbody> | </tbody> | ||
</table> | </table> | ||
| − | |||
<table style="margin-left: auto; margin-right: auto;" border="0" width="582" height="101"> | <table style="margin-left: auto; margin-right: auto;" border="0" width="582" height="101"> | ||
<tbody> | <tbody> | ||
<tr> | <tr> | ||
| − | <td style="text-align: center;"> <a href="/index.php?title= | + | <td style="text-align: center;"> <a href="/index.php?title=Pagina_principale_di_Scheduler#Messaggio_del_giorno"><img style="display: block; margin-left: auto; margin-right: auto; border: 2px dotted blue;" src="/images/DayInfoShortRed.png" alt="" width="401" height="102" /></a></td> |
</tr> | </tr> | ||
<tr> | <tr> | ||
Revision as of 17:26, 24 January 2013
 |
Contents |
Tasti
Alcuni tasti possiedono funzioni speciali. Fare click su di essi per maggiori informazioni.
| <a href="/index.php?title=Liste_appuntamenti"><img style="display: block; margin-left: auto; margin-right: auto; border: 2px dotted blue;" src="/images/AppointmentList.png" alt="" width="125" height="24" /></a> | Visualizza gli appuntamenti del paziente selezionato. |
| <a href="/index.php?title=Appuntamenti"><img style="display: block; margin-left: auto; margin-right: auto; border: 2px dotted blue;" src="/images/NewAppointment.PNG" alt="" /></a> | Apre un nuovo appuntamento. |
| <img style="display: block; margin-left: auto; margin-right: auto;" src="/images/OpenPatientInMeditexIVF.PNG" alt="" width="27" height="27" /> | Se MediTEX IVF è installato, questo tanto apre il paziente in MedITEX IVF. |
| <a href="/index.php?title=Schermate_di_Scheduler#Rappresentazione_delle_risorse"><img style="display: block; margin-left: auto; margin-right: auto; border: 2px dotted blue;" src="/images/Defi.png" alt="" width="84" height="27" /></a> | Definisce la selezione delle risors. |
| <img src="/images/A.png" alt="" width="50" height="26" /> | Mostra tutte le risorse nella pianificazione. |
| <a href="/index.php?title=Pagina_principale_di_Scheduler#Selezione_speciale"><img style="display: block; margin-left: auto; margin-right: auto; border: 2px dotted blue;" src="/images/SpecialSelection.png" alt="" width="134" height="26" /></a> |
Premendo il tasto Selezione speciale potete aprire la lista di tutte le risorse esistenti ed attive, che sono state definite nelle impostazioni. |
| <a href="/index.php?title=Schermate_di_Scheduler"><img style="display: block; margin-left: auto; margin-right: auto; border: 2px dotted blue;" src="/images/ViewOptionsBut.png" alt="" width="137" height="82" /></a> | Utilizzare i tasti G, S e GR per passare dalla visualizzazione giornaliera a quella settimanale o alla griglia oraria. |
Aree cliccabili sukl lato sinistro di scheduler
Alcune aree cliccabili hanno funzioni speciali. Fare click su di esse per maggiori informazioni..
| <a href="/index.php?title=Schermate_di_Scheduler#Selezione_rapida_di_diversi_set_di_risorse"><img style="display: block; margin-left: auto; margin-right: auto; border: 2px dotted blue;" src="/images/DelRed.png" alt="" width="140" height="99" /></a> | Scegliere le risorse per gruppo o set. |
| <a href="/index.php?title=Schermate_di_Scheduler"><img style="display: block; margin-left: auto; margin-right: auto; border: 2px dotted blue;" src="/images/Date.png" alt="" width="151" height="284" /></a> |
La data corrente è nel quadrato azzurro. Se è attiva la visualizzazione giornaliera, è possibile selezionare più giorni dal calendario. |
| <a href="/index.php?title=Pagina_principale_di_Scheduler#Lista_appuntamenti_.2F_stampa"><img style="display: block; margin-left: auto; margin-right: auto; border: 2px dotted blue;" src="/images/Appointmentlist-print.png" alt="" width="154" height="25" /></a> | Resorse richieste in un periodo selezionato. E' possibile stampare. |
| <a href="/index.php?title=Pagina_principale_di_Scheduler#Anteprima_di_stampa_della_pianificazione"><img style="display: block; margin-left: auto; margin-right: auto; border: 2px dotted blue;" src="/images/printScheduler.png" alt="" width="124" height="23" /></a> |
Stampa la pianificazione. |
| <a href="/index.php?title=Posizione_del_paziente"><img style="display: block; margin-left: auto; margin-right: auto; border: 2px dotted blue;" src="/images/PatientLocation.png" alt="" width="135" height="22" /></a> |
Sala d'attesa . |
| <a href="/index.php?title=Pagina_principale_di_Scheduler#Messaggio_del_giorno"><img style="display: block; margin-left: auto; margin-right: auto; border: 2px dotted blue;" src="/images/DayInfo.png" alt="" width="135" height="22" /></a> |
Messaggi importanti per un dato giorno. I messaggi relativi alla data corrente sono visualizzati nella pagina principale. |
| <a href="/index.php?title=Pagina_principale_di_Scheduler#Numero_di_risorse_visualizzate"><img style="display: block; margin-left: auto; margin-right: auto; border: 2px dotted blue;" src="/images/MainWindowNSmall.png" alt="" width="166" height="72" /></a> | Modifica le risorse visibili. |
Schede nella parte alta di scheduler
Le schede contengono informazioni utili. Fare click su di esse per saperne di più.
| <a href="/index.php?title=Posizione_del_paziente"><img style="display: block; margin-left: auto; margin-right: auto; border: 2px dotted blue;" src="/images/PatientsLShortRed.png" alt="" width="556" height="100" /></a> |
| Pazienti in sala d'attesa. E' possibile vedere il nome del paziente e del dottore, lo status, il numero della stanza e il tempo di attesa. |
| <a href="/index.php?title=Pagina_principale_di_Scheduler#Messaggio_del_giorno"><img style="display: block; margin-left: auto; margin-right: auto; border: 2px dotted blue;" src="/images/DayInfoShortRed.png" alt="" width="401" height="102" /></a> |
|
Important messages from current date. By clicking in the field you can add news to your info. |
Selezione speciale
| <img style="display: block; margin-left: auto; margin-right: auto;" src="/images/DefineSpecialView.png" alt="" width="572" height="532" /> |
|
In this list it is possible to vary the order of resources by moving the selected resource it up or down using the corresponding buttons on the right side. In the middle of the window you can create your personal scheduler view: day, week, timeline or year. This order will be saved for each user individually. So if you quit the scheduler and log in again you will see the order as you have defined it. |
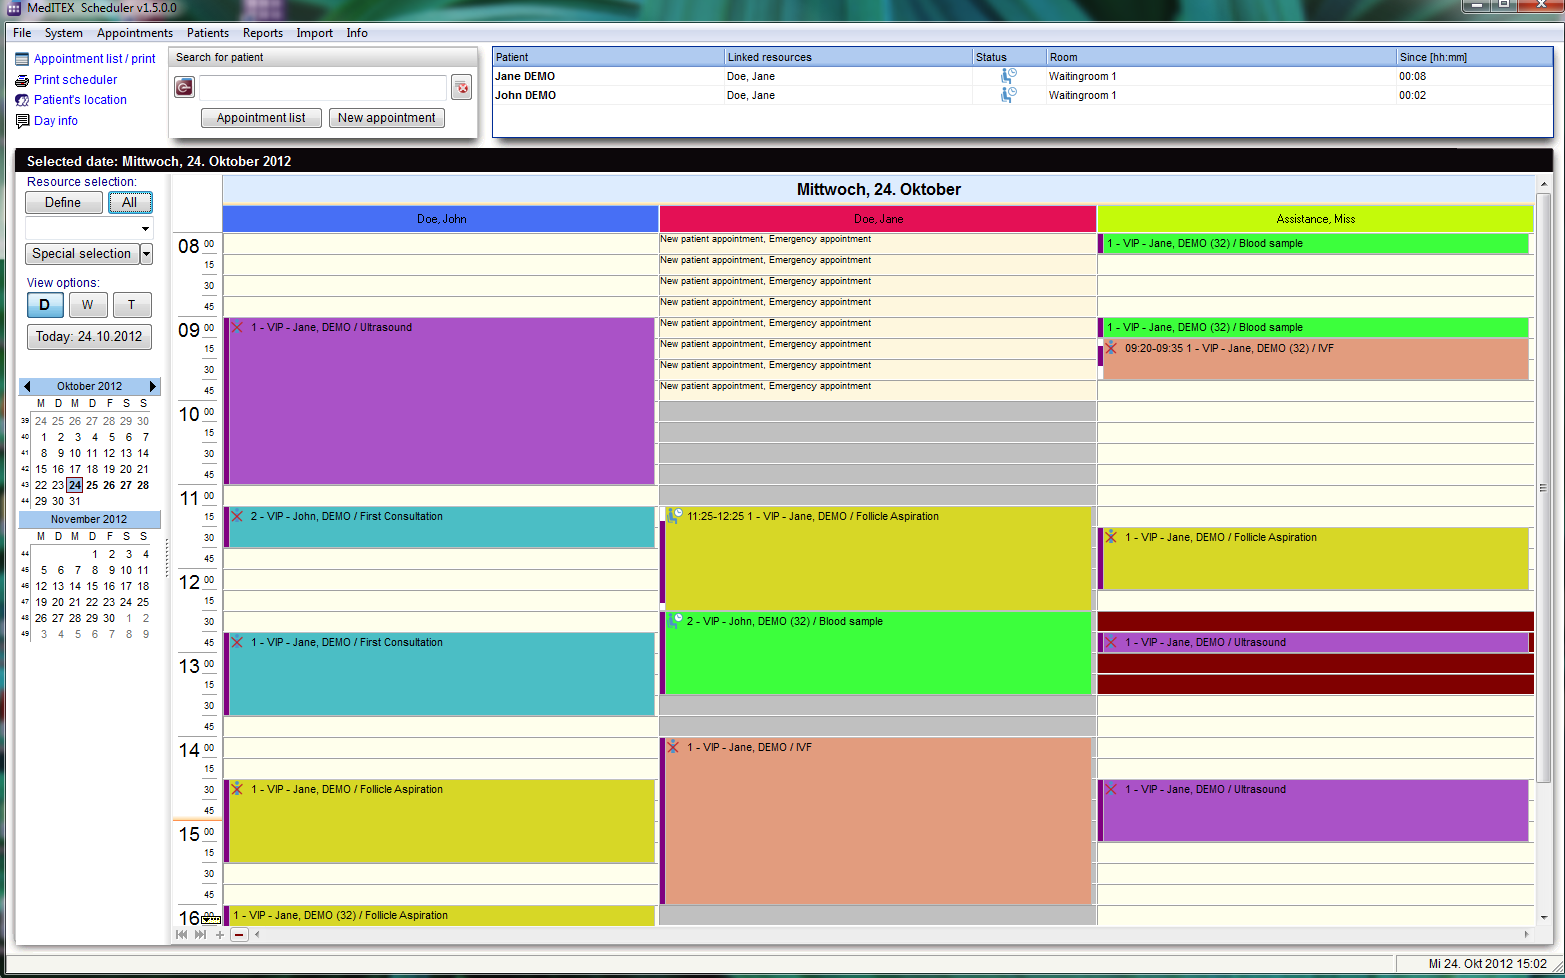
Lista appuntamenti / stampa
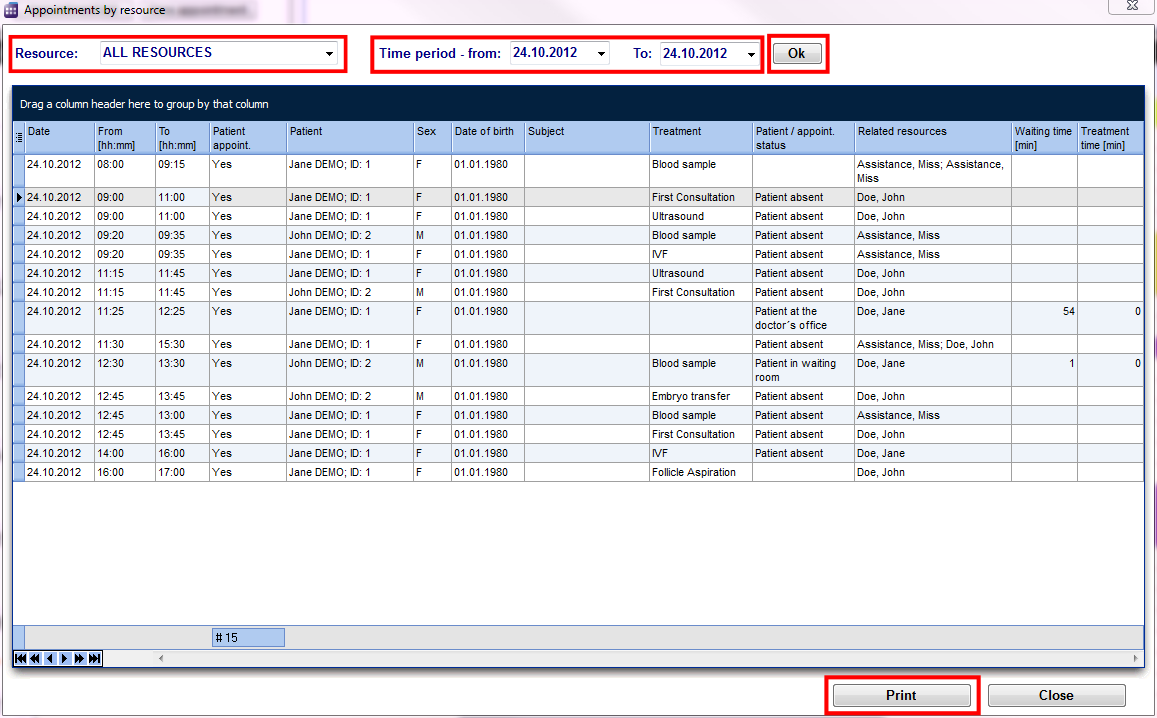 |
|
Filters the list with resource name, time and date. If you click on Print, the print preview will be opened. The window also will be opened if you click in the menu bar: Appointments -> Appointments by resource. |
Anteprima di stampa della pianificazione
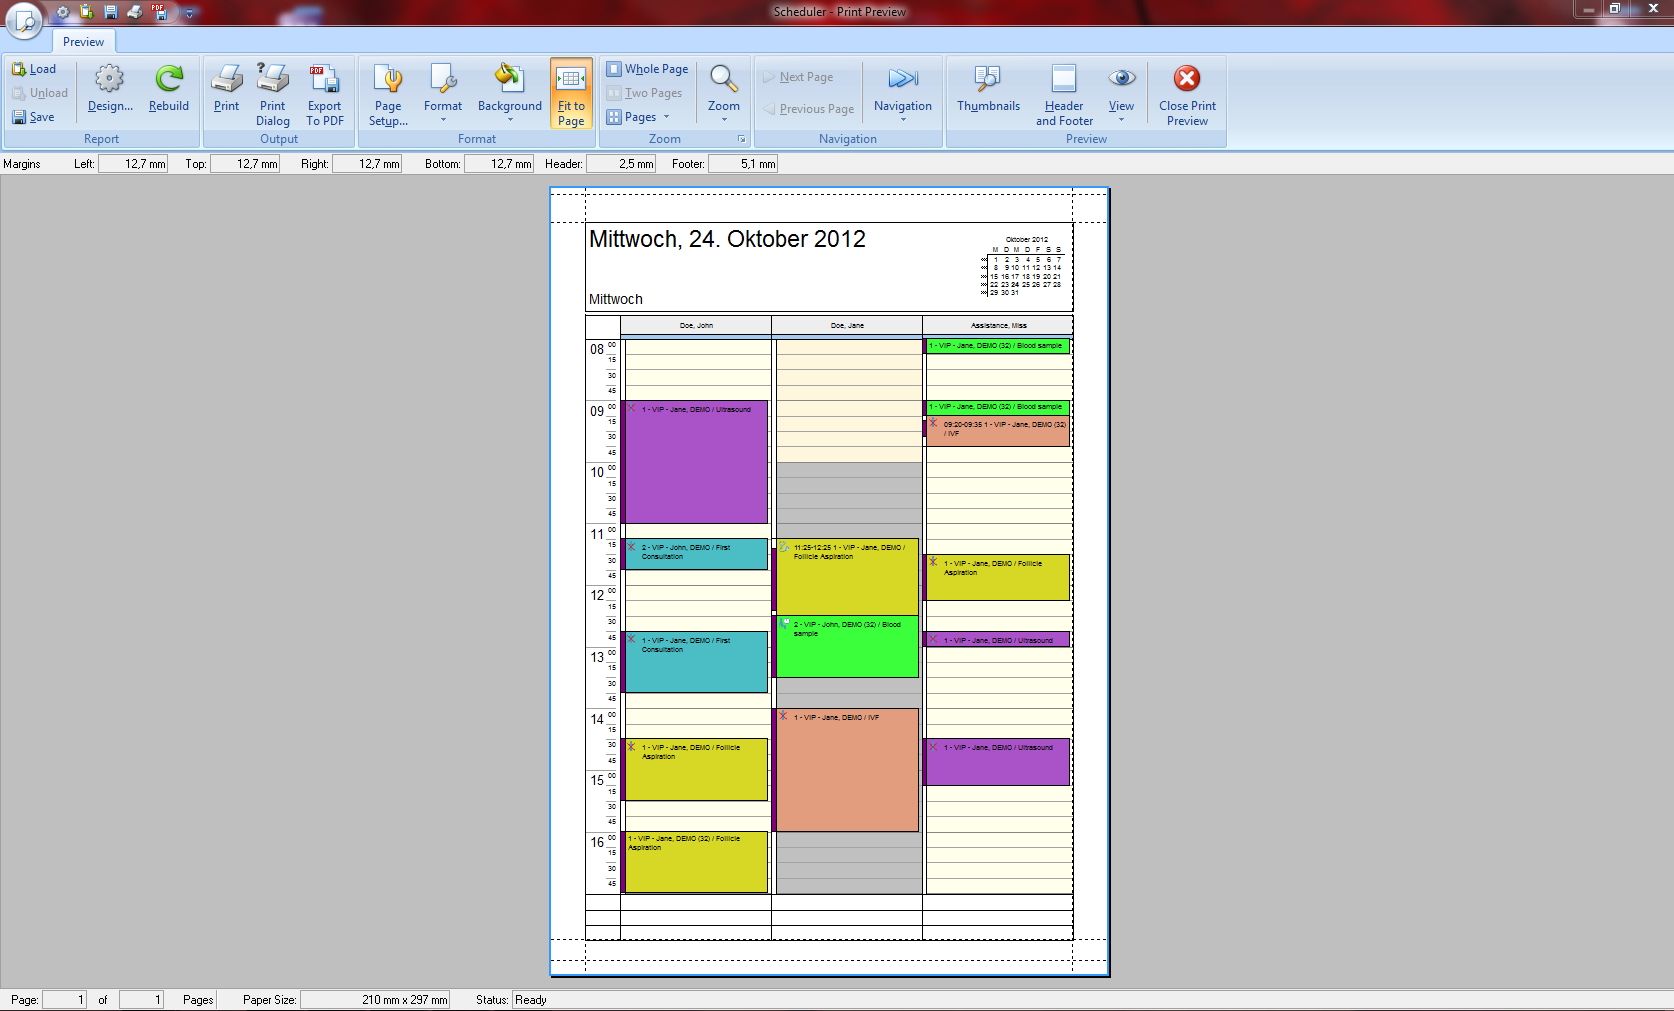 |
|
Prints the appointments. The window will also be opened if you click in the menu bar: Appointments -> Print scheduler. |
Messaggio del giorno
 |
| Edit, add or delete messages in this window. Save it with OK, otherwise click Cancel. |
Numero di risorse visualizzate
 |
| When you start MedITEX Scheduler and you have more than three resources defined, the scheduler will usually display 4 resources. In the bottom of the scheduler you will find small navigation buttons. With "+" you can increase the number of the resources in your view, and with "–" decrease it. |
| <a href="/index.php?title=MedITEX_Scheduler_manual">Back to the MedITEX Scheduler menu </a> | <a href="#top">Back to top</a> |