Overview Ciclo
From MedITEX - Wiki
| Line 8: | Line 8: | ||
</tbody> | </tbody> | ||
</table> | </table> | ||
| − | <p> | + | <p>L' <strong>Overview</strong> del ciclo è la vostra <strong>"cabina di pilotaggio"</strong>. In questa maschera è possibile trovare tutti gli <strong>elementi importanti</strong> e <strong>raggiungere sotto-sezioni</strong> con un solo click.</p> |
| − | <p><strong> | + | <p><strong>Inserendo </strong>tutti i <strong>farmaci prescritti </strong>in questa sezione, permetterà a <strong>MedITEX IVF</strong> di <strong>calcolare il primo e ultimo giorno di stimolazione</strong>, il <strong>protocollo di stimolazioneti</strong>, <strong>la data di induzione,</strong> <strong>farmaci utilizzati nella fase luteale e molto altro</strong>.</p> |
| + | <p> </p> | ||
<table style="margin-left: auto; margin-right: auto;" border="0"> | <table style="margin-left: auto; margin-right: auto;" border="0"> | ||
<tbody> | <tbody> | ||
<tr> | <tr> | ||
<td><img src="/images/hint48.png" alt="" width="48" height="48" /></td> | <td><img src="/images/hint48.png" alt="" width="48" height="48" /></td> | ||
| − | <td> | + | <td>Nelle <a href="/index.php?title=MedITEX_IVF_Impostazioni#Opzioni_di_presentazione">impostazione</a> sarà possibile modificare a vostro piacimento l'interfaccia del calendario.</td> |
</tr> | </tr> | ||
</tbody> | </tbody> | ||
</table> | </table> | ||
<p> </p> | <p> </p> | ||
| − | <h2> | + | <h2>Sezione superiore</h2> |
<table style="margin-left: auto; margin-right: auto;" border="0" width="86" height="44"> | <table style="margin-left: auto; margin-right: auto;" border="0" width="86" height="44"> | ||
<tbody> | <tbody> | ||
| Line 28: | Line 29: | ||
</table> | </table> | ||
<p> </p> | <p> </p> | ||
| − | <p> | + | <p>Questa sezione rappresenta un riassunto delle informazioni più importanti riguardanti il ciclo, come ad esempio il tipo di trattamento, numero di embrioni da trasferire, etc.</p> |
| − | <p><strong> | + | <p><strong>Sulla sinistra</strong> sono visualizzate le informazioni inserite in <strong><a href="/index.php?title=Cycle_Details">Dettagli terapia</a></strong>, finestra che si aprirà cliccando con il mouse questa sezione.</p> |
| − | <p><strong> | + | <p><strong>Sulla destra</strong> invece sono visualizzate informazioni del ciclo in corso, come ad esempio la data di ultima mestruazione e di induzione, il tipo di farmaci utilizzati, etc.</p> |
<ul> | <ul> | ||
</ul> | </ul> | ||
| Line 37: | Line 38: | ||
<tr> | <tr> | ||
<td><img src="/images/hint48.png" alt="" width="48" height="48" /></td> | <td><img src="/images/hint48.png" alt="" width="48" height="48" /></td> | ||
| − | <td> | + | <td>Importante notare l'utilizzo di parentesi []. Le informazione visualizzate all'interno di parentesi rappresentano la procedura eseguita. Per esempio nella figura precedente, il tipo di trattamento scelto durante la creazione del ciclo era <strong>FIVET</strong> e, subito sulla destra, le parentesi dimostrano che quanto pianificato è stato effettivamente fatto. Altro esempio è dato dall'informazione sul liquido seminale da utilizzare, inizialmente si era pianificato l'utilizzo di liquido seminale raccolto da <strong>Eiaculazione retrograda</strong>, ma al momento dell'inseminazione si è utilizzato un liquido seminale ottenuto con <strong>Elettrostimolazone</strong>.</td> |
</tr> | </tr> | ||
</tbody> | </tbody> | ||
</table> | </table> | ||
<p> </p> | <p> </p> | ||
| − | <h2> | + | <h2>Sezione inferiore</h2> |
| − | <p> | + | <p>Questa sezione rappresenta il calendario contenente le azioni effettuate giorno per giorno. Il calendario è diviso in 5 sezioni:</p> |
<table border="0"> | <table border="0"> | ||
<tbody> | <tbody> | ||
| Line 54: | Line 55: | ||
</ul> | </ul> | ||
<ol> | <ol> | ||
| − | <li><a href="/index.php?title= | + | <li><a href="/index.php?title=Overview_Ciclo#Eventi"><strong>Eventi</strong></a>: visualizza eventi importanti come il primo giorno dell'ultima mestruazione, il pick up, transfer ed eventuale gravidanza clinica. <strong>MedITEX IVF</strong> creerà automaticamente queste informazioni sulla base dei dati inseriti dall'utente nelle varie sezioni del ciclo.</li> |
| − | <li><a href="/index.php?title=Cycle_Overview#Medication">< | + | <li><strong><a href="/index.php?title=Cycle_Overview#Medication">Farmaco</a>:</strong> sezione dinamica in cui inserire/eliminare i farmaci prescritti alla paziente durante il trattamento.</li> |
| − | <li><a href="/index.php?title=Cycle_Overview#Hormones"><strong> | + | <li><a href="/index.php?title=Cycle_Overview#Hormones"><strong>Ormoni</strong></a>: campi riservati all'inserimento e visualizzazione dei valori dei più importanti ormoni: FSH, LH, E2, PRG e HCG.</li> |
| − | <li><a href="/index.php?title=Cycle_Overview#Ultrasound">< | + | <li><strong><a href="/index.php?title=Cycle_Overview#Ultrasound">Ecografia</a></strong>: in questa riga vengono salvate immagini e note di ecografie.</li> |
| − | <li><a href="/index.php?title=Cycle_Overview#Ultrasound"><strong> | + | <li><a href="/index.php?title=Cycle_Overview#Ultrasound"><strong>Eco follicoli</strong></a>: in quest'area sarà possibile documentare informazioni ed immagini relative ad ecografie follicolare. Le immagini e diametri follicolari prodotti da particolari apparecchi ecografici possono essere automaticamente trasferite a <strong>MedITEX IVF</strong> via l'interfaccia <strong>DICOM.</strong></li> |
</ol> | </ol> | ||
<ul> | <ul> | ||
| Line 67: | Line 68: | ||
</table> | </table> | ||
<p> </p> | <p> </p> | ||
| − | <h3> | + | <h3>Eventi</h3> |
<table border="0"> | <table border="0"> | ||
<tbody> | <tbody> | ||
| Line 76: | Line 77: | ||
<td><img src="/images/EventRightClick.png" alt="" width="235" height="109" /></td> | <td><img src="/images/EventRightClick.png" alt="" width="235" height="109" /></td> | ||
<td> | <td> | ||
| − | <p> | + | <p>Cliccando con il tasto destro su questa riga in corrispondenza del giorno desiderato si potranno inserire o riposizionare <strong>Eventi</strong>.</p> |
</td> | </td> | ||
</tr> | </tr> | ||
| Line 82: | Line 83: | ||
</table> | </table> | ||
<p> </p> | <p> </p> | ||
| − | <p> | + | <p>La riga <strong>Eventi </strong>visualizza eventi importanti come<strong> il primo giorno dell'ultima mestruazione, il pick up, transfer ed eventuale gravidanza clinica. <strong>MedITEX IVF</strong> c</strong>reerà automaticamente queste informazioni sulla base dei dati inseriti dall'utente nelle varie sezioni del ciclo.</p> |
<table style="margin-left: auto; margin-right: auto;" border="0"> | <table style="margin-left: auto; margin-right: auto;" border="0"> | ||
<tbody> | <tbody> | ||
<tr> | <tr> | ||
<td><a href="/index.php?title=How_to_set_events_in_a_cycle%3F"><img src="/images/howto48.png" alt="" width="48" height="48" /></a></td> | <td><a href="/index.php?title=How_to_set_events_in_a_cycle%3F"><img src="/images/howto48.png" alt="" width="48" height="48" /></a></td> | ||
| − | <td><a href="/index.php?title=How_to_set_events_in_a_cycle%3F"> | + | <td><a href="/index.php?title=How_to_set_events_in_a_cycle%3F">Cliccare qui</a> per avere maggiori informazioni su Eventi.</td> |
</tr> | </tr> | ||
</tbody> | </tbody> | ||
</table> | </table> | ||
<p> </p> | <p> </p> | ||
| − | <h3> | + | <h3>Farmaci</h3> |
<table style="margin-left: auto; margin-right: auto;" border="0"> | <table style="margin-left: auto; margin-right: auto;" border="0"> | ||
<tbody> | <tbody> | ||
| Line 101: | Line 102: | ||
</table> | </table> | ||
<p> </p> | <p> </p> | ||
| − | <p> | + | <p>In questa sezione sono visualizzati tutti i farmaci prescritti con relative dosi giornaliere.</p> |
| − | <p><strong>MedITEX IVF</strong> | + | <p><strong>MedITEX IVF</strong> fornisce una lista di farmaci utilizzati nel campo della procreazione assistita. Per inserire ulteriori farmaci andare nella sezione dedicata delle <a href="/index.php?title=MedITEX_IVF_Impostazioni#Farmaco">impostazioni</a>.</p> |
<table style="margin-left: auto; margin-right: auto;" border="0"> | <table style="margin-left: auto; margin-right: auto;" border="0"> | ||
<tbody> | <tbody> | ||
Revision as of 12:57, 22 April 2016
 |
L' Overview del ciclo è la vostra "cabina di pilotaggio". In questa maschera è possibile trovare tutti gli elementi importanti e raggiungere sotto-sezioni con un solo click.
Inserendo tutti i farmaci prescritti in questa sezione, permetterà a MedITEX IVF di calcolare il primo e ultimo giorno di stimolazione, il protocollo di stimolazioneti, la data di induzione, farmaci utilizzati nella fase luteale e molto altro.
| <img src="/images/hint48.png" alt="" width="48" height="48" /> | Nelle <a href="/index.php?title=MedITEX_IVF_Impostazioni#Opzioni_di_presentazione">impostazione</a> sarà possibile modificare a vostro piacimento l'interfaccia del calendario. |
Contents |
Sezione superiore
| <a href="/index.php?title=Cycle_Details"><img style="border: 2px dotted blue;" src="/images/CycleOverviewSummary.png" alt="" width="757" height="137" /></a> |
Questa sezione rappresenta un riassunto delle informazioni più importanti riguardanti il ciclo, come ad esempio il tipo di trattamento, numero di embrioni da trasferire, etc.
Sulla sinistra sono visualizzate le informazioni inserite in <a href="/index.php?title=Cycle_Details">Dettagli terapia</a>, finestra che si aprirà cliccando con il mouse questa sezione.
Sulla destra invece sono visualizzate informazioni del ciclo in corso, come ad esempio la data di ultima mestruazione e di induzione, il tipo di farmaci utilizzati, etc.
| <img src="/images/hint48.png" alt="" width="48" height="48" /> | Importante notare l'utilizzo di parentesi []. Le informazione visualizzate all'interno di parentesi rappresentano la procedura eseguita. Per esempio nella figura precedente, il tipo di trattamento scelto durante la creazione del ciclo era FIVET e, subito sulla destra, le parentesi dimostrano che quanto pianificato è stato effettivamente fatto. Altro esempio è dato dall'informazione sul liquido seminale da utilizzare, inizialmente si era pianificato l'utilizzo di liquido seminale raccolto da Eiaculazione retrograda, ma al momento dell'inseminazione si è utilizzato un liquido seminale ottenuto con Elettrostimolazone. |
Sezione inferiore
Questa sezione rappresenta il calendario contenente le azioni effettuate giorno per giorno. Il calendario è diviso in 5 sezioni:
| <img src="/images/BottomPart.png" alt="" /> |
|
Eventi
 |
|
| <img src="/images/EventRightClick.png" alt="" width="235" height="109" /> |
Cliccando con il tasto destro su questa riga in corrispondenza del giorno desiderato si potranno inserire o riposizionare Eventi. |
La riga Eventi visualizza eventi importanti come il primo giorno dell'ultima mestruazione, il pick up, transfer ed eventuale gravidanza clinica. <strong>MedITEX IVF c</strong>reerà automaticamente queste informazioni sulla base dei dati inseriti dall'utente nelle varie sezioni del ciclo.
| <a href="/index.php?title=How_to_set_events_in_a_cycle%3F"><img src="/images/howto48.png" alt="" width="48" height="48" /></a> | <a href="/index.php?title=How_to_set_events_in_a_cycle%3F">Cliccare qui</a> per avere maggiori informazioni su Eventi. |
Farmaci
 |
In questa sezione sono visualizzati tutti i farmaci prescritti con relative dosi giornaliere.
MedITEX IVF fornisce una lista di farmaci utilizzati nel campo della procreazione assistita. Per inserire ulteriori farmaci andare nella sezione dedicata delle <a href="/index.php?title=MedITEX_IVF_Impostazioni#Farmaco">impostazioni</a>.
| <img src="/images/M+.png" alt="" width="530" height="329" /> |
|
In order to administrate a single medication on several days, do the following:
Method 1:
- Select a cell;
- Click again and enter a numeric value;
- Click on a different cell to save the changes.
| <img src="/images/med1.png" alt="" width="406" height="109" /> |
| <img src="/images/med2.png" alt="" width="404" height="109" /> |
| <img src="/images/hint48.png" alt="" width="48" height="48" /> | This is not a double-click. If you double-click a medication, you will be asked to lock the cell. |
Method 2:
- Select a cell;
- Press CTRL-C;
- Select another cell;
- Press CTRL-V;
Method 3:
- Enter the dosage for the desired drug in the designated date;
- Press and hold CTRL on your keyboard;
- Click on the last date when that drug should be administrated.
| <img src="/images/CTRLMedication.png" alt="" width="350" height="329" /> |
Method 4:
- Select one cell;
- Hold Shift and with the right or left arrows, select the remaining cells;
- Press CTRL-C;
- Select another cell to paste;
- Press CTRL-V.
| <img src="/images/ShiftMedication.png" alt="" /> |
| <img src="/images/hint48.png" alt="" width="48" height="48" /> | Pay close attention to the number of cells that were selected with this method. |
| <a href="/index.php?title=MedITEX_IVF_how_to#Cycle"><img src="/images/howto48.png" alt="" width="48" height="48" /></a> | <a href="/index.php?title=MedITEX_IVF_how_to#Cycle">Click here</a> to read more about drugs. |
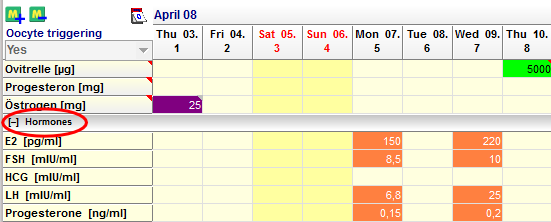
Hormones
 |
In order to enter hormone values for a patient, double-click the respective cell in the hormone area.
 |
The window Lab values will open:
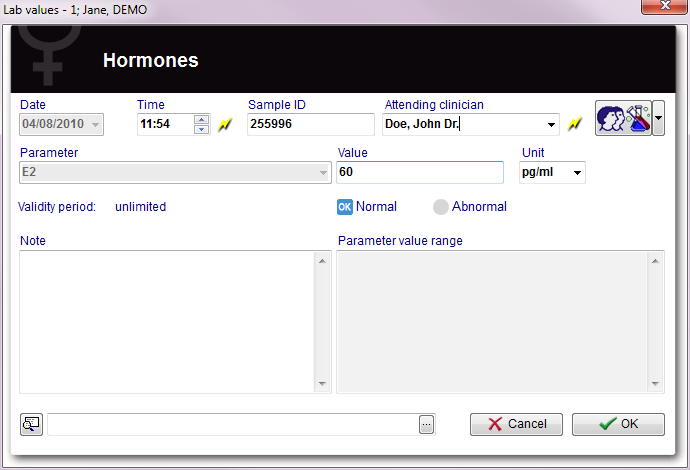 |
From this window, you can enter all information regarding hormones for the corresponding days.
If you wish to document other hormones, you must do it from the <a href="/index.php?title=Lab_diagnostics_female">Female lab. diagnostics</a>. The entries for these hormones will automatically be linked to the patient's lab. diagnostics.
Add further data if needed and close the window by pressing the OK button.
Another way of entering values for hormones here in the Overview tab, is similar to the Method 1 for medications:
- Select a cell;
- Click again and enter a numeric value;
- Click on a different cell to save the changes.
| <img src="/images/hint48.png" alt="" width="48" height="48" /> | This is not a double-click. If you double-click a hormone cell, the editor for hormones will open. |
You can extend the list of hormones and other laboratory parameters that are displayed in the Overview. You can edit this information at the <a href="/index.php?title=MedITEX_IVF_Settings#Lab">System settings</a>. The image below shows the Overview tab with extended lab parameters.
| <img style="display: block; margin-left: auto; margin-right: auto;" src="/images/OverviewExtendedLabParameters.png" alt="" width="354" height="580" /> | |
| <a href="/index.php?title=MedITEX_IVF_Settings#Lab"><img src="/images/plus48.png" alt="" width="48" height="48" /></a> |
<a href="/index.php?title=MedITEX_IVF_Settings#Lab">Click here</a> for more information about the system settings. |
| <a href="/index.php?title=How_to_add_/_edit_a_laboratory_parameter%3F"><img src="/images/howto48.png" alt="" width="48" height="48" /></a> | <a href="/index.php?title=How_to_add_/_edit_a_laboratory_parameter%3F">Click here</a> for more information on how to add new parameters. |
Ultrasound and Follicle US
Ultrasound, also referred to as US in the program, is the area in the cycle Overview where you can enter pictures of ultrasounds, folliculometric data and the endometrial thickness.
In order to add a new ultrasound picture, double-click the desired date in the Ultrasound area. The following window will open:
| <img src="/images/UltrasoundAddOverview.png" alt="" width="591" height="413" /> |
| From this page, you can upload pictures from the ultrasound, export existing ones, add notes, etc. |
If you double-click a cell from the Follicle US area, the following window will open:
| <img src="/images/Ultra.png" alt="" width="591" height="724" /> |
|
Ultrasound pictures can also be added from this window. |
In this window, you can document the number of follicles by size.
- Numbers displayed to the left of the chart (22, 21,…, 10) are the sizes for the follicles;
- Numbers in the middle of the chart are the current count of follicles of that specific size;
- The two numbers displayed at the bottom of each ovary chart, is the sum of all follicles for that ovary;
- The number displayed at the bottom, in the middle of both charts is the total amount of follicles counted;
- EMT stands for Endometrium Thickness and it is measured in millimetres.
| <img src="/images/hint48.png" alt="" width="48" height="48" /> |
Pay really close attention to the position of the ovary charts. The left ovary is displayed on the right side and vice versa. This is to prevent mistakenly documentation, since when examining a patient, the ovaries are on the opposite side from the doctors perspective. |
| <img src="/images/FollicleUSAddRemove.png" alt="" width="251" height="284" /> |
To count the number of follicles, follow this steps:
|
| <a href="/index.php?title=DICOM_interface"><img src="/images/DICOM_plus_icon.png" alt="" width="119" height="54" /></a> | MedITEX IVF has one very important functionality. It can automatically import pictures from the ultrasound machine using DICOM. <a href="/index.php?title=DICOM_interface">Click here</a> to read more about this feature. |
| <a href="/index.php?title=How_to_enter_ultrasound_data_in_a_cycle%3F"><img src="/images/howto48.png" alt="" width="48" height="48" /></a> |
<a href="/index.php?title=How_to_enter_ultrasound_data_in_a_cycle%3F">Click here</a> for more information about entering US data. |
| <a href="/index.php?title=MedITEX_IVF_manual">Back to the MedITEX IVF menu </a> | <a href="/index.php?title=Cycles">Back to the cycles</a> | <a href="#top">Back to top</a> |