MedITEX IVF main page
From MedITEX - Wiki
| Line 116: | Line 116: | ||
<tbody> | <tbody> | ||
<tr> | <tr> | ||
| − | <td>[[Image:CyleOverview.png|none|740px|thumb|left|link=http://wiki.meditex-software.com/images/CyleOverview.png| ]]</td> | + | <td>[[Image:CyleOverview.png|none|740px|thumb|left|link=http://wiki.meditex-software.com/images/CyleOverview.png| Cycles.]]</td> |
</tr> | </tr> | ||
<tr> | <tr> | ||
| − | <td>[[Image:CylePlOverview.png|none|740px|thumb|left|link=http://wiki.meditex-software.com/images/CylePlOverview.png| ]]</td> | + | <td>[[Image:CylePlOverview.png|none|740px|thumb|left|link=http://wiki.meditex-software.com/images/CylePlOverview.png| Planned cycles.]]</td> |
</tr> | </tr> | ||
</tbody> | </tbody> | ||
</table> | </table> | ||
| − | + | <p style="text-align: justify;">In the bottom section of the page are summarized the outcome of the previous treatments. The meaning of the columns is explainded in the cycle section.</p> | |
| − | <p style="text-align: justify;">In the bottom section of the | + | <p style="text-align: justify;"> </p> |
| − | <p | + | |
| − | + | ||
| − | + | ||
| − | + | ||
<ul> | <ul> | ||
</ul> | </ul> | ||
| + | Back to MedITEX IVF manual + Back to top: | ||
| + | |||
| + | <table style="float: right;" border="0"> | ||
| + | <tbody> | ||
| + | <tr> | ||
| + | <td style="text-align: right;"><a href="/index.php?title=MedITEX_IVF_manual">Back to the MedITEX IVF menu </a></td> | ||
| + | <td style="text-align: right;"><a href="#top">Back to top</a></td> | ||
| + | </tr> | ||
| + | </tbody> | ||
| + | </table> | ||
| + | <p><span class="mw-headline"><br /></span></p> | ||
Revision as of 14:44, 4 December 2012

Contents |
Buttons
Some buttons have special functionalities. Click on it to have more information.
| <a href="/index.php?title=Demographics"><img src="/images/Demographics.png" alt="" width="125" height="33" /></a> | Demopgraphics: Here you can add patient's data such as address, telephone, documents, etc. |
| <a href="/index.php?title=Medical_History"><img src="/images/Medhis.jpg" alt="" width="123" height="34" /></a> | Medical history: The medical history of the patient can be documented here. |
| <a href="/index.php?title=Lab_diagnostics"><img src="/images/Labdia.jpg" alt="" width="124" height="29" /></a> | Lab. diagnostics: Documentation of the results of lab samples. Overview about the status of the lab orders. Generation of statistics. |
| <a href="/index.php?title=Female_examinations"><img src="/images/Femexam.jpg" alt="" width="121" height="31" /></a> | Female examination: To document female findings, examinations, etc. |
| <a href="/index.php?title=Male_examinations"><img src="/images/Malexam.jpg" alt="" width="124" height="35" /></a> | Male examination: For the documentation of male findings. |
| <img style="display: block; margin-left: auto; margin-right: auto;" src="/images/Plus.png" alt="" width="34" height="28" /> | Create / Plan new cycle: To start a new cycle access the Cycle section clicking on. Same functionality at the "Planned cycles". |
| <img style="display: block; margin-left: auto; margin-right: auto;" src="/images/DeleteX.png" alt="" width="26" height="24" /> | Delete selected cycle / planning: To delete a cyle access the Cycle section clicking on. Same functionallity at the "Planned cycles". |
| <img style="display: block; margin-left: auto; margin-right: auto;" src="/images/CycleDetails.png" alt="" width="144" height="25" /> | Cycle details: Take a look at the cycle details. |
| <img style="display: block; margin-left: auto; margin-right: auto;" src="/images/PlanningDetails.png" alt="" width="142" height="25" /> | Planning details: Overview about the planned cylce. |
| <img src="/images/OverviewCycles.png" alt="" width="138" height="45" /> | To plan a cycle access the planned cycles section clicking on the label "Planned cycles". |
After logging in with your individual password you will first see the MedITEX IVF main window also. On the main screen you will see all important informations about the currently choosen patient / or couple.
Clickable areas
Female and male information area
| <img style="display: block; margin-left: auto; margin-right: auto;" src="/images/FemaleInfoArea.png" alt="" width="273" height="328" /> | <img style="display: block; margin-left: auto; margin-right: auto;" src="/images/MaleInfoArea.png" alt="" width="276" height="331" /> |
|
On the top part of the starting window are indicated the female and male information area (female on the left and male on the right). Each panel displays
It is possible to access directy to the medical history by clicking on the grey boxes, to the cryostorage for that given patient by clicking on the bluebox or to the donor section by clicking on the green box. Note: The section related to donor information may be not available if donation is not allowed in user's country. |
|
Search for patients
| <img style="display: block; margin-left: auto; margin-right: auto;" src="/images/SearchField.png" alt="" width="372" height="54" /> |
| <img src="/images/SearchLeft.png" alt="" width="20" height="26" /> <img src="/images/SearchRight.png" alt="" width="25" height="31" /> | Go one patient back / forward. |
| <img style="display: block; margin-left: auto; margin-right: auto;" src="/images/Single_pat.jpg" alt="" /> | Insert a single patient. |
| <img style="display: block; margin-left: auto; margin-right: auto;" src="/images/Couple.jpg" alt="" width="35" height="31" /> | Insert a new couple. |
| <img style="display: block; margin-left: auto; margin-right: auto;" src="/images/SearchMessage.png" alt="" width="33" height="27" /> | Open all messages in the Communication overview. |
In this section it is possible to search for existing patients or create new patients or couples. To search for a patient just type in surname, date of birth or patient ID. It is also possible to type a part of surname or patient ID in order to find all the patients with the same root. The patient may be selected just double clicking on her/his name. The patient will be shown along with her/his partner (if present).
Tabs
Messages,lab findings and Donor informations
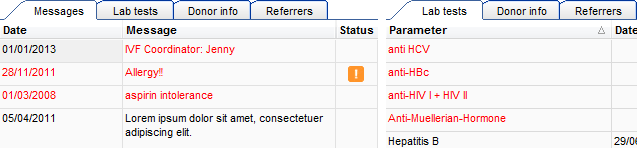 |
| In this area are published the results of lab diagnostics or attention/note messages. You will also find information on Linked sperm donations. Choose in the system settings which are the lab parameter to be published. If the parameter is red it means that the lab test has reached the expiry date set by the user. The attention/note messages may be created by the user in the Medical History section. Double clicking on a row containing a message, a finding or the sperm donor info will open the related window. |
Overview of cycles
 |
 |
In the bottom section of the page are summarized the outcome of the previous treatments. The meaning of the columns is explainded in the cycle section.
Back to MedITEX IVF manual + Back to top:
| <a href="/index.php?title=MedITEX_IVF_manual">Back to the MedITEX IVF menu </a> | <a href="#top">Back to top</a> |