MedITEX IVF Settings
From MedITEX - Wiki
| Line 483: | Line 483: | ||
<tbody> | <tbody> | ||
<tr> | <tr> | ||
| − | <td colspan="2">[[Image:BloodGroups.png|none|740px|thumb| | + | <td colspan="2">[[Image:BloodGroups.png|none|740px|thumb|middle|link=http://wiki.meditex-software.com/images/BloodGroups.png| ]]</td> |
</tr> | </tr> | ||
<tr> | <tr> | ||
| Line 518: | Line 518: | ||
<p> </p> | <p> </p> | ||
<h3>Presentation options</h3> | <h3>Presentation options</h3> | ||
| − | <h4> | + | <p> </p> |
| + | <h4>General</h4> | ||
| + | <table border="0" width="69" height="24"> | ||
| + | <tbody> | ||
| + | <tr> | ||
| + | <td>[[Image:PresGeneral.png|none|740px|thumb|middle|link=http://wiki.meditex-software.com/images/PresGeneral.png| ]]</td> | ||
| + | </tr> | ||
| + | </tbody> | ||
| + | </table> | ||
| + | <p> </p> | ||
<table border="0"> | <table border="0"> | ||
<tbody> | <tbody> | ||
<tr> | <tr> | ||
| + | <td><img src="/images/PresWind.png" alt="" width="460" height="81" /></td> | ||
| + | <td> </td> | ||
| + | </tr> | ||
| + | <tr> | ||
| + | <td><img src="/images/PresCycle.png" alt="" width="463" height="207" /></td> | ||
| + | <td> </td> | ||
| + | </tr> | ||
| + | <tr> | ||
| + | <td><img src="/images/PresCulture.png" alt="" width="461" height="155" /></td> | ||
<td> </td> | <td> </td> | ||
</tr> | </tr> | ||
</tbody> | </tbody> | ||
</table> | </table> | ||
| − | |||
| − | |||
<table style="float: right;" border="0"> | <table style="float: right;" border="0"> | ||
<tbody> | <tbody> | ||
| Line 535: | Line 551: | ||
</tbody> | </tbody> | ||
</table> | </table> | ||
| − | <h4> | + | <p> </p> |
| + | <p> </p> | ||
| + | <h4>Statistics</h4> | ||
| + | <p> </p> | ||
<table border="0"> | <table border="0"> | ||
<tbody> | <tbody> | ||
Revision as of 12:14, 6 December 2012
 |
Contents |
Clinic
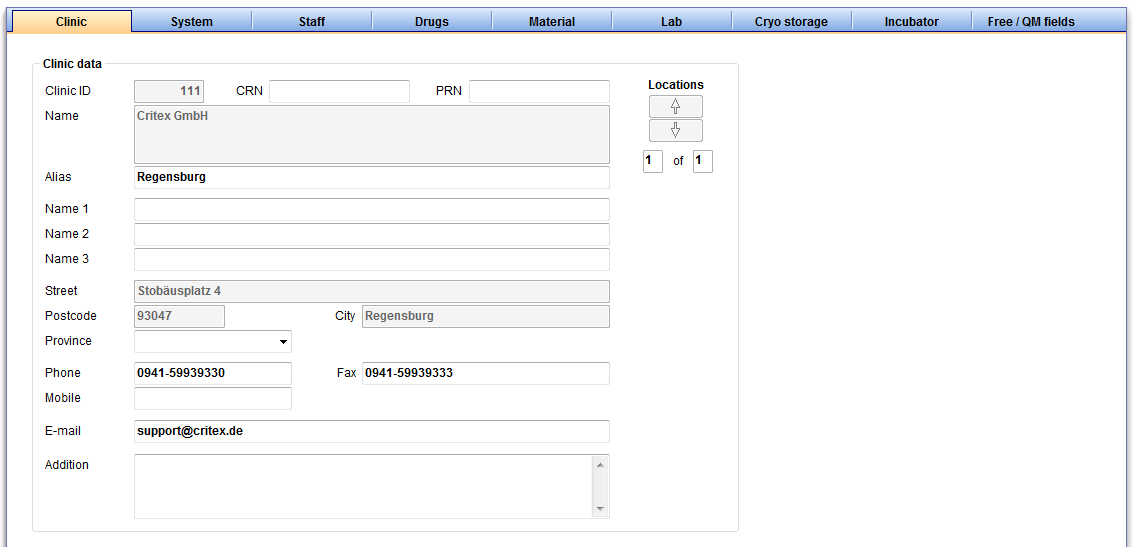 |
Here you can enter the contact details about your clinic and see your clinic ID.
Enter and edit the alias of your clinic, as well as the names of the main clinican and other data.
If there are several clinics, you can switch with the "location" button between them.
| <a href="#top">Back to top</a> |
System
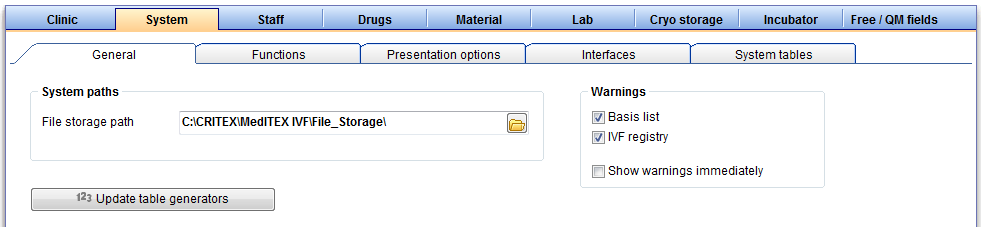 |
General
| <img style="display: block; margin-left: auto; margin-right: auto;" src="/images/UpdateTableGenerators.png" alt="" width="249" height="29" /> | Update table generators.
|
| <img src="/images/SystemPath.png" alt="" width="421" height="89" /> | System paths.
|
| <img src="/images/Waring.png" alt="" width="263" height="120" /> | Warnings.
|
| Only change the warning settings if you are sure in what you are doing. Otherwise, incorrect entries may go unnoticed. |
|
| <a href="#top">Back to top</a> |
Functions
General
 |
|
<img src="/images/SFGeneral2.png" alt="" width="488" height="148" /> |
Generate patient ID automatically. It is possible to create the patient ID automatically on creating new patient record. If you want to use it, you have to activate it. Then choose a creating rule from the list. |
| <img src="/images/SFGeneral3.png" alt="" width="490" height="167" /> |
Automatic anonymous IDs. This rules are only important, if you have activated the using of anonymous ID at the <a href="/index.php?title=MedITEX_IVF_Settings#Donation_.2F_surrogate_motherhood">donation settings</a>. |
| <img src="/images/SFGeneral4.png" alt="" width="491" height="90" /> |
Logging of data changes. Edit here the number of displayed <a href="/index.php?title=Change_logs">change logs</a>. The maximum is 25. Enter 0 if you want to keep all changes. |
| <img src="/images/SFGeneral5.png" alt="" width="490" height="117" /> |
Screenshot functionality / notebook. Check here to view a screenshot icon in the window header frame. Activate a keyboard functionality (ALT + Print) for using the screenshot. |
| <img src="/images/SFGeneral6.png" alt="" width="366" height="37" /> |
Show extern documents. With this function you can display external documents in the finding mask. |
| <img src="/images/SFGeneral7.png" alt="" width="428" height="299" /> |
Barcode / RFID. Here you can activate the automatic login if you using a RFID or barcode. Add a printer that you are use for printing barcodes. Furthermore you can choose a label template. Set your desired width and height of your patient photos and your clinic logo at the bottom of this area . |
| <img src="/images/SFGeneral8.png" alt="" width="423" height="186" /> |
Mediaplayer settings. Select your prefered setting of the quality of the voice records. You can record them in the QM fields. |
| <a href="#top">Back to top</a> |
Report editor
This section describes the settings of Report editor. If you want to get more information about the queries, <a href="/index.php?title=Queries_of_Report_editor">click here</a>.
To edit the Settings of Report editor click on the menu item System -> Configuration -> Settings -> System -> Functions -> Report editor.
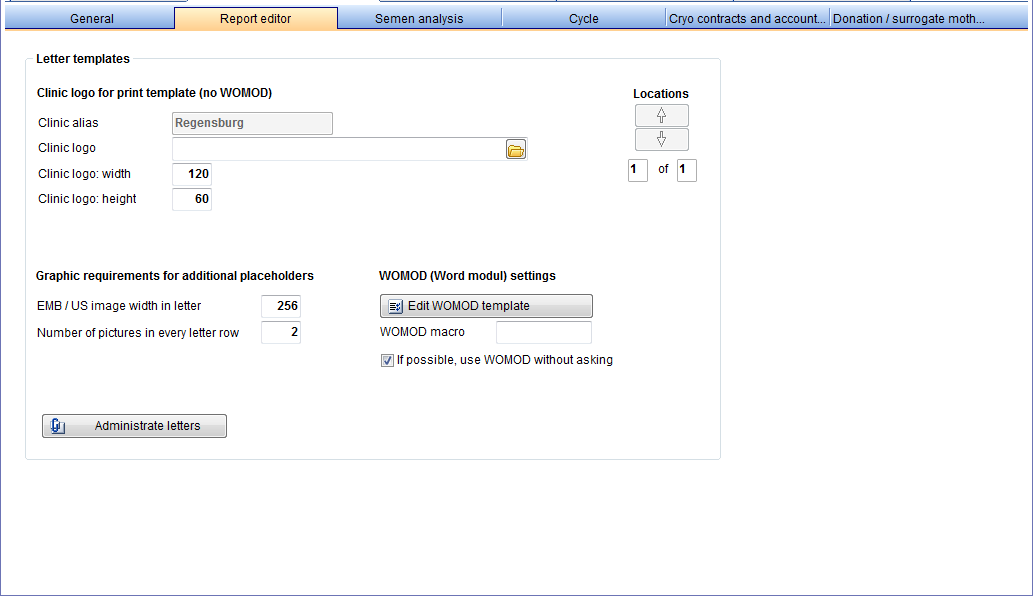 |
| <img src="/images/LetterTemplatesRE.png" alt="" width="518" height="176" /> |
Letter templates. Here you can define the properties of your logo for letter templates, with:
|
| <img src="/images/LocationsRE.png" alt="" width="77" height="111" /> |
Locations. If your center operates at multiple places, you can create custom templates for each location. Move with the arrow keys between the individual centers. |
| <img src="/images/GraphicRE.png" alt="" width="304" height="105" /> |
Graphic requirements for additional placeholders. Define here, the size of the oocyte- / ultrasound pictures used in your letters and how many pictures can be shown in one row. By doing so, you will always have an identical and clear typeface. |
| <img src="/images/WomodRE.png" alt="" width="265" height="117" /> |
Word modul settings.
|
| <a href="/index.php?title=Configure letters"><img src="/images/AdministrateLettersRE.png" alt="" width="196" height="33" /></a> |
Administrate letters. Activate this field for editing the values A + B in one field. This button takes you to the configuration of the letters. Click on it to get more information. |
| <a href="#top">Back to top</a> |
Semen analysis
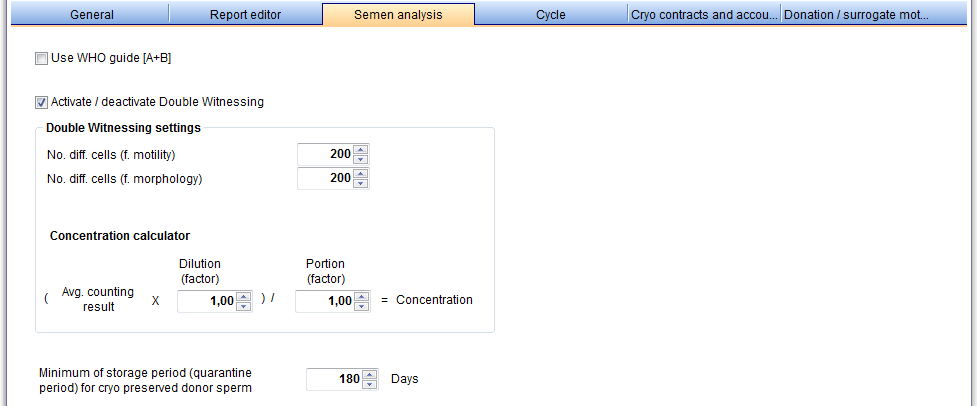 |
| <img src="/images/SemenUseWHOAB.png" alt="" width="346" height="30" /> |
Use WHO [A+B]. German user can not activate this field. Because the german IVF register demands both values separately. |
| <img src="/images/SemenDouble.png" alt="" /> |
Double witnessing.
|
| <img src="/images/SemenStored.png" alt="" width="422" height="49" /> |
Quarantine period for cryo preserved donor sperm. Set here the days for the quarantine period for cryopreserved donor sperm. Donor sperm, in which a laboratory value of HEP B, HEP C, TPHA, HIV is positive, or those that have not yet reached the quarantine period can not be thawed or used. |
| <a href="#top">Back to top</a> |
Cycle
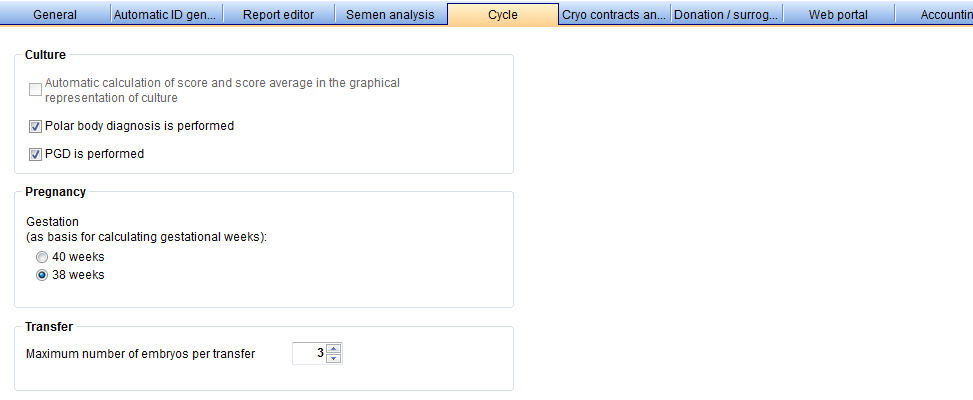 |
| <img src="/images/CycleCulture.png" alt="" /> |
Culture. Activate here the automatic calculation of score and score average in the graphical representation of culture at the cycle. |
| <img src="/images/CyclePregnancy.png" alt="" /> |
Pregnancy. For the automatic calculation of the indicated gestational weeks in the program, you can choose 40 or 38 weeks. |
| <img src="/images/CycleTransfer.png" alt="" /> |
Transfer. The maximum number of embryos per transfer is set here. Observe the legal requirements of your country. |
| <a href="#top">Back to top</a> |
Cryo contracts and accounting
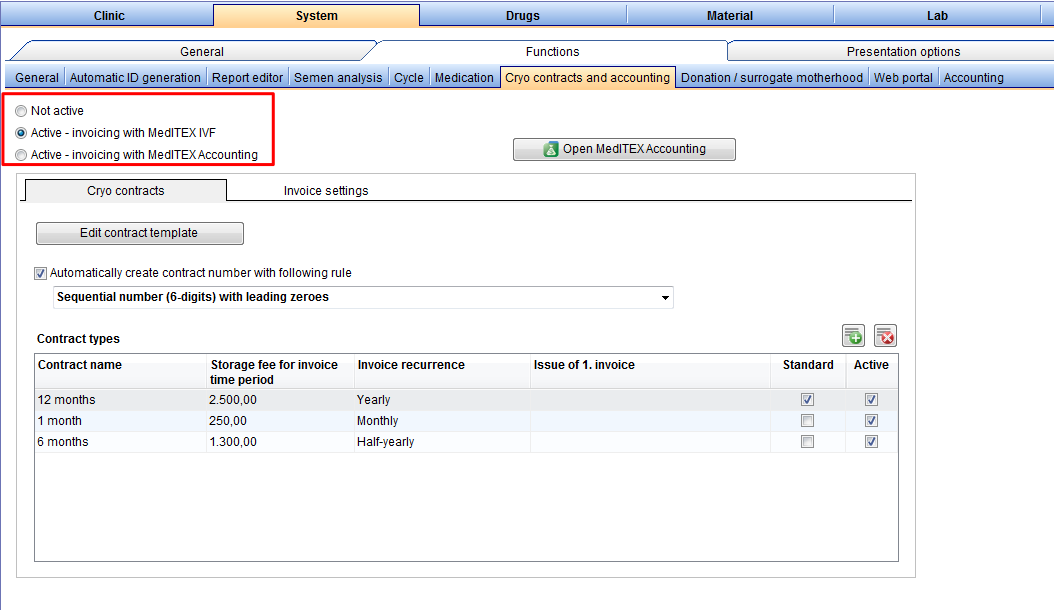 |
| <img style="display: block; margin-left: auto; margin-right: auto;" src="/images/CryoActivate.png" alt="" width="254" height="29" /> |
Activate cryo contracts and accounting. |
 |
|
| <img style="display: block; margin-left: auto; margin-right: auto;" src="/images/CryoConNum.png" alt="" width="384" height="60" /> |
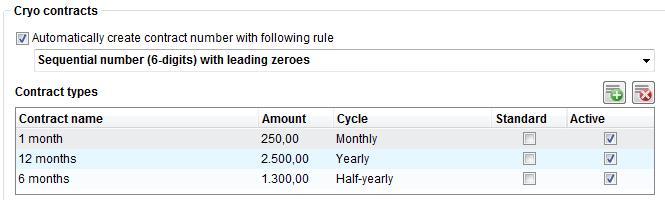
Automatically create contract number. Decide here the automatic generation of your contract numbers. While using the program the contract numbers have not be entered manually. |
| <img src="/images/CryoContracTypes.png" alt="" width="522" height="93" /> |
Contract types. An Overview list of possible types of contracts your clinic. With the "Plus" button, you can add a new type of contract. Do this by specifying the name, frequency and amount in the new window. Also, here you can set whether a contract as a "standard template" is used, and whether a contract is "active", i.e. currently in use. To edit an existing contract, double-click on the desired line. Deleting a contract is only possible if it is not used. |
| <img style="display: block; margin-left: auto; margin-right: auto;" src="/images/CryoEditCon.png" alt="" width="218" height="36" /> |
Edit contract template. Click this button to edit the template of the contract letter. Change only the content of the letters. Never the gray colored bookmarks. The program requires them, for the correct data transfer. |
 |
|
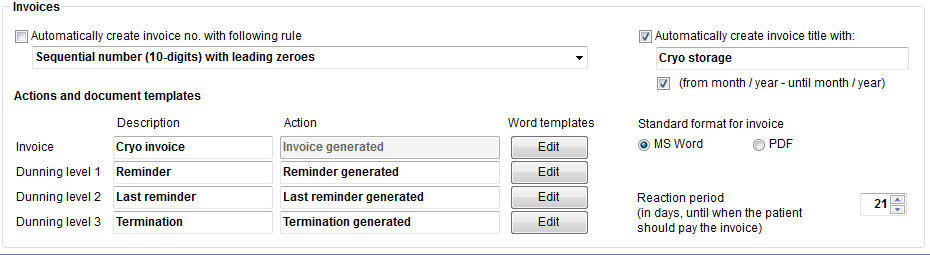
| <img style="display: block; margin-left: auto; margin-right: auto;" src="/images/CryoIn1.png" alt="" width="521" height="48" /> |
Automatically create invoice number. Decide here the automatic generation of your invoice numbers. While using the program the contract numbers have not be entered manually. |
| <img style="display: block; margin-left: auto; margin-right: auto;" src="/images/CryoIn2.png" alt="" width="520" height="137" /> |
Actions and document templates. You can create and edit a variety of letter templates for various actions, such as the invoice letter or payment reminder letter. Change only the content of the letters. Never the gray colored bookmarks. The program requires them, for the correct data transfer. |
| <img style="display: block; margin-left: auto; margin-right: auto;" src="/images/CryoIn3.png" alt="" width="288" height="75" /> |
Automatically create invoice title. Leave here your invoice title automatically transferred to all letters. |
| <img style="display: block; margin-left: auto; margin-right: auto;" src="/images/CryoIn4.png" alt="" /> |
Standard format for invoice. Choose a default format for your invoices. |
| <img style="display: block; margin-left: auto; margin-right: auto;" src="/images/CryoIn5.png" alt="" width="284" height="64" /> |
Reaction period. Setting of the reaction period. From the establishment of the invoice till the due payment date. |
| <a href="#top">Back to top</a> |
Donation / surrogate motherhood
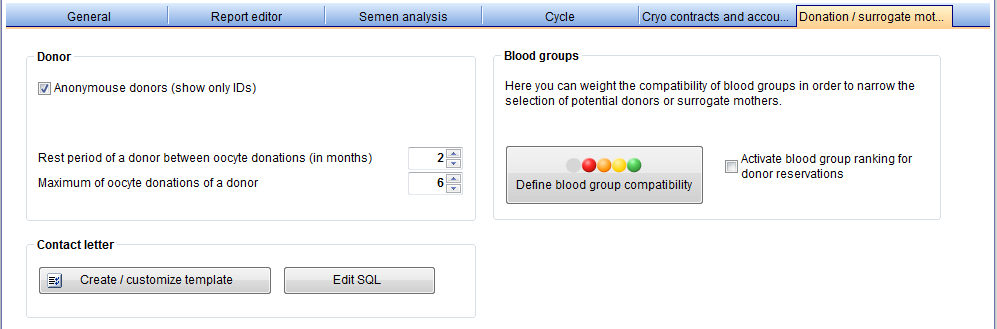 |
| <img style="display: block; margin-left: auto; margin-right: auto;" src="/images/DonationDonor.png" alt="" width="458" height="181" /> |
Donor. If this box is checked you see instead the donors only an anonymous ID. Furthermore can specify here how long rest period of a oocyte donor between the donations and how many oocytes can be donated at one intervention. |
| <img style="display: block; margin-left: auto; margin-right: auto;" src="/images/DonationContactL.png" alt="" width="462" height="86" /> |
Contact letter. See the function of this area beneath. |
| <img style="display: block; margin-left: auto; margin-right: auto;" src="/images/DonationCreateButton.png" alt="" width="241" height="30" /> |
"Create / cusomize template". Create or edit the template for your contact letter. Click the button to open it.
|
| <img style="display: block; margin-left: auto; margin-right: auto;" src="/images/DonationSQLButton.png" alt="" width="156" height="30" /> |
"Edit SQL". If you have permission, you can press this button to edit the SQL. |
 |
|
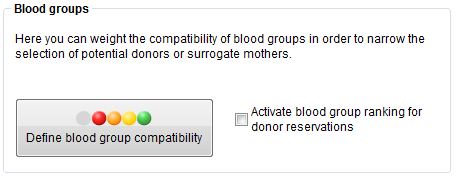
| <img style="display: block; margin-left: auto; margin-right: auto;" src="/images/DonationBlood2.png" alt="" width="209" height="43" /> |
Blood groups ranking for donor reservations. Activate here the blood group ranking for donor reservations. If you link a donor you can see how good are the agreement of the blood groups. |
| <img style="display: block; margin-left: auto; margin-right: auto;" src="/images/DonationBlood1.png" alt="" width="207" height="66" /> |
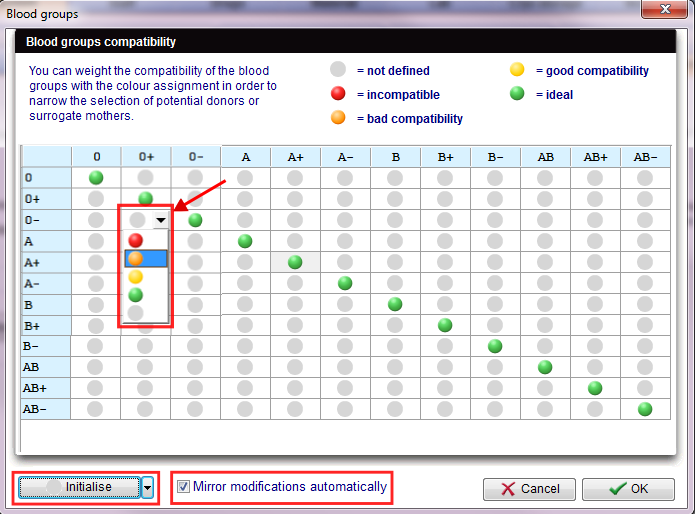
Define blood group compatibility. With this button, you can choose the compatibilities of blood groups. The following window will be opened. |
 |
|
| <img style="display: block; margin-left: auto; margin-right: auto;" src="/images/BloodGroups1.png" alt="" width="202" height="188" /> |
Weight of compatibility. Choose the weight of the compatibility with the colours. Sie können eine Beschreibung über die Farben im Detail finden Sie an der Spitze dieser Gegend. |
| <img style="display: block; margin-left: auto; margin-right: auto;" src="/images/Initialize1.png" alt="" width="376" height="131" /> |
"Initialise". With this button you can initialise the table settings. "Without settings" connotes an empty table. "With settings" represented the diagonal set green points. "Set all combinations with" means, fill the whole table with your chosen colour. "Standard" symbolized filling the table with "good compatibility". |
| <img style="display: block; margin-left: auto; margin-right: auto;" src="/images/BloodGroups2.png" alt="" width="231" height="27" /> |
Mirror modifications automatically. Mirror modifications means to automatically reflect the set points on the diagonal of the table. |
| <a href="#top">Back to top</a> |
Presentation options
General
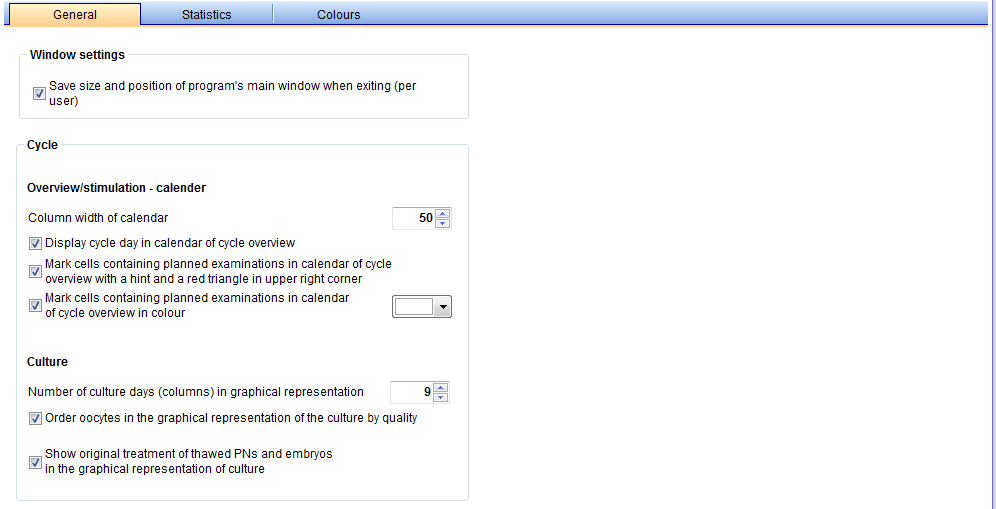 |
| <img src="/images/PresWind.png" alt="" width="460" height="81" /> | |
| <img src="/images/PresCycle.png" alt="" width="463" height="207" /> | |
| <img src="/images/PresCulture.png" alt="" width="461" height="155" /> |
| <a href="#top">Back to top</a> |
Statistics
| <a href="#top">Back to top</a> |
Colours
| <a href="#top">Back to top</a> |
Interfaces
!!! Only change the interface settings if you are sure in the changes you want to make. Otherwise there may be functionality errors or complete failure of certain functions. !!!
Internal
| <a href="#top">Back to top</a> |
External
| <a href="#top">Back to top</a> |
System tables
Moreover, you can define the parameters for the logos, pictures and templates used in letters that you can create with the report editor.
| <a href="#top">Back to top</a> |
Staff
 |
| <a href="#top">Back to top</a> |
Drugs
The section “Drugs” contains a fixed list of the most important products which are used in the field of reproductive medicine.
Besides this, you can also define additional long-term and pill products that are used in your medical center.
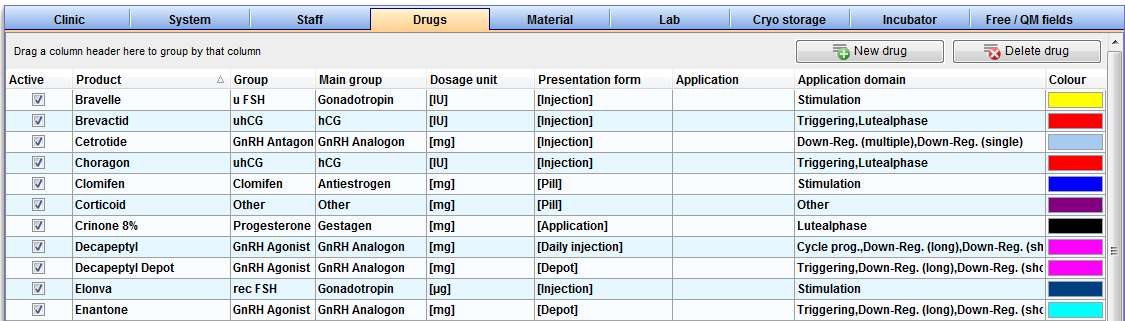 |
| <img style="display: block; margin-left: auto; margin-right: auto;" src="/images/NewDrug.png" alt="" width="154" height="26" /> |
New drug: Add a new drug. Read more about adding new drugs, <a href="/index.php?title=How_to_add_new_drugs%3F">here</a>. |
| <img style="display: block; margin-left: auto; margin-right: auto;" src="/images/DeleteDrug.png" alt="" width="152" height="25" /> |
Delete drug: Only drugs you have added yourself can be deleted by pressing this button. |
- The list of drugs contains products in the groups Gonadotropin, GnRH Analogon, hCG, Progesterone, Gestagen, Estrogen, Antiestrogen and Pill according to the current Red List®
- The list of drugs is provided and updated by CRITEX and cannot be changed by the user.
- If you do not wish to use this drug, untick the box "Active". To do so, double-click on the drug to open the drug editor. There you can untick the "Active" box. Then the drug will not be shown in any selection window of the program.
- Press the column header to sort the entries according to their names, to reverse the sorting or to filter the list.
 |
| <a href="#top">Back to top</a> |
Material
In the section “Material” you can enter data concerning material groups, manufacturers and products. You can also create different batches and "activate" them for a certain period of time.
Articles / Batches
At this tab you can add the needed materials to the list and make them available for the creation of QM fields.
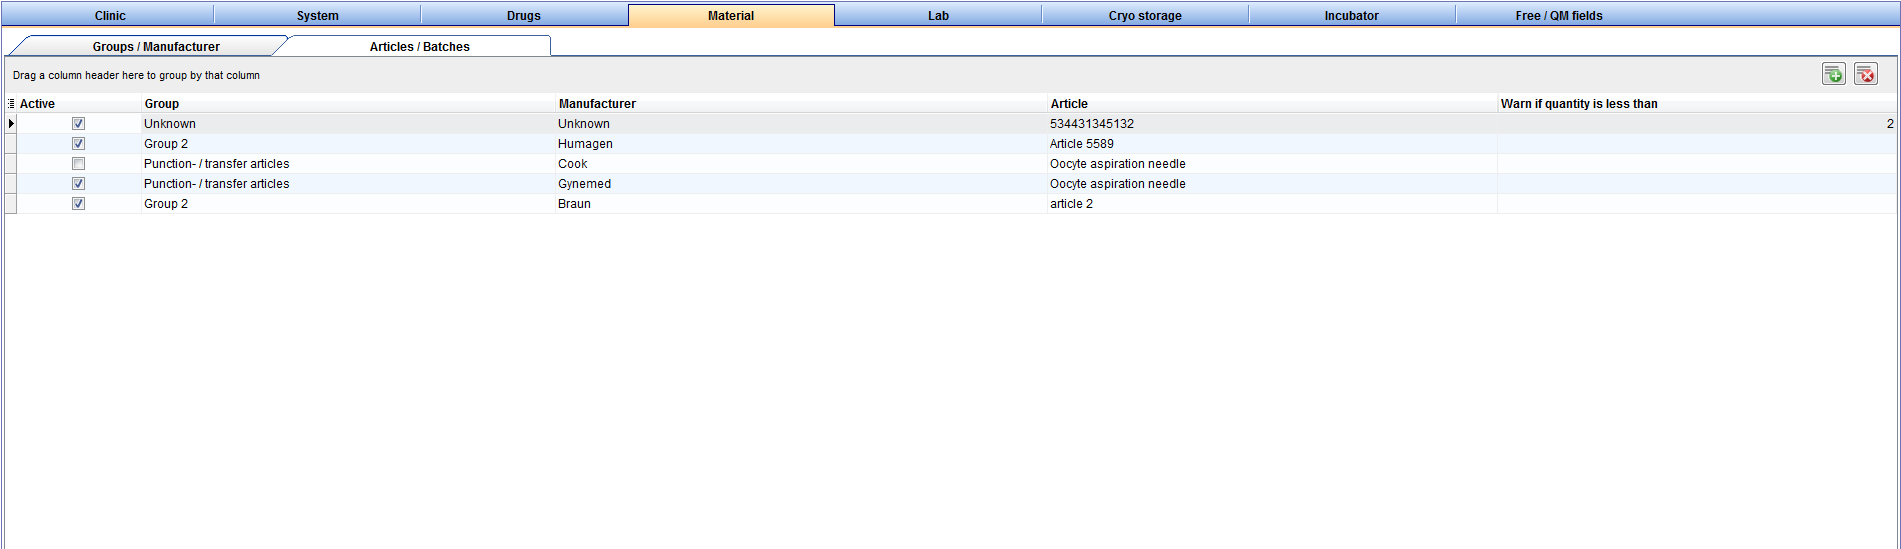 |
| <img style="display: block; margin-left: auto; margin-right: auto;" src="/images/Plus.png" alt="" width="34" height="28" /> | Press this button on the top right to add a new article. |
| <img style="display: block; margin-left: auto; margin-right: auto;" src="/images/DeleteX.png" alt="" width="26" height="24" /> |
Delete it with this button. This is only possible if articles have not been assigned to QM fields or used otherwise. Should this be the case, deactivate the item by unticking the box "Active". This data will then be hidden without being deleted. Articles can only be deleted if they have not yet been used. |
Get more informations about the usability, <a href="/index.php?title=How_to_add_material_articles_/_batches%3F">here</a>.
| <a href="#top">Back to top</a> |
Manufacturer
You can see a list of all existing manufactures at the tab “Manufacturer”.
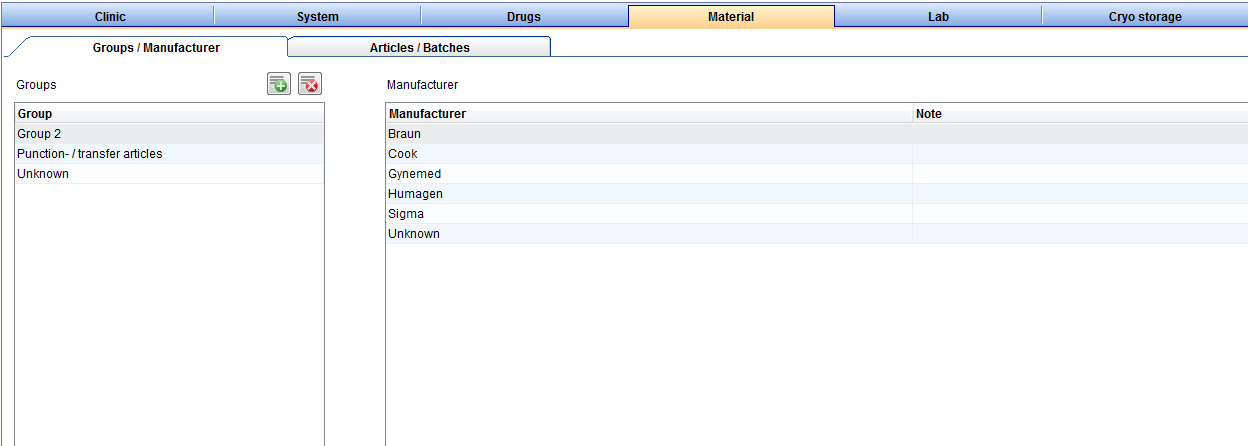 |
| <img style="display: block; margin-left: auto; margin-right: auto;" src="/images/Plus.png" alt="" width="34" height="28" /> | Press this button on the top right to add a new manufacturer. |
| <img style="display: block; margin-left: auto; margin-right: auto;" src="/images/DeleteX.png" alt="" width="26" height="24" /> |
Delete it with this button. This is only possible if manufactures have not been assigned to QM fields or used otherwise. Should this be the case, deactivate the item by unticking the box "Active". This data will then be hidden without being deleted. Manufacturers can only be deleted if they have not yet been used. |
Get more informations about the usability, <a href="/index.php?title=How_to_add_material_manufacturer%3F">here</a>.
| <a href="#top">Back to top</a> |
Groups
At this tab you can create a new material group, for example probes. Here you can see a list of all existing groups.
 |
| <img style="display: block; margin-left: auto; margin-right: auto;" src="/images/Plus.png" alt="" width="34" height="28" /> | Press this button on the top right to create a new group. |
| <img style="display: block; margin-left: auto; margin-right: auto;" src="/images/DeleteX.png" alt="" width="26" height="24" /> |
Delete a group with this button. This is only possible if groups have not been assigned to QM fields or used otherwise. Should this be the case, deactivate the item by unticking the box "Active". This data will then be hidden without being deleted. Groups can only be deleted if they have not yet been used. |
Get more informations about the usability, <a href="/index.php?title=How_to_add_material_groups%3F">here</a>.
| <a href="#top">Back to top</a> |
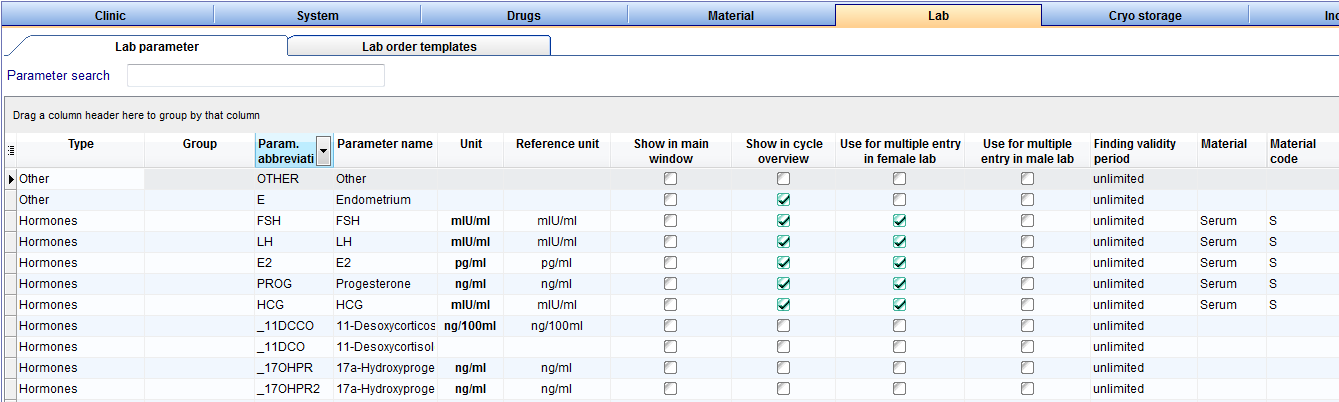
Lab
 |
| <a href="#top">Back to top</a> |
Cryo storage
In the section “Cryo storage” you can manage all cryo canisters and their storage system. You can define up to three hierarchic storage levels per canister. Their filling level can be checked in the freezing section to determine free space.
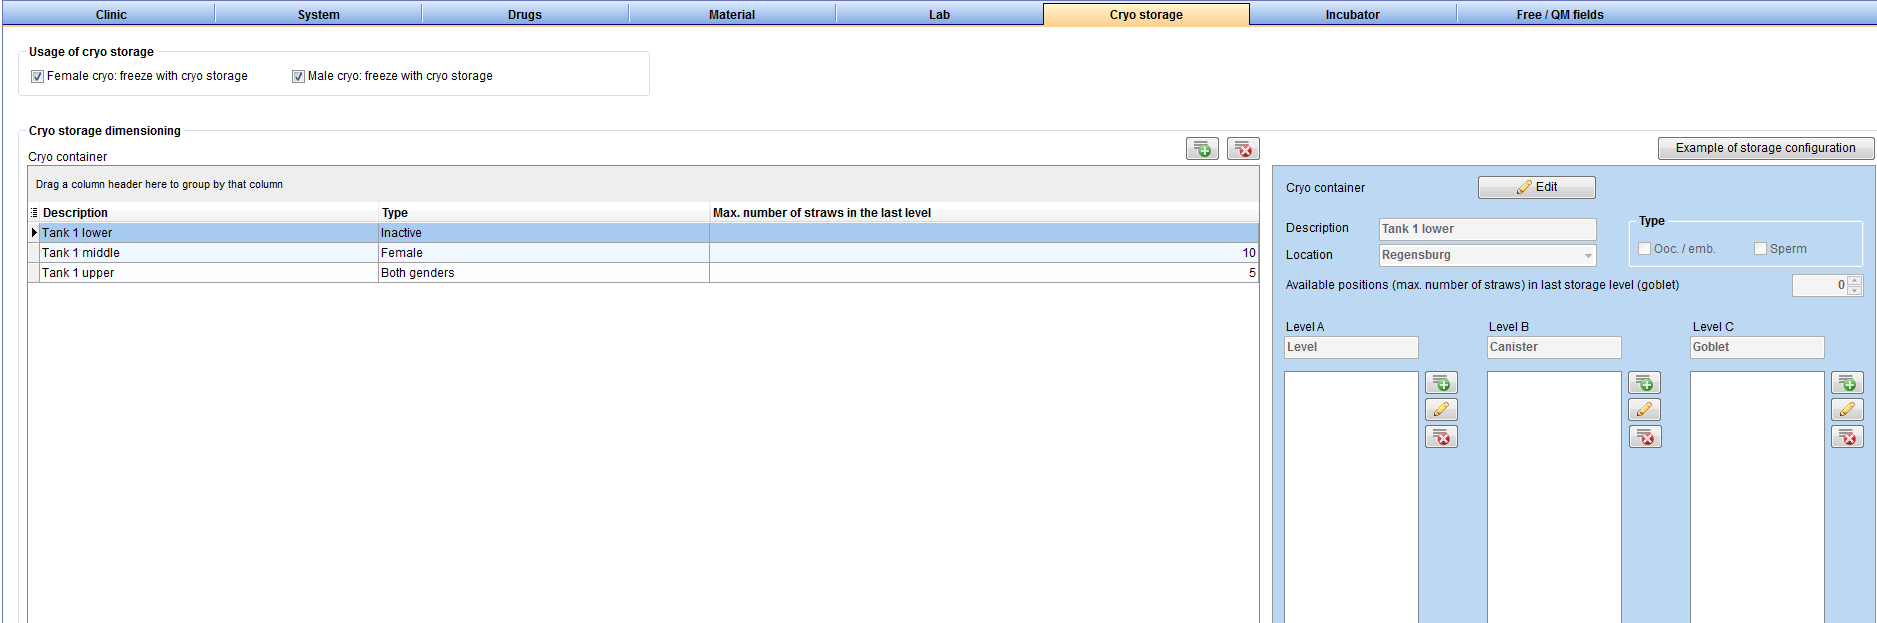 |
| <img style="display: block; margin-left: auto; margin-right: auto;" src="/images/Plus.png" alt="" width="34" height="28" /> |
Press this button to add a new unit. More information about adding a new unit read <a href="/index.php?title=How_to_add_a_new_canister_to_the_cryo_storage%3F">here</a>. |
| <img style="display: block; margin-left: auto; margin-right: auto;" src="/images/DeleteX.png" alt="" width="26" height="24" /> | Select the unit you wish to delete and click this button. |
| <img style="display: block; margin-left: auto; margin-right: auto;" src="/images/SaveChanges.png" alt="" width="162" height="29" /> | Save your changes. |
| <img src="/images/CryoFreeze.png" alt="" width="467" height="59" /> | You can choose which "type" you will freeze in your cryostorage: female or male, or both. |
 |
When a new unit will be created, the following fields have to be filled:
|
| <img src="/images/CryoType.png" alt="" width="235" height="49" /> | You can also determine whether oocytes and embryos ("Ooc./emb.") or sperms (“Andro”) will be stored in a unit. |
- It is possible to modify the name of the allocation units. Select an existing unit by clicking on it in the column "Allocation unit" and edit name, type and storage level accordingly.
| <a href="#top">Back to top</a> |
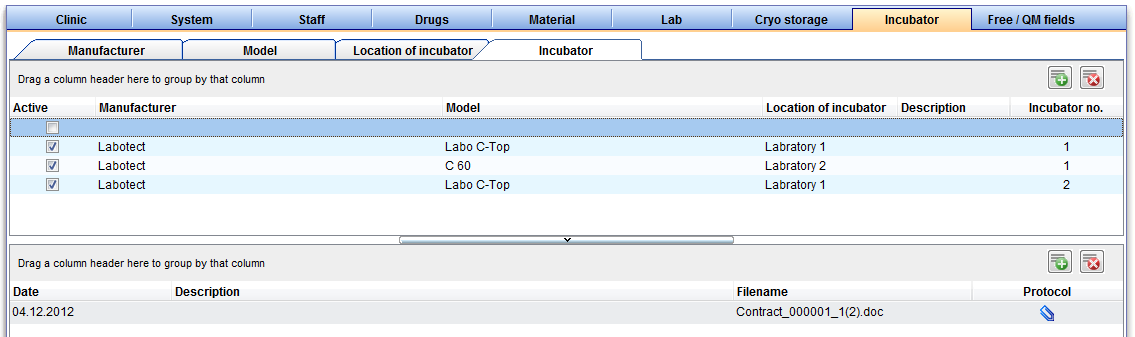
Incubator
 |
| <a href="#top">Back to top</a> |
Free / QM fields
The management of QM fields is an important section in the settings. Here you can configure all QM and free fields.
QM, quality management, stands for the option to document all the information relevant to you with the help of QM fields.
Staff, material, times and further free fields can be assigned to any QM field – and therefore every associated input area - in the settings.
 |
Some buttons have special functionalities. Click on it to have more information.
| <img style="display: block; margin-left: auto; margin-right: auto;" src="/images/Plus.png" alt="" width="34" height="28" /> | This button is placed at the "QM assignment selection". You can define or add new items with it. |
| <img style="display: block; margin-left: auto; margin-right: auto;" src="/images/DeleteX.png" alt="" width="26" height="24" /> | This button is placed at the "QM assignment selection". You can delete articles from this area. |
| <img style="display: block; margin-left: auto; margin-right: auto;" src="/images/LeftRight.png" alt="" width="29" height="64" /> | Use this buttons between the "QM domain assignment" and the "QM assignment selection" to assign a selcted entry (right) to a QM field (left) or delet a entry from the "QM domain assignment" (left). |
| <a href="/index.php?title=How_to_configure_items%3F"><img style="display: block; margin-left: auto; margin-right: auto;" src="/images/QMEdit.png" alt="" width="24" height="23" /></a> | Configuration: Add or edit members of staff, material or values. |
| Three QM types: | |
| <img style="display: block; margin-left: auto; margin-right: auto;" src="/images/O.png" alt="" width="22" height="20" /> | Staff: Type of personell. |
| <img style="display: block; margin-left: auto; margin-right: auto;" src="/images/L.png" alt="" /> | Material: Materials and batch numbers. |
| <img style="display: block; margin-left: auto; margin-right: auto;" src="/images/F.png" alt="" /> | Free fields: Any additional information. |
| <img src="/images/QMDomanissignment.png" alt="" width="175" height="405" /> | <img src="/images/QMDomanis.png" alt="" width="288" height="406" /> |
<img src="/images/QMDomanissignmentSelection.png" alt="" width="198" height="404" /> |
|
QM fields: A list of all QM fields in MedITEX IVF. The number and description of QM fields can not be changed by the user. In the example the field "Follicle aspiration" is selected. |
Items assigned to the selected QM field: In this column you can see all items assigned to the selected QM field (Follicle aspiration). The entries are separeted in the three types, which are represented as symbols.
|
Pool of all available items: This column displas all positions that have allready been defined for all QM domains (QM fields). They represent a "pool" whose items can be assigned flexibly.
|
Press the column header to sort the items by their names, type or description.
There are a number of options to edit the items assigned to a QM field. Read more about
- defining and adding new items,
- adding new items from the list "QM assignment selection",
- item cofiguration,
- and deleting in the <a href="/index.php?title=MedITEX_IVF_how_to#QM_.2F_free_fields">How to</a>.
Tips for managing QM fields:
- Access to settings and the possibility to modify the program should only be given to the MedITEX Administrator/Representative.
- Try to avoid the frequent adding and removing of items in the column "QM assignment selection". Instead, try to create a logical system in which existing items can be modified in the column "QM assignment selection" (for example modifying of material and staff).
- Update the QM settings regularly.
- Deleting items in the column „QM assignment selection“ can be risky. Try to avoid this and instead only remove assigned items from the column “QM domain assignment” (right arrow between columns).
- You do not have to define times in the settings. After pressing the QM fields in the program, you can determine a start and end time.
- You do not have to define comments in the settings. After pressing the QM fields in the program, you can add a comment to all items.
- Not matter if staff, material or free field: You can add staff and a list of values to any item. Combine material and staff in one entry.
<a href="/index.php?title=MedITEX IVF System Settings">System</a>
| <a href="/index.php?title=MedITEX_IVF_manual">Back to the MedITEX IVF menu </a> | <a href="#top">Back to top</a> |