MedITEX IVF Settings
From MedITEX - Wiki
| (201 intermediate revisions by 5 users not shown) | |||
| Line 6: | Line 6: | ||
</tbody> | </tbody> | ||
</table> | </table> | ||
| + | <p><strong>Define your individual structure.</strong></p> | ||
| + | <p>The MedITEX IVF settings are of<strong> utmost importance</strong>. They allow you to adapt the program to your center's <strong>specific </strong>conditions and circumstances.</p> | ||
| + | <p>This includes adding or editing existing drugs, manage materials and interfaces to accounting and laboratory programs, definition of incubators, and also organize the cryo storage. The definition of QM/free fields and the content of selected system tables are also managed in the settings.</p> | ||
| + | <p><strong>It is crucial to define the settings fully and correctly before using MedITEX IVF. </strong><strong> </strong></p> | ||
<h2>Clinic</h2> | <h2>Clinic</h2> | ||
| − | <p>To edit the Settings of Clinic, click on the menu item <strong>System -> Configuration -> Settings -> Clinic.<br /></strong></p> | + | <p>To edit the Settings of Clinic, click on the menu item <strong>System -> Configuration / administration -> Settings -> Clinic</strong>.<strong><br /></strong></p> |
<table style="margin-left: auto; margin-right: auto;" border="0"> | <table style="margin-left: auto; margin-right: auto;" border="0"> | ||
<tbody> | <tbody> | ||
<tr> | <tr> | ||
| − | <td>[[Image:Clinic.png|none|740px|thumb|left|link=http://wiki.meditex-software.com/images/Clinic.png| ]]</td> | + | <td>[[Image:Clinic.png|none|740px|thumb|left|link=http://wiki.meditex-software.com/images/Clinic.png| Tab Clinic.]]</td> |
</tr> | </tr> | ||
</tbody> | </tbody> | ||
| Line 19: | Line 23: | ||
</ul> | </ul> | ||
<ul style="text-align: justify;"> | <ul style="text-align: justify;"> | ||
| − | <li>Enter and edit the <strong>alias of your clinic</strong>, as well as the <strong>names of the main | + | <li>Enter and edit the <strong>alias of your clinic</strong>, as well as the <strong>names of the main clinician</strong> and <strong>other data</strong>.</li> |
</ul> | </ul> | ||
<ul> | <ul> | ||
| Line 26: | Line 30: | ||
<ul> | <ul> | ||
<li>The disabled areas are filled by MedITEX. <span id="result_box" class="short_text" lang="en"><span class="hps">If you wish to</span> <span class="hps">change</span><span>, please contact</span> <span class="hps">us.</span></span></li> | <li>The disabled areas are filled by MedITEX. <span id="result_box" class="short_text" lang="en"><span class="hps">If you wish to</span> <span class="hps">change</span><span>, please contact</span> <span class="hps">us.</span></span></li> | ||
| − | |||
| − | |||
</ul> | </ul> | ||
<table style="float: right;" border="0"> | <table style="float: right;" border="0"> | ||
| Line 39: | Line 41: | ||
<p> </p> | <p> </p> | ||
<h2>System</h2> | <h2>System</h2> | ||
| − | <p>To edit the Settings of System click on the menu item <strong>System -> Configuration -> Settings -> System | + | <p>To edit the Settings of System click on the menu item <strong>System -> Configuration / administration-> Settings -> System -> General</strong>.</p> |
<h3>General</h3> | <h3>General</h3> | ||
<table style="margin-left: auto; margin-right: auto;" border="0"> | <table style="margin-left: auto; margin-right: auto;" border="0"> | ||
<tbody> | <tbody> | ||
<tr> | <tr> | ||
| − | <td>[[Image:SystemS.png|none|740px|thumb|middle|link=http://wiki.meditex-software.com/images/SystemS.png| ]]</td> | + | <td>[[Image:SystemS.png|none|740px|thumb|middle|link=http://wiki.meditex-software.com/images/SystemS.png| Tab System.]]</td> |
</tr> | </tr> | ||
</tbody> | </tbody> | ||
</table> | </table> | ||
<ul> | <ul> | ||
| − | <li><strong>System paths</strong>: here you can define which file paths are used for the interfaces of accounting and laboratory programs, as well as the location where the program manages file storage and | + | <li><strong>System paths</strong>: here you can define which file paths are used for the interfaces of accounting and laboratory programs, as well as the location where the program manages file storage and digital documents. In order to change file paths, click the directory symbol on the right side of the respective row. A dialog window will open and you can change the file path accordingly.</li> |
</ul> | </ul> | ||
<ul> | <ul> | ||
| − | <li><strong>Update table generators</strong>: to use this function, please make sure that no one is using the program and all users are logged off the system.</li> | + | <li><strong>Update table generators</strong>: with this button, you can update your table generators. to use this function, please make sure that no one is using the program and all users are logged off the system.</li> |
</ul> | </ul> | ||
<ul> | <ul> | ||
| − | <li><strong>Warnings</strong>: you can set the relevant warnings for your clinic (for example “Basis list”). Warnings defined by German IVF Registry (DIR) are relevant only for clinics based in Germany. | + | <li><strong>Warnings</strong>: you can set the relevant warnings for your clinic (for example “Basis list”). Warnings defined by German IVF Registry (DIR) are relevant only for clinics based in Germany. |
| − | <p>In the area "Warnings" you can individually choose the field | + | <p>In the area "Warnings" you can individually choose the field catalogues that are relevant to your centre. MedITEX IVF can then selectively indicate erroneous entries or missing information with red warnings.</p> |
| − | <p>As MedITEX IVF checks data in real time, warnings are immediately shown when switching to another input mask. Deselecting the box “Show warnings immediately” can disable this option.</p> | + | <p>As MedITEX IVF checks data in real time, warnings are immediately shown when switching to another input mask. Deselecting the box “Show warnings immediately” can disable this option.</p> |
</li> | </li> | ||
<li><strong>Only change the warning settings if you are absolutely sure what you are doing. Otherwise, incorrect entries may go unnoticed.</strong></li> | <li><strong>Only change the warning settings if you are absolutely sure what you are doing. Otherwise, incorrect entries may go unnoticed.</strong></li> | ||
| Line 72: | Line 74: | ||
<h3>Functions</h3> | <h3>Functions</h3> | ||
<h4>General</h4> | <h4>General</h4> | ||
| − | <p>To edit the Settings of General functions click on the menu item <strong>System -> Configuration -> Settings -> System -> Functions -> General</strong>.</p> | + | <p>To edit the Settings of General functions click on the menu item <strong>System -> Configuration / administration -> Settings -> System -> Functions -> General</strong>.</p> |
<table style="margin-left: auto; margin-right: auto;" border="0" width="10" height="24"> | <table style="margin-left: auto; margin-right: auto;" border="0" width="10" height="24"> | ||
<tbody> | <tbody> | ||
<tr> | <tr> | ||
| − | <td>[[Image:SFGeneral1.png|none|740px|thumb|middle|link=http://wiki.meditex-software.com/images/SFGeneral1.png| ]]</td> | + | <td>[[Image:SFGeneral1.png|none|740px|thumb|middle|link=http://wiki.meditex-software.com/images/SFGeneral1.png| Tab Functions - General.]]</td> |
</tr> | </tr> | ||
</tbody> | </tbody> | ||
</table> | </table> | ||
<p> </p> | <p> </p> | ||
| − | <table style="margin-left: auto; margin-right: auto;" border="0"> | + | <table style="margin-left: auto; margin-right: auto;" border="0" width="790" height="1078"> |
<tbody> | <tbody> | ||
<tr> | <tr> | ||
| Line 88: | Line 90: | ||
<p><strong>Generate patient ID automatically</strong></p> | <p><strong>Generate patient ID automatically</strong></p> | ||
<ul> | <ul> | ||
| − | <li>It is possible to | + | <li>It is possible to <strong>generate </strong>a<strong> Patient ID automatically </strong>when<a href="/index.php?title=How_to_create_a_new_patient%3F"> creating a new patient</a>. Check this option if you want to use this function and choose a rule from the list.</li> |
</ul> | </ul> | ||
| − | + | </td> | |
</tr> | </tr> | ||
<tr> | <tr> | ||
| Line 97: | Line 99: | ||
<p><strong>Automatic anonymous IDs</strong></p> | <p><strong>Automatic anonymous IDs</strong></p> | ||
<ul> | <ul> | ||
| − | <li> | + | <li>These rules are only important if you have checked the box <strong>Anonymous donors</strong> at the <a href="/index.php?title=MedITEX_IVF_Settings#Donation_.2F_surrogate_motherhood">donation settings</a>.</li> |
</ul> | </ul> | ||
<ul> | <ul> | ||
| − | <li>If active, you can choose a creation rule. This ID will be shown instead the name of the patient.</li> | + | <li>If active, here you can <strong>choose a creation rule</strong>. This ID will be shown instead of the name of the patient. You can edit the number in the <a href="/index.php?title=Demographics#Clickable_Areas">Demographics </a>at the field <strong>"Anonym ID"</strong>.</li> |
</ul> | </ul> | ||
</td> | </td> | ||
| Line 109: | Line 111: | ||
<p><strong>Logging of data changes</strong></p> | <p><strong>Logging of data changes</strong></p> | ||
<ul> | <ul> | ||
| − | <li>Number of displayed <a href="/index.php?title=Change_logs">change logs</a>. The maximum is 25. Enter 0 if you want to keep all changes.</li> | + | <li>Number of displayed <a href="/index.php?title=Change_logs">change logs</a>. The maximum is 25. Enter 0 if you <strong>want to keep</strong> all changes.</li> |
</ul> | </ul> | ||
</td> | </td> | ||
| Line 118: | Line 120: | ||
<p><strong>Screenshot functionality / notebook</strong></p> | <p><strong>Screenshot functionality / notebook</strong></p> | ||
<ul> | <ul> | ||
| − | <li><span id="result_box" class="short_text" lang="en"><span class="hps">Check</span> <span class="hps">this option</span> <span class="hps">to view</span> <span class="hps">a screenshot</span> <span class="hps">icon in the window header frame.</span></span></li> | + | <li><span id="result_box" class="short_text" lang="en"><span class="hps">Check</span> <span class="hps">this option</span> <span class="hps">to view</span> <span class="hps">a <strong>screenshot</strong></span> <span class="hps"><strong>icon</strong> in the window header frame.</span></span></li> |
</ul> | </ul> | ||
<ul> | <ul> | ||
| − | <li> Activate | + | <li> Activate <strong>keyboard functionality</strong> (ALT + Print) for taking screenshots.</li> |
| − | + | ||
| − | + | ||
| − | + | ||
| − | + | ||
| − | + | ||
| − | + | ||
| − | + | ||
| − | + | ||
| − | + | ||
</ul> | </ul> | ||
</td> | </td> | ||
</tr> | </tr> | ||
<tr> | <tr> | ||
| − | <td> <img src="/images/SFGeneral7.png" alt=" | + | <td> <img src="/images/SFGeneral7.png" alt="" /></td> |
<td> | <td> | ||
<p><strong>Barcode / RFID</strong></p> | <p><strong>Barcode / RFID</strong></p> | ||
<ul> | <ul> | ||
| − | <li>Here you can activate the automatic login if you are using an RFID or barcode. Add | + | <li>Here you can <strong>activate </strong>the<strong> automatic login</strong> if you are using an <strong>RFID </strong>or<strong> barcode</strong>. Add the<strong> printer</strong> that you are using for printing barcodes.</li> |
</ul> | </ul> | ||
<ul> | <ul> | ||
| − | <li>Furthermore, you can choose a label template.</li> | + | <li>Furthermore, you can choose a <strong>label template</strong>.</li> |
</ul> | </ul> | ||
<ul> | <ul> | ||
| − | <li>Set the desired width and height for patient photos and clinic logo | + | <li>Set the desired width and height for <strong>patient photos</strong> and <strong>clinic logo</strong>.</li> |
</ul> | </ul> | ||
</td> | </td> | ||
</tr> | </tr> | ||
<tr> | <tr> | ||
| − | <td> <img src="/images/SFGeneral8.png" alt=" | + | <td> <img src="/images/SFGeneral8.png" alt="" /></td> |
<td> | <td> | ||
<p><strong>Mediaplayer settings</strong></p> | <p><strong>Mediaplayer settings</strong></p> | ||
<ul> | <ul> | ||
| − | <li>Select | + | <li>Select the desired setting for the quality of<strong> voice recordings</strong>.</li> |
</ul> | </ul> | ||
<ul> | <ul> | ||
| − | <li>You can record them in the QM fields.</li> | + | <li>You can record them in the <a href="/index.php?title=Free_/_QM_fields">QM fields</a>.</li> |
</ul> | </ul> | ||
</td> | </td> | ||
| Line 171: | Line 164: | ||
</table> | </table> | ||
<p> </p> | <p> </p> | ||
| + | <h4>Automatic ID generation</h4> | ||
| + | <p> </p> | ||
| + | <table border="0" width="10" height="24"> | ||
| + | <tbody> | ||
| + | <tr> | ||
| + | <td>[[Image:SettingsReportEditorID.PNG|none|740px|thumb|middle|link=http://wiki.meditex-software.com/images/SettingsReportEditorID.PNG| Automatic ID generation.]]</td> | ||
| + | </tr> | ||
| + | </tbody> | ||
| + | </table> | ||
<p> </p> | <p> </p> | ||
<h4>Report editor</h4> | <h4>Report editor</h4> | ||
| − | <p>This section describes the settings | + | <p>This section describes the settings for the <strong>Report editor</strong>.</p> |
| − | <p>To edit the Settings of Report editor click on the menu item <strong>System -> Configuration -> Settings -> System -> Functions -> Report editor</strong>.</p> | + | <table style="margin-left: auto; margin-right: auto;" border="0"> |
| − | <table border="0"> | + | <tbody> |
| + | <tr> | ||
| + | <td><a href="/index.php?title=Queries_of_Report_editor"><img src="/images/plus48.png" alt="" width="48" height="48" /></a></td> | ||
| + | <td><a href="/index.php?title=Queries_of_Report_editor">Click here</a> if you want to get more information about queries.</td> | ||
| + | </tr> | ||
| + | </tbody> | ||
| + | </table> | ||
| + | <p> </p> | ||
| + | <p>To edit the <strong>Settings </strong>of the <strong>Report editor</strong> click on the menu item <strong>System -> Configuration</strong><strong> / administration</strong><strong> -> Settings -> System -> Functions -> Report editor</strong>.</p> | ||
| + | <table style="margin-left: auto; margin-right: auto;" border="0"> | ||
<tbody> | <tbody> | ||
<tr> | <tr> | ||
| − | <td>[[Image:SettingsRE.png|none|740px|thumb|middle|link=http://wiki.meditex-software.com/images/SettingsRE.png| ]]</td> | + | <td>[[Image:SettingsRE.png|none|740px|thumb|middle|link=http://wiki.meditex-software.com/images/SettingsRE.png| Tab Functions - Report editor.]]</td> |
</tr> | </tr> | ||
</tbody> | </tbody> | ||
</table> | </table> | ||
| + | <p><strong>Letter templates</strong>: here you can define the properties of your logo for letter templates.</p> | ||
<ul> | <ul> | ||
| + | <li><strong>Locations</strong>: if your centre operates at multiple places, you can create custom templates for each location. Move with the arrow keys between the individual centres.</li> | ||
</ul> | </ul> | ||
<ul> | <ul> | ||
| − | <li><strong> | + | <li><strong>Graphic requirements for additional placeholders</strong>: define the size of embryos/ultrasound pictures used in your letters and how many pictures can be shown in one row. This will make sure you will always have an identical and clear typeface.</li> |
</ul> | </ul> | ||
<ul> | <ul> | ||
| + | <li><strong>WOMOD settings</strong>: create/edit the template of letters.</li> | ||
</ul> | </ul> | ||
<ul> | <ul> | ||
| + | <li><strong>Administrate letters</strong>: This button takes you to the configuration of the letters.</li> | ||
</ul> | </ul> | ||
| − | < | + | <table style="margin-left: auto; margin-right: auto;" border="0"> |
| − | < | + | <tbody> |
| − | < | + | <tr> |
| − | < | + | <td><a href="/index.php?title=Result_management#Administrate_letters"><img src="/images/plus48.png" alt="" width="48" height="48" /></a></td> |
| − | < | + | <td><a href="/index.php?title=Result_management#Administrate_letters">Click here</a> if you want to get more information about the buttom <strong>Administrate letters</strong>.</td> |
| − | + | </tr> | |
| − | </ | + | </tbody> |
| − | < | + | </table> |
| − | < | + | |
| − | + | ||
| − | + | ||
| − | + | ||
| − | </ | + | |
| − | + | ||
| − | + | ||
| − | </ | + | |
<table style="float: right;" border="0"> | <table style="float: right;" border="0"> | ||
<tbody> | <tbody> | ||
| Line 214: | Line 221: | ||
</tbody> | </tbody> | ||
</table> | </table> | ||
| + | <p> </p> | ||
<p> </p> | <p> </p> | ||
<p> </p> | <p> </p> | ||
<h4>Semen analysis</h4> | <h4>Semen analysis</h4> | ||
| − | <p>To edit the Settings of Semen analysis click on the menu item <strong>System -> Configuration -> Settings -> System -> Functions -> Semen analysis | + | <p>To edit the <strong>Settings </strong>of <strong>Semen analysis </strong>click on the menu item <strong>System -> Configuration</strong><strong> / administration</strong><strong> -> Settings -> System -> Functions -> Semen analysis</strong>.</p> |
| − | <table border="0"> | + | <table style="margin-left: auto; margin-right: auto;" border="0"> |
<tbody> | <tbody> | ||
<tr> | <tr> | ||
| − | <td>[[Image: | + | <td>[[Image:SemenA.png|none|740px|thumb|middle|link=http://wiki.meditex-software.com/images/SemenA.png| Tab Functions - Semen analysis.]]</td> |
</tr> | </tr> | ||
</tbody> | </tbody> | ||
| Line 227: | Line 235: | ||
<ul> | <ul> | ||
<li> | <li> | ||
| − | <p><strong>Use WHO [A+B] | + | <p><strong>Use WHO guide [A+B]</strong>: Determines if your clinic is documenting three instead of four motility parameters - progressive motile (PR), locally motile (NP) and immotile (IM), according to current WHO instructions for semen analysis (parameters A and B together as PR, C and D separated as NP and IM).</p> |
</li> | </li> | ||
| − | |||
</ul> | </ul> | ||
| + | <blockquote> | ||
<ul> | <ul> | ||
| − | <li><strong> | + | <li>Info for MedITEX customers in <strong>Germany</strong>: if you check this box, the values A (fast) and B (slow prog. motile) will be automatically calculated and submitted to <strong>DIR </strong>in the following way:<br />A = 1/3 of AB<br />B = 2/3 of AB<br />This rule is according to the agreement with DIR, because DIR is still collecting all four parameters separately.</li> |
</ul> | </ul> | ||
| + | </blockquote> | ||
| + | <ul> | ||
| + | <li><strong>Semen analysis quality assessment</strong>: activates and deactivates quality assessment and add your data.</li> | ||
| + | </ul> | ||
| + | <blockquote> | ||
| + | <ul> | ||
| + | <li><strong>Add</strong> the names of your <strong>workplaces</strong>, <strong>examinations</strong>, <strong>examination methods</strong> and <strong>units</strong>. You need it for the calculation and validation in the semen analysis.</li> | ||
| + | <li>Choose your <strong>counting unit</strong> and <strong>adapt the dilution factor</strong> and the <strong>portion factor</strong>, if it is necessary.</li> | ||
| + | </ul> | ||
| + | </blockquote> | ||
| + | <ul> | ||
| + | </ul> | ||
| + | <blockquote> | ||
| + | <ul> | ||
| + | </ul> | ||
| + | </blockquote> | ||
| + | <blockquote> | ||
| + | <ul> | ||
| + | </ul> | ||
| + | </blockquote> | ||
| + | <ul> | ||
| + | <li><a href="/index.php?title=MedITEX_IVF_Settings#System_tables"><img style="border: 2px dotted blue; float: left;" src="/images/EditSemen.png" alt="" width="31" height="26" /></a> Go to the system tables for <strong>adding or editing a workplace/unit</strong>. Subsequently, the newly added workplace/unit can be directly <strong>chosen from the list</strong>.</li> | ||
| + | </ul> | ||
| + | <ul> | ||
| + | <li><strong>Minimum of storage period</strong>: days for the quarantine period for cryopreserved sperm. Donor sperm, in which a laboratory value of HEP B, HEP C, TPHA and HIV is positive, or those that have not yet reached the quarantine period cannot be thawed or used.</li> | ||
| + | </ul> | ||
| + | <p> </p> | ||
| + | <table style="margin-left: auto; margin-right: auto;" border="0"> | ||
| + | <tbody> | ||
| + | <tr> | ||
| + | <td><a href="/index.php?title=Documenting_a_new_sample#Documenting_a_semen_analysis"><img src="/images/plus48.png" alt="" width="48" height="48" /></a></td> | ||
| + | <td><a href="/index.php?title=Documenting_a_new_sample#Documenting_a_semen_analysis">Click here</a> for more information about the documentation of semen analysis.</td> | ||
| + | </tr> | ||
| + | </tbody> | ||
| + | </table> | ||
<table style="float: right;" border="0"> | <table style="float: right;" border="0"> | ||
<tbody> | <tbody> | ||
| Line 241: | Line 284: | ||
</tbody> | </tbody> | ||
</table> | </table> | ||
| + | <p> </p> | ||
<p> </p> | <p> </p> | ||
<p> </p> | <p> </p> | ||
<h4>Cycle</h4> | <h4>Cycle</h4> | ||
| − | <p>To edit the Settings of | + | <p>To edit the <strong>Settings </strong>of <strong>Cycles </strong>click on the menu item <strong>System -> Configuration</strong><strong> / administration</strong><strong> -> Settings -> System -> Functions -> Cycle</strong>.</p> |
| − | <table border="0"> | + | <table style="margin-left: auto; margin-right: auto;" border="0"> |
<tbody> | <tbody> | ||
<tr> | <tr> | ||
| − | <td>[[Image:CycleSettings.png|none|740px|thumb|middle|link=http://wiki.meditex-software.com/images/CycleSettings.png| ]]</td> | + | <td>[[Image:CycleSettings.png|none|740px|thumb|middle|link=http://wiki.meditex-software.com/images/CycleSettings.png| Tab Functions - Cycle.]]</td> |
</tr> | </tr> | ||
</tbody> | </tbody> | ||
</table> | </table> | ||
| − | |||
<ul> | <ul> | ||
| − | <li><strong>Culture | + | <li><a href="/index.php?title=Cycle_Culture"><strong>Culture</strong></a>: activates the automatic calculation of score and score average in the <a href="/index.php?title=Cycle_Culture#Graphical_representation"><strong>Graphical representation</strong></a> of culture for a cycle.</li> |
</ul> | </ul> | ||
<ul> | <ul> | ||
| − | <li><strong>Pregnancy</strong>: | + | <li><a href="/index.php?title=Cycle_Pregnancy"><strong>Pregnancy</strong></a>: gestational weeks throughout the program will be calculated based on this setting. You can choose between 40 or 38 weeks.</li> |
</ul> | </ul> | ||
<ul> | <ul> | ||
| − | <li><strong>Transfer | + | <li><a href="/index.php?title=Cycle_Transfer"><strong>Transfer</strong></a>: the maximum number of embryos per transfer. Observe the legal requirements of your country.</li> |
</ul> | </ul> | ||
<table style="float: right;" border="0"> | <table style="float: right;" border="0"> | ||
| Line 271: | Line 314: | ||
<p> </p> | <p> </p> | ||
<p> </p> | <p> </p> | ||
| − | <h4> | + | <h4>Medication</h4> |
| − | <p> | + | <p> </p> |
<table border="0"> | <table border="0"> | ||
<tbody> | <tbody> | ||
<tr> | <tr> | ||
| − | <td>[[Image: | + | <td>[[Image:SettingsReportMedication.PNG|none|740px|thumb|middle|link=http://wiki.meditex-software.com/images/SettingsReportMedication.PNG| Medication Prescriptions.]]<br /><br /></td> |
</tr> | </tr> | ||
</tbody> | </tbody> | ||
</table> | </table> | ||
<p> </p> | <p> </p> | ||
| − | <table border="0"> | + | <p> </p> |
| + | <h4>Cryo contracts and accounting</h4> | ||
| + | <p>To edit the <strong>Settings </strong>of<strong> Cryo contracts and accounting</strong> click on the menu item <strong>System -> Configuration</strong><strong> / administration</strong><strong> -> Settings -> System -> Functions -> Cryo contracts and accounting</strong>.</p> | ||
| + | <table style="margin-left: auto; margin-right: auto;" border="0" width="805" height="24"> | ||
<tbody> | <tbody> | ||
<tr> | <tr> | ||
| − | <td> | + | <td>[[Image:CryoSettings.png|none|740px|thumb|middle|link=http://wiki.meditex-software.com/images/CryoSettings.png| Tab Functions - Cryo contracts and accounting --> Activate cryo contracts and accounting.]]</td> |
| − | + | ||
| − | + | ||
| − | + | ||
| − | </td> | + | |
</tr> | </tr> | ||
| + | </tbody> | ||
| + | </table> | ||
| + | <ul> | ||
| + | <li><strong>Activate cryo contracts and accounting</strong>: by default, this option is checked. It enables the creation of cryo contracts and invoices for a patient. <strong>If this option is unchecked, all contract and invoice functionalities will be disabled throughout the program</strong>.</li> | ||
| + | </ul> | ||
| + | <table border="0" width="805" height="24"> | ||
| + | <tbody> | ||
<tr> | <tr> | ||
| − | <td | + | <td>[[Image:CryoSettings2.PNG|none|740px|thumb|middle|link=http://wiki.meditex-software.com/images/CryoSettings2.PNG| Tab Functions - Cryo contracts and accounting --> Invoice settings.]]</td> |
</tr> | </tr> | ||
</tbody> | </tbody> | ||
</table> | </table> | ||
<p> </p> | <p> </p> | ||
| + | <table style="margin-left: auto; margin-right: auto;" border="0" width="778" height="1"> | ||
| + | <tbody> | ||
| + | <tr> | ||
| + | <td colspan="2">[[Image:CryoContracts.png|none|740px|thumb|left|link=http://wiki.meditex-software.com/images/CryoContracts.png| Area cryo contracts.]]</td> | ||
| + | </tr> | ||
| + | </tbody> | ||
| + | </table> | ||
<ul> | <ul> | ||
| − | <li style="text-align: justify;"><strong>Automatically create contract number | + | <li style="text-align: justify;"><strong>Automatically create contract number</strong>: if this option is checked, it will apply a predefined rule to generate a number once every <a href="/index.php?title=Create_a_new_entry_in_demographics">cryo contract</a> is created in the <a href="/index.php?title=Demographics">demographics</a>.</li> |
</ul> | </ul> | ||
<ul> | <ul> | ||
<li> | <li> | ||
| − | <p style="text-align: justify;"><strong>Contract types | + | <p style="text-align: justify;"><strong>Contract types</strong>: a list with all types of contracts that can be issued. With the <strong>"Plus"</strong> button, you can add a new type of contract. Do this by specifying the <strong>name</strong>, <strong>frequency </strong>and <strong>amount </strong>in the new window. Here, you can also set whether a contract is used as a <strong>Standard </strong>(template for every contract) or <strong>Active</strong> (visible templates for choosing in the cryo mask). <span id="result_box" lang="en"><span class="hps">To</span> <span class="hps">edit an existing</span> <span class="hps">contract</span><span>, double-click</span> <span class="hps">the desired row</span><span>.</span></span><span id="result_box" lang="en"><span> </span></span><span id="result_box" lang="en"><span class="hps">Deleting a</span> <span class="hps">contract</span> <span class="hps">is only possible</span> <span class="hps">if</span> <span class="hps">it is not being used</span><span>.</span></span></p> |
</li> | </li> | ||
</ul> | </ul> | ||
<ul> | <ul> | ||
| − | <li><strong>Edit contract template | + | <li><strong>Edit contract template</strong>: opens MS Word to enable creation and editing of templates used for cryo contracts. Only change the content of these templates and never the grey colour placeholders. The program requires them for the correct transferring of data.</li> |
</ul> | </ul> | ||
<p> </p> | <p> </p> | ||
| − | <table border="0"> | + | <table style="margin-left: auto; margin-right: auto;" border="0"> |
<tbody> | <tbody> | ||
<tr> | <tr> | ||
| − | <td> [[Image:Invoices.png|none|740px|thumb|middle|link=http://wiki.meditex-software.com/images/Invoices.png| ]]</td> | + | <td> [[Image:Invoices.png|none|740px|thumb|middle|link=http://wiki.meditex-software.com/images/Invoices.png| Area invoices.]]</td> |
| + | </tr> | ||
| + | <tr> | ||
| + | <td><strong>Automatically create invoice number</strong>: If this option is checked, it will apply a predefined rule to generate a number once <a href="/index.php?title=How_to_create_a_new_cryo_invoice%3F"> every invoice is created</a>.</td> | ||
</tr> | </tr> | ||
</tbody> | </tbody> | ||
</table> | </table> | ||
| + | <p><strong>Actions and document templates</strong>:</p> | ||
<ul> | <ul> | ||
| − | <li | + | <li><strong>Invoice</strong>: the first invoice created. |
| − | + | ||
| − | + | ||
| − | + | ||
| − | + | ||
| − | + | ||
| − | + | ||
| − | + | ||
| − | + | ||
<ul> | <ul> | ||
| − | <li><strong>Dunning level 1 | + | <li><strong>Dunning level 1</strong>: first document emitted if payment for the invoice has not been done.</li> |
| − | <li><strong>Dunning level 2 | + | <li><strong>Dunning level 2</strong>: second document emitted if payment for the invoice has not been done.</li> |
| − | <li><strong>Dunning level 3 | + | <li><strong>Dunning level 3</strong>: third and final document emitted if payment for the invoice has not been done.</li> |
| − | <li><strong>Description | + | <li><strong>Description</strong>: describes the content of the document. This information appears when navigating through <strong>Administration of documents</strong> for a patient.</li> |
| − | <li><strong>Action | + | <li><strong>Action</strong>: describes what action is taken when creating the document. This information appears when navigating through <strong>Outstanding invoices</strong> and on individual invoices for a patient.</li> |
| − | <li><strong>Word templates | + | <li><strong>Word templates</strong>: option to create and edit template of documents. A few options are available when clicking the <strong>Edit </strong>button: <strong>Create new document</strong> prompts for a <strong>Template name</strong> and opens <strong> MSWord </strong>so it is possible to create a brand new document. To edit, delete or rename an existing template, select the desired template and choose one of the options.</li> |
</ul> | </ul> | ||
</li> | </li> | ||
</ul> | </ul> | ||
<ul> | <ul> | ||
| − | <li><strong>Automatically create invoice title | + | <li><strong>Automatically create invoice title</strong>: sets the name for the created invoice according to the information provided by this setting. If this option is unchecked, when creating a new invoice, no name will be automatically created, although it will still be possible to click on the auto generate button or enter the desired name. If (from month / year – until month / year) is checked, it also includes month and year to the name.</li> |
</ul> | </ul> | ||
<ul> | <ul> | ||
<li> | <li> | ||
| − | <p><strong>Standard format for invoice | + | <p><strong>Standard format for invoice</strong>: <span id="result_box" class="short_text" lang="en"><span class="hps">choose a default</span> <span class="hps">format</span> <span class="hps">for</span> <span class="hps">your invoices.</span></span></p> |
</li> | </li> | ||
<li> | <li> | ||
| − | <p><strong>Reaction period | + | <p><strong>Reaction period</strong>: the amount of days the patient has to pay an invoice.</p> |
</li> | </li> | ||
</ul> | </ul> | ||
| + | <table style="margin-left: auto; margin-right: auto;" border="0"> | ||
| + | <tbody> | ||
| + | <tr> | ||
| + | <td rowspan="3"><img src="/images/plus48.png" alt="" width="48" height="48" /></td> | ||
| + | <td><a href="/index.php?title=MedITEX_IVF_Settings#Cryo_storage">Click here</a> to read more about the <strong>settings </strong>of the <strong>Cryo storage</strong>.</td> | ||
| + | </tr> | ||
| + | <tr> | ||
| + | <td><a href="/index.php?title=Cryo_storage">Click here</a> to read more about <strong>Cryo storage</strong>.</td> | ||
| + | </tr> | ||
| + | <tr> | ||
| + | <td><a href="/index.php?title=Cryo_contracts_and_accounting">Click here</a> to read more about <strong>Cryo contracts and accounting</strong>.</td> | ||
| + | </tr> | ||
| + | <tr> | ||
| + | <td><a href="/index.php?title=MedITEX_IVF_how_to#Cryo_contracts_and_invoicing"><img src="/images/howto48.png" alt="" width="48" height="48" /></a></td> | ||
| + | <td><a href="/index.php?title=MedITEX_IVF_how_to#Cryo_contracts_and_invoicing">Click here</a> to read our <strong>How to </strong>page.</td> | ||
| + | </tr> | ||
| + | </tbody> | ||
| + | </table> | ||
<table style="float: right;" border="0"> | <table style="float: right;" border="0"> | ||
<tbody> | <tbody> | ||
| Line 356: | Line 426: | ||
<p> </p> | <p> </p> | ||
<h4>Donation / surrogate motherhood</h4> | <h4>Donation / surrogate motherhood</h4> | ||
| − | <p>To edit the Settings of Donation / surrogate motherhood click on the menu item <strong>System -> Configuration -> Settings -> System -> Functions -> Donation / surrogate motherhood</strong> | + | <p>To edit the <strong>Settings </strong>of <strong>Donation / surrogate motherhood</strong> click on the menu item <strong>System -> Configuration</strong><strong> / administration</strong><strong> -> Settings -> System -> Functions -> Donation / surrogate motherhood.</strong></p> |
| − | <table border="0"> | + | <table style="margin-left: auto; margin-right: auto;" border="0"> |
<tbody> | <tbody> | ||
<tr> | <tr> | ||
| − | <td colspan="2">[[Image:DonationSettings.png|none|740px|thumb|middle|link=http://wiki.meditex-software.com/images/DonationSettings.png| ]]</td> | + | <td colspan="2">[[Image:DonationSettings.png|none|740px|thumb|middle|link=http://wiki.meditex-software.com/images/DonationSettings.png| Tab Functions - Donation and surrogate motherhood.]]</td> |
</tr> | </tr> | ||
</tbody> | </tbody> | ||
</table> | </table> | ||
<p> </p> | <p> </p> | ||
| − | <table border="0" width="768" height=" | + | <table style="margin-left: auto; margin-right: auto;" border="0" width="768" height="311"> |
<tbody> | <tbody> | ||
<tr> | <tr> | ||
<td><img style="display: block; margin-left: auto; margin-right: auto;" src="/images/DonationDonor.png" alt="" width="458" height="181" /></td> | <td><img style="display: block; margin-left: auto; margin-right: auto;" src="/images/DonationDonor.png" alt="" width="458" height="181" /></td> | ||
<td> | <td> | ||
| − | <p><strong>Donor | + | <p><strong>Donor</strong>:</p> |
| − | < | + | <ul> |
| − | < | + | <li>If this box is checked you can only see an <strong>anonymous ID</strong> when viewing donations.</li> |
| + | </ul> | ||
| + | <ul> | ||
| + | <li>Furthermore, you can specify how long the <strong>rest period</strong> for donors and <strong>how many oocytes</strong> can be donated at one intervention.</li> | ||
| + | </ul> | ||
</td> | </td> | ||
</tr> | </tr> | ||
<tr> | <tr> | ||
| − | <td><img style="display: block; margin-left: auto; margin-right: auto;" src="/images/ | + | <td><img style="display: block; margin-left: auto; margin-right: auto;" src="/images/DonationCreateButton.png" alt="" width="241" height="30" /> |
| + | <p> </p> | ||
| + | <img style="display: block; margin-left: auto; margin-right: auto;" src="/images/DonationSQLButton.png" alt="" width="156" height="30" /></td> | ||
<td> | <td> | ||
| − | <p><strong>Contact letter | + | <p><strong>Contact letter</strong>:</p> |
| − | < | + | <ul> |
| + | <li><strong>Create / customize template</strong>: create or edit the template for your contact letter.</li> | ||
| + | </ul> | ||
| + | <ul> | ||
| + | <li><strong>Edit SQL</strong>: if you have permission, you can press this button to edit the SQL.</li> | ||
| + | </ul> | ||
</td> | </td> | ||
</tr> | </tr> | ||
| + | </tbody> | ||
| + | </table> | ||
| + | <p> </p> | ||
| + | <table border="0"> | ||
| + | <tbody> | ||
<tr> | <tr> | ||
| − | <td><img style="display: block; margin-left: auto; margin-right: auto;" src="/images/ | + | <td><img style="display: block; margin-left: auto; margin-right: auto;" src="/images/DonationBlood.png" alt="" width="458" height="180" /></td> |
<td> | <td> | ||
| − | <p><strong> | + | <p><strong>Blood groups ranking for donor reservations</strong>: activates the <strong>blood group ranking</strong> for donor reservations. If you link a donor, you can see how good the compatibility of the blood groups is.</p> |
| − | < | + | |
<p> </p> | <p> </p> | ||
| + | <p><strong>Define blood group compatibility.</strong></p> | ||
| + | <p style="text-align: justify;">With this button, you can <strong>choose the compatibilities of blood groups</strong>. The following window will be opened:</p> | ||
</td> | </td> | ||
</tr> | </tr> | ||
| + | </tbody> | ||
| + | </table> | ||
| + | <table border="0" width="790" height="705"> | ||
| + | <tbody> | ||
<tr> | <tr> | ||
| − | <td><img style="display: block; margin-left: auto; margin-right: auto;" src="/images/ | + | <td colspan="2"><img style="display: block; margin-left: auto; margin-right: auto;" src="/images/BloodGroups.png" alt="" width="695" height="514" /> |
| − | < | + | <p> </p> |
| − | <p><strong> | + | <p><strong>Weight of compatibility</strong>: choose the <strong>weight of the compatibility</strong> with colours. The description of the colours is explained at the top of this window. Click on the fields in the table and choose the appropriate colour.</p> |
| − | < | + | <strong> </strong></td> |
| − | </td> | + | </tr> |
| + | <tr> | ||
| + | <td><img style="display: block; margin-left: auto; margin-right: auto;" src="/images/Initialize1.png" alt="" /></td> | ||
| + | <td><strong>Initialise</strong>: with this button you can <strong>initialise </strong>the<strong> table settings</strong>. <strong>Without settings</strong> makes the whole table empty. <strong>With settings</strong> makes the main diagonal green. <strong>Set all combinations with</strong> will fill the whole table with your chosen colour and <strong>Standard </strong>will fill the table with <strong>good compatibility</strong>.</td> | ||
| + | </tr> | ||
| + | <tr> | ||
| + | <td><img style="display: block; margin-left: auto; margin-right: auto;" src="/images/BloodGroups2.png" alt="" width="231" height="27" /></td> | ||
| + | <td><strong>Mirror modifications automatically</strong> mirrors modifications to automatically <strong>reflect the set points</strong> on the diagonal of the table.</td> | ||
</tr> | </tr> | ||
</tbody> | </tbody> | ||
</table> | </table> | ||
| − | + | <table border="0"> | |
| − | <table border="0 | + | |
<tbody> | <tbody> | ||
<tr> | <tr> | ||
| − | <td | + | <td><img style="display: block; margin-left: auto; margin-right: auto;" src="/images/plus48.png" alt="" width="48" height="48" /></td> |
| + | <td><a href="/index.php?title=Search_for_suitable_patient#Search_area">Click here</a> to go directly to the search for donor page, where you can use this feature.</td> | ||
</tr> | </tr> | ||
| + | </tbody> | ||
| + | </table> | ||
| + | <table style="float: right;" border="0"> | ||
| + | <tbody> | ||
<tr> | <tr> | ||
| − | <td>< | + | <td><a href="#top">Back to top</a><br /></td> |
| − | + | ||
| − | + | ||
| − | + | ||
| − | </td> | + | |
</tr> | </tr> | ||
| + | </tbody> | ||
| + | </table> | ||
| + | <p> </p> | ||
| + | <p> </p> | ||
| + | <h4>Witnessing</h4> | ||
| + | <p>To edit the <strong>Settings </strong>of <strong>Witnessing</strong> click on the menu item <strong>System -> Configuration</strong><strong> / administration</strong><strong> -> Settings -> System -> Functions -> Witnessing.</strong></p> | ||
| + | <table style="margin-left: auto; margin-right: auto;" border="0"> | ||
| + | <tbody> | ||
<tr> | <tr> | ||
| − | <td | + | <td style="text-align: center;">[[Image:witness1.jpg|none|740px|thumb|middle|link=http://wiki.meditex-software.com/images/witness1.jpg|]]</td> |
| − | + | ||
| − | + | ||
| − | + | ||
| − | </td> | + | |
</tr> | </tr> | ||
</tbody> | </tbody> | ||
</table> | </table> | ||
| + | <p style="text-align: left;">1. To activate <strong>Witnessing</strong>, select <strong>Witnessing active</strong>.</p> | ||
| + | <p style="text-align: left;"> </p> | ||
| + | <p style="text-align: left;">2. Three identification methods are available to choose from:</p> | ||
| + | <p>- Login/Password</p> | ||
| + | <p>- Fingerprint</p> | ||
| + | <p>- Barcode</p> | ||
<p> </p> | <p> </p> | ||
| + | <p style="text-align: left;">3. MedITEX actions with Witnessing possibility:</p> | ||
| + | <p style="text-align: left;">- Create/Update of semen analysis</p> | ||
| + | <p style="text-align: left;">- New cryopreservation of a sperm</p> | ||
| + | <p style="text-align: left;">- Removal of a straw</p> | ||
| + | <p style="text-align: left;">- Removal of an oocyte/embryo</p> | ||
| + | <p style="text-align: left;">- New cryopreservation of an oocyte/embryo</p> | ||
| + | <p style="text-align: left;"> </p> | ||
| + | <p style="text-align: left;">4. Multiple Witnessing actions can be chosen:</p> | ||
| + | <p style="text-align: left;">- Active: Activate <strong>Witnessing</strong> for a specific MedITEX action.</p> | ||
| + | <p style="text-align: left;">- Create document: Save the witnessing report as a <strong>Word</strong> document.</p> | ||
| + | <p style="text-align: left;">- Save as PDF: Save the witnessing report as a <strong>PDF</strong> file.</p> | ||
| + | <p style="text-align: left;">- Open document after create.</p> | ||
| + | <p style="text-align: left;">- Template: Open the report template, if a template was created.</p> | ||
| + | <p style="text-align: left;"> </p> | ||
<table border="0"> | <table border="0"> | ||
<tbody> | <tbody> | ||
<tr> | <tr> | ||
| − | <td | + | <td><a href="/index.php?title=Witnessing"><img src="/images/plus48.png" alt="" width="48" height="48" /></a></td> |
| + | <td style="text-align: center;"><a href="/index.php?title=Witnessing">Click here</a> for more information about the witnessing process.<br /><br /></td> | ||
</tr> | </tr> | ||
| + | </tbody> | ||
| + | </table> | ||
| + | <p style="text-align: left;"> </p> | ||
| + | <p style="text-align: left;"> </p> | ||
| + | <table style="float: right;" border="0"> | ||
| + | <tbody> | ||
<tr> | <tr> | ||
| − | <td | + | <td style="text-align: right;"><a href="#top">Back to top</a><br /></td> |
| − | < | + | </tr> |
| − | <p><strong> | + | </tbody> |
| − | < | + | </table> |
| − | </td> | + | <p> </p> |
| + | <h4>Web portal</h4> | ||
| + | <p>To edit the <strong>Settings </strong>of <strong>Web portal</strong> click on the menu item <strong>System -> Configuration</strong><strong> / administration</strong><strong> -> Settings -> System -> Functions -> Web portal.</strong></p> | ||
| + | <table style="margin-left: auto; margin-right: auto;" border="0" width="69" height="24"> | ||
| + | <tbody> | ||
| + | <tr> | ||
| + | <td>[[Image:SettingsWebPortal.png|none|740px|thumb|middle|link=http://wiki.meditex-software.com/images/SettingsWebPortal.png|]]</td> | ||
| + | </tr> | ||
| + | </tbody> | ||
| + | </table> | ||
| + | <p> </p> | ||
| + | <table style="margin-left: auto; margin-right: auto;" border="0" width="10" height="44"> | ||
| + | <tbody> | ||
| + | <tr> | ||
| + | <td><img style="display: block; margin-left: auto; margin-right: auto;" src="/images/WebPortalEmailSettings.png" alt="" /></td> | ||
</tr> | </tr> | ||
<tr> | <tr> | ||
| − | |||
<td> | <td> | ||
| − | <p>< | + | <p>This portion of the configuration corresponds to the email services provided by the portal.</p> |
| − | < | + | <ul> |
| + | <li>Host: host name of the web client.</li> | ||
| + | </ul> | ||
| + | <ul> | ||
| + | <li>Port: number of the port defined in the web client.</li> | ||
| + | </ul> | ||
| + | <ul> | ||
| + | <li>Username: login for connection to the webclient.</li> | ||
| + | </ul> | ||
| + | <ul> | ||
| + | <li>Password: password for connection to the webclient.</li> | ||
| + | </ul> | ||
| + | <ul> | ||
| + | <li>Email address: address that will be displayed when receiving an email from the portal.</li> | ||
| + | </ul> | ||
| + | <ul> | ||
| + | <li>Name of sender: name that will be displayed when receiving an email from the portal.</li> | ||
| + | </ul> | ||
</td> | </td> | ||
| + | </tr> | ||
| + | </tbody> | ||
| + | </table> | ||
| + | <p> </p> | ||
| + | <table style="margin-left: auto; margin-right: auto;" border="0" width="10" height="44"> | ||
| + | <tbody> | ||
| + | <tr> | ||
| + | <td><img style="display: block; margin-left: auto; margin-right: auto;" src="/images/WebPortalSectionSettings.png" alt="" width="483" height="441" /></td> | ||
</tr> | </tr> | ||
<tr> | <tr> | ||
| − | |||
<td> | <td> | ||
| − | <p>< | + | <p>In this section of the configuration:</p> |
| − | < | + | <ul> |
| + | <li>Web portal sections: define the visibility of sections in the web portal to the user.</li> | ||
| + | <li>Field administration: define the fields that can be edited by the patient in the specific web portal section.</li> | ||
| + | </ul> | ||
</td> | </td> | ||
</tr> | </tr> | ||
</tbody> | </tbody> | ||
</table> | </table> | ||
| + | <p> </p> | ||
<table style="float: right;" border="0"> | <table style="float: right;" border="0"> | ||
<tbody> | <tbody> | ||
| Line 458: | Line 628: | ||
</table> | </table> | ||
<p> </p> | <p> </p> | ||
| + | <p> </p> | ||
| + | <h4>Digital Signature</h4> | ||
| + | <p>To edit the <strong>System settings</strong> of the <strong>Digital Signature,</strong> click on the Digital signature tab sheet under <strong>System -> Configuration</strong><strong> / administration</strong><strong> -> Settings -> Functions.</strong></p> | ||
| + | <p><strong><br /></strong></p> | ||
| + | <p><strong>1. Certificate settings:</strong></p> | ||
| + | <p>Two options are available to set up a certificate:</p> | ||
| + | <p><strong>a. Reading a certificate from smart card:</strong></p> | ||
| + | <p>When a smart card is plugged in, MediTEX reads its certificate and offers to sign it.</p> | ||
| + | <p>The <strong>Show only certificates which are suitable for digital signing </strong>option filters unsuitable certificates. E.g.: a server authentication certificate will not be offered. It is recommended to check this option.</p> | ||
| + | <p><strong>b. Creating a certificate within personal settings:</strong></p> | ||
| + | <p>In order to use this option, the settings for <strong>Clinic certificate</strong> must be filled with the paths of the <strong>clinic certificate</strong> and the <strong>certificate key </strong>files (both should be saved on the server). You can see how long the certificate is valid.</p> | ||
| + | <p>The clinic certificate is needed as a root certificate for every user certificate: Every user must create his own certificate with a password under <strong>Personal settings</strong>. The user’s certificate needs to have a root certificate. This is needed to authenticate the user as a staff of the clinic. The user certificate is valid as long as the clinic certificate is.</p> | ||
| + | <p><strong><br /></strong></p> | ||
| + | <table style="margin-left: auto; margin-right: auto;" border="0"> | ||
| + | <tbody> | ||
| + | <tr> | ||
| + | <td><img src="/images/a.jpg" alt="" width="642" height="274" /></td> | ||
| + | </tr> | ||
| + | </tbody> | ||
| + | </table> | ||
| + | <p style="text-align: center;"> </p> | ||
| + | <p style="text-align: left;"><strong>2. Signing process settings:</strong></p> | ||
| + | <p><strong> </strong><strong>a. </strong><strong>Signature default type:</strong></p> | ||
| + | <p>There are two different types of digital signatures:</p> | ||
| + | <p>- PDF (PAdES): it is the usual digital signature. The signed file will be saved as PDF.</p> | ||
| + | <p>- P7M (CAdES): it is another kind of digital signature. The signed file will be saved as P7M. An additional software is needed to open P7M files.</p> | ||
| + | <p>This setting will be displayed as default during the signing process, it can be changed at the moment of signing.</p> | ||
| + | <p><strong>b. </strong><strong>Unsigned files:</strong></p> | ||
| + | <p>This setting allows the user to choose whether the unsigned files are deleted, or are kept in the patient file storage (only if they are doc(x) files).</p> | ||
| + | <p style="text-align: left;"><strong><br /></strong></p> | ||
| + | <table style="margin-left: auto; margin-right: auto;" border="0"> | ||
| + | <tbody> | ||
| + | <tr> | ||
| + | <td style="text-align: center;"><img src="/images/signing_process.jpg" alt="" width="627" height="173" /></td> | ||
| + | </tr> | ||
| + | </tbody> | ||
| + | </table> | ||
| + | <p style="text-align: center;"><strong><br /></strong></p> | ||
| + | <p style="text-align: center;"> </p> | ||
| + | <table style="margin-left: auto; margin-right: auto;" border="0"> | ||
| + | <tbody> | ||
| + | <tr> | ||
| + | <td style="text-align: center;"><a href="/index.php?title=Digital_Signature"><img src="/images/plus48.png" alt="" width="48" height="48" /></a></td> | ||
| + | <td style="text-align: center;"><a href="/index.php?title=Digital_Signature">Click here</a> for more information about the signing process.<br /></td> | ||
| + | </tr> | ||
| + | </tbody> | ||
| + | </table> | ||
| + | <p style="text-align: center;"> </p> | ||
| + | <table style="float: right;" border="0"> | ||
| + | <tbody> | ||
| + | <tr> | ||
| + | <td style="text-align: right;"><a href="#top">Back to top</a><br /></td> | ||
| + | </tr> | ||
| + | </tbody> | ||
| + | </table> | ||
<p> </p> | <p> </p> | ||
<h3>Presentation options</h3> | <h3>Presentation options</h3> | ||
<h4>General</h4> | <h4>General</h4> | ||
| − | <p>To edit the Settings of | + | <p>To edit the <strong>Settings </strong>of the overall <strong>Presentation options</strong> click on the menu item <strong>System -> Configuration</strong><strong> / administration</strong><strong> -> Settings -> System -> Presentation options -> General</strong>.</p> |
| − | <table border="0" width="69" height="24"> | + | <table style="margin-left: auto; margin-right: auto;" border="0" width="69" height="24"> |
<tbody> | <tbody> | ||
<tr> | <tr> | ||
| − | <td>[[Image:PresGeneral.png|none|740px|thumb|middle|link=http://wiki.meditex-software.com/images/PresGeneral.png| ]]</td> | + | <td>[[Image:PresGeneral.png|none|740px|thumb|middle|link=http://wiki.meditex-software.com/images/PresGeneral.png| General presentation options.]]</td> |
</tr> | </tr> | ||
</tbody> | </tbody> | ||
</table> | </table> | ||
<ul> | <ul> | ||
| − | <li><strong>Window settings | + | <li><strong>Window settings</strong>: here you can set whether the view of the main window (height, width, position) will be stored and should be resorted at the next login. This option saves the presentation of the program individually for each user. So different users might have slightly different interfaces. </li> |
</ul> | </ul> | ||
<ul> | <ul> | ||
| − | <li><strong>Cycle | + | <li><a href="/index.php?title=Cycle_Overview"><strong>Cycle</strong></a>: settings for changing the interface of the calendar.</li> |
</ul> | </ul> | ||
<ul> | <ul> | ||
<li> | <li> | ||
| − | <p style="text-align: justify;"><strong>Culture | + | <p style="text-align: justify;"><a href="/index.php?title=Cycle_Culture"><strong>Culture</strong></a>: under culture, you can choose the number of days at the graphical representation.</p> |
| − | < | + | <ul> |
| − | < | + | <li>You can set the sorting of oocytes and embryos of the culture window. You can choose between sorting according to quality (the best first) or according to the relative oocyte ID.</li> |
| + | </ul> | ||
| + | <ul> | ||
| + | <li>Displays the original treatment of the thawed PNs and embryos in the graph view.</li> | ||
| + | </ul> | ||
</li> | </li> | ||
</ul> | </ul> | ||
| Line 489: | Line 718: | ||
</tbody> | </tbody> | ||
</table> | </table> | ||
| + | <p> </p> | ||
<p> </p> | <p> </p> | ||
<p> </p> | <p> </p> | ||
<h4>Statistics</h4> | <h4>Statistics</h4> | ||
| − | <p>To edit the Settings of Statistics click on the menu item <strong>System -> Configuration -> Settings -> System -> Presentation options -> Statistics | + | <p>To edit the <strong>Settings </strong>of <strong>Statistics </strong>click on the menu item <strong>System -> Configuration</strong><strong> / administration</strong><strong> -> Settings -> System -> Presentation options -> Statistics</strong>.</p> |
| − | <table border="0" width="69" height="24"> | + | <table style="margin-left: auto; margin-right: auto;" border="0" width="69" height="24"> |
<tbody> | <tbody> | ||
<tr> | <tr> | ||
| − | <td>[[Image:PreStatistics.png|none|740px|thumb|middle|link=http://wiki.meditex-software.com/images/PreStatistics.png| ]]</td> | + | <td>[[Image:PreStatistics.png|none|740px|thumb|middle|link=http://wiki.meditex-software.com/images/PreStatistics.png| Statistical presentation options.]]</td> |
</tr> | </tr> | ||
<tr> | <tr> | ||
<td> | <td> | ||
| − | <p>In the section<strong> | + | <p>In the section<strong> Statistics</strong>, you can determine how your charts will be displayed in the reports. With this setting, your reports will always be consistent.</p> |
</td> | </td> | ||
</tr> | </tr> | ||
| Line 512: | Line 742: | ||
</tbody> | </tbody> | ||
</table> | </table> | ||
| + | <p> </p> | ||
<p> </p> | <p> </p> | ||
<p> </p> | <p> </p> | ||
<h4>Colours</h4> | <h4>Colours</h4> | ||
| − | <p>To edit the Settings of Colours click on the menu item <strong>System -> Configuration -> Settings -> System -> Presentation options -> Colours | + | <p>To edit the <strong>Settings </strong>of <strong>Colours </strong>click on the menu item <strong>System -> Configuration</strong><strong> / administration</strong><strong> -> Settings -> System -> Presentation options -> Colours</strong>.</p> |
| − | <p>You can use | + | <p>You can use colours in the different sections of MedITEX IVF, for example in the section <a href="/index.php?title=Cryo_storage"><strong>Cryo storage</strong></a>. </p> |
| − | <table border="0"> | + | <table style="margin-left: auto; margin-right: auto;" border="0"> |
<tbody> | <tbody> | ||
<tr> | <tr> | ||
| − | <td>[[Image:Colour.png|none|740px|thumb|middle|link=http://wiki.meditex-software.com/images/Colour.png| ]] <br /> | + | <td colspan="2">[[Image:Colour.png|none|740px|thumb|middle|link=http://wiki.meditex-software.com/images/Colour.png| Coloured presentation options.]] <br /></td> |
| − | + | ||
| − | + | ||
| − | + | ||
| − | + | ||
| − | + | ||
| − | + | ||
| − | + | ||
| − | + | ||
| − | + | ||
| − | + | ||
| − | + | ||
| − | + | ||
| − | + | ||
| − | + | ||
| − | + | ||
| − | + | ||
| − | + | ||
| − | </td> | + | |
</tr> | </tr> | ||
<tr> | <tr> | ||
<td><img style="display: block; margin-left: auto; margin-right: auto;" src="/images/ColourUse.png" alt="" width="180" height="27" /></td> | <td><img style="display: block; margin-left: auto; margin-right: auto;" src="/images/ColourUse.png" alt="" width="180" height="27" /></td> | ||
| − | <td | + | <td>Check this option if you wish to use custom colours only.</td> |
| − | + | ||
| − | + | ||
| − | + | ||
| − | + | ||
</tr> | </tr> | ||
</tbody> | </tbody> | ||
</table> | </table> | ||
| − | <p> | + | <p><strong>Choose a colour</strong>:</p> |
| + | <ul> | ||
| + | <li>You can choose a colour by scrolling through the entire colour palette. If you wish to use standardized colour values, you can enter RGB values numerically. The currently selected colour will be shown in a small preview window.</li> | ||
| + | </ul> | ||
| + | <ul> | ||
| + | <li>Click<strong> OK</strong> and the colour will be displayed in the list on the left side. The colour code of your operating system will be used for the description of the colour.</li> | ||
| + | </ul> | ||
| + | <ul> | ||
| + | <li>To <strong>change the description</strong>, click on the text next to the colour.</li> | ||
| + | </ul> | ||
<table style="float: right;" border="0"> | <table style="float: right;" border="0"> | ||
<tbody> | <tbody> | ||
| Line 562: | Line 780: | ||
<p> </p> | <p> </p> | ||
<h3>Interfaces</h3> | <h3>Interfaces</h3> | ||
| − | <p>< | + | <p><strong>Only change the interface settings if you are sure what these changes will do in the program. Otherwise there may be functionality errors or complete failure of certain functions.</strong><span style="color: #ff0000;"> </span></p> |
<h4>Internal</h4> | <h4>Internal</h4> | ||
| − | <p>To edit the Settings of Internal interfaces click on the menu item <strong>System -> Configuration -> Settings -> System -> Interfaces -> Internal.</strong></p> | + | <p>To edit the <strong>Settings </strong>of <strong>Internal </strong>interfaces click on the menu item <strong>System -> Configuration</strong><strong> / administration</strong><strong> -> Settings -> System -> Interfaces -> Internal.</strong></p> |
| − | <table border="0"> | + | <table style="margin-left: auto; margin-right: auto;" border="0"> |
<tbody> | <tbody> | ||
<tr> | <tr> | ||
| − | <td>[[Image:Internal.png|none|740px|thumb|middle|link=http://wiki.meditex-software.com/images/Internal.png| ]]</td> | + | <td>[[Image:Internal.png|none|740px|thumb|middle|link=http://wiki.meditex-software.com/images/Internal.png| Internal interface settings.]]</td> |
</tr> | </tr> | ||
<tr> | <tr> | ||
| − | <td>In order to change file paths, click the directory symbol on the right side of the respective row. A dialog window will open | + | <td>In order to change file paths, click the directory symbol on the right side of the respective row. A dialog window will open and you can change the file path accordingly.</td> |
</tr> | </tr> | ||
</tbody> | </tbody> | ||
</table> | </table> | ||
| − | |||
| − | |||
| − | |||
| − | |||
| − | |||
| − | |||
| − | |||
| − | |||
| − | |||
<h4>External</h4> | <h4>External</h4> | ||
| − | <p>To edit the Settings of | + | <p>To edit the <strong>Settings </strong>of <strong>External </strong>interfaces click on the menu item <strong>System -> Configuration</strong><strong> / administration</strong><strong> -> Settings -> System -> Interfaces -> External</strong>.</p> |
| − | <table border="0"> | + | <table style="margin-left: auto; margin-right: auto;" border="0"> |
<tbody> | <tbody> | ||
<tr> | <tr> | ||
| − | <td>[[Image:External.png|none|740px|thumb|middle|link=http://wiki.meditex-software.com/images/External.png| ]] <br /></td> | + | <td>[[Image:External.png|none|740px|thumb|middle|link=http://wiki.meditex-software.com/images/External.png| External interface settings.]] <br /></td> |
</tr> | </tr> | ||
<tr> | <tr> | ||
<td> | <td> | ||
| − | <p style="text-align: justify;"> | + | <p style="text-align: justify;">On this page you should include the path for importing or exporting <strong>Data </strong>from different programs.</p> |
| − | <p style="text-align: justify;">In order to change file paths, click the directory | + | <p style="text-align: justify;">In order to change file paths, click the directory button on the right side of the respective row. A dialog window will open and you can change the file path accordingly.</p> |
</td> | </td> | ||
</tr> | </tr> | ||
| Line 606: | Line 815: | ||
</tbody> | </tbody> | ||
</table> | </table> | ||
| + | <p> </p> | ||
| + | <h4>SMS Account</h4> | ||
| + | <p> </p> | ||
| + | <table border="0"> | ||
| + | <tbody> | ||
| + | <tr> | ||
| + | <td>[[Image:Sms account.PNG|none|740px|thumb|middle|link=http://wiki.meditex-software.com/images/Sms account.PNG| SMS Account settings.]] </td> | ||
| + | </tr> | ||
| + | </tbody> | ||
| + | </table> | ||
| + | <p> </p> | ||
<p> </p> | <p> </p> | ||
<p> </p> | <p> </p> | ||
<p> </p> | <p> </p> | ||
<h3>System tables</h3> | <h3>System tables</h3> | ||
| − | <p>To edit the Settings of System tables click on the menu item <strong>System -> Configuration -> Settings -> System -> System tables | + | <p>To edit the <strong>Settings </strong>of <strong>System tables</strong> click on the menu item <strong>System -> Configuration</strong><strong> / administration</strong><strong> -> Settings -> System -> System tables</strong>.</p> |
| − | <p>In the section <strong> | + | <p>In the section <strong>System tables</strong> you can modify different values within the program accordingly. You can, for example, define additional measures for a cycle. These can then be shown as a selection field in the cycle.</p> |
| − | <table border="0"> | + | <table style="margin-left: auto; margin-right: auto;" border="0"> |
<tbody> | <tbody> | ||
<tr> | <tr> | ||
| − | <td>[[Image:SystemTables.png|none|740px|thumb|middle|link=http://wiki.meditex-software.com/images/SystemTables.png| ]] <br /></td> | + | <td>[[Image:SystemTables.png|none|740px|thumb|middle|link=http://wiki.meditex-software.com/images/SystemTables.png| Overview system tables.]] <br /></td> |
</tr> | </tr> | ||
</tbody> | </tbody> | ||
</table> | </table> | ||
<p> </p> | <p> </p> | ||
| − | <table border="0"> | + | <table style="margin-left: auto; margin-right: auto;" border="0"> |
<tbody> | <tbody> | ||
<tr> | <tr> | ||
| − | <td><img style="display: block; margin-left: auto; margin-right: auto;" src="/images/ | + | <td><img style="display: block; margin-left: auto; margin-right: auto;" src="/images/Plus.png" alt="" width="23" height="23" /></td> |
<td> | <td> | ||
| − | <p>Press <strong> | + | <p>Press <strong>New entry</strong> and enter the additional measure in the <strong>new line</strong>. Subsequently, the new additional measure will be <strong>displayed</strong>. The program will <strong>order the list alphabetically</strong>.</p> |
</td> | </td> | ||
</tr> | </tr> | ||
<tr> | <tr> | ||
| − | <td><img style="display: block; margin-left: auto; margin-right: auto;" src="/images/ | + | <td><img style="display: block; margin-left: auto; margin-right: auto;" src="/images/EditSemen.png" alt="" width="28" height="26" /> <img style="display: block; margin-left: auto; margin-right: auto;" src="/images/DeleteX.png" alt="" width="28" height="24" /></td> |
<td> | <td> | ||
| − | <p> | + | <p>You can <strong>edit or delete</strong> the contents of the tables at any time. However, the<strong> predefined entries</strong> cannot be <strong>edited </strong>or <strong>deleted</strong>.</p> |
| − | < | + | |
| − | < | + | |
</td> | </td> | ||
</tr> | </tr> | ||
| + | </tbody> | ||
| + | </table> | ||
| + | <p> </p> | ||
| + | <p><strong>There is one exception:</strong></p> | ||
| + | <table border="0"> | ||
| + | <tbody> | ||
<tr> | <tr> | ||
| − | <td> | + | <td>[[Image:tablesmedical.png|none|740px|thumb|middle|link=http://wiki.meditex-software.com/images/tablesmedical.png| Exception: <strong>Medical history: entry type</strong> with the possibility of a colored text.]]</td> |
| + | </tr> | ||
| + | </tbody> | ||
| + | </table> | ||
| + | <p>At the table <strong>Medical history: entry type</strong> you have <strong>more functionalities</strong>, as in the others. Here you can add additionally a<strong> text colour</strong> and if the Item should be <strong>shown in the main window</strong>.</p> | ||
| + | <table border="0"> | ||
| + | <tbody> | ||
| + | <tr> | ||
| + | <td><img src="/images/tablesmedical1.png" alt="" width="532" height="130" /></td> | ||
| + | <td>Here we are in the <strong>main window</strong>. You can see the <strong>different types</strong> of informations in their <strong>colours</strong>.</td> | ||
| + | </tr> | ||
| + | </tbody> | ||
| + | </table> | ||
| + | <p>You can also go to the <strong>system tables from the medical history page</strong>:</p> | ||
| + | <table border="0"> | ||
| + | <tbody> | ||
| + | <tr> | ||
| + | <td><img src="/images/tablesmedical2.png" alt="" width="227" height="174" /></td> | ||
<td> | <td> | ||
| − | <p> | + | <p>To edit the <strong>entries </strong>of <strong>medical history</strong></p> |
| + | <ul> | ||
| + | <li>click on the menu item <strong>System -> Configuration</strong><strong> / administration</strong><strong> -> Settings -> System -> System tables</strong> or</li> | ||
| + | </ul> | ||
| + | <ul> | ||
| + | <li>click on the button <strong>Medical history -> New entry -> Administrate entries</strong>.</li> | ||
| + | </ul> | ||
| + | <p> </p> | ||
| + | <p>In this list you can see <strong>all existing possibilities</strong> for entries at the <strong>medical history area</strong>.</p> | ||
</td> | </td> | ||
</tr> | </tr> | ||
| Line 654: | Line 903: | ||
<p> </p> | <p> </p> | ||
<h2>Staff</h2> | <h2>Staff</h2> | ||
| − | <p>To edit the Settings of Staff click on the menu item <strong>System -> Configuration -> Settings -> Staff | + | <p>To edit the <strong>Settings </strong>of <strong>Staff </strong>click on the menu item <strong>System -> Configuration</strong><strong> / administration</strong><strong> -> Settings -> Staff</strong>.</p> |
| − | <table border="0"> | + | <table style="margin-left: auto; margin-right: auto;" border="0"> |
<tbody> | <tbody> | ||
<tr> | <tr> | ||
| − | <td>[[Image:StaffS.png|none|740px|thumb|left|link=http://wiki.meditex-software.com/images/StaffS.png| ]]</td> | + | <td>[[Image:StaffS.png|none|740px|thumb|left|link=http://wiki.meditex-software.com/images/StaffS.png| Link to MedITEX Administration for staff settings.]]</td> |
</tr> | </tr> | ||
</tbody> | </tbody> | ||
| Line 669: | Line 918: | ||
</tbody> | </tbody> | ||
</table> | </table> | ||
| + | <p> </p> | ||
<p> </p> | <p> </p> | ||
<p> </p> | <p> </p> | ||
<h2>Drugs</h2> | <h2>Drugs</h2> | ||
| − | <p>To edit the Settings of Drugs click on the menu item <strong>System -> Configuration -> Settings -> Drugs | + | <p>To edit the <strong>Settings </strong>of <strong>Drugs </strong>click on the menu item <strong>System -> Configuration</strong><strong> / administration</strong><strong> -> Settings -> Drugs</strong>.</p> |
| − | <p>The section <strong> | + | <p>The section <strong>Drugs</strong> contains a fixed list of the most important products used in the field of reproductive medicine.</p> |
| − | <p>Besides | + | <p>Besides, you can also define additional long-term and pill products that are used in your medical centre.</p> |
| − | <table border="0"> | + | <table style="margin-left: auto; margin-right: auto;" border="0"> |
<tbody> | <tbody> | ||
<tr> | <tr> | ||
| − | <td>[[Image:Drugs.png|none|740px|thumb|left|link=http://wiki.meditex-software.com/images/Drugs.png| ]]</td> | + | <td>[[Image:Drugs.png|none|740px|thumb|left|link=http://wiki.meditex-software.com/images/Drugs.png| List of drugs.]]</td> |
</tr> | </tr> | ||
</tbody> | </tbody> | ||
</table> | </table> | ||
| + | <p> </p> | ||
<table border="0"> | <table border="0"> | ||
<tbody> | <tbody> | ||
| Line 687: | Line 938: | ||
<td><img style="display: block; margin-left: auto; margin-right: auto;" src="/images/NewDrug.png" alt="" width="154" height="26" /></td> | <td><img style="display: block; margin-left: auto; margin-right: auto;" src="/images/NewDrug.png" alt="" width="154" height="26" /></td> | ||
<td> | <td> | ||
| − | <p><strong>New drug | + | <p><strong>New drug</strong>: add a new drug.</p> |
| − | + | ||
</td> | </td> | ||
</tr> | </tr> | ||
| Line 694: | Line 944: | ||
<td><img style="display: block; margin-left: auto; margin-right: auto;" src="/images/DeleteDrug.png" alt="" width="152" height="25" /></td> | <td><img style="display: block; margin-left: auto; margin-right: auto;" src="/images/DeleteDrug.png" alt="" width="152" height="25" /></td> | ||
<td> | <td> | ||
| − | <p><strong>Delete drug | + | <p><strong>Delete drug</strong>: only drugs you have added yourself can be deleted by pressing this button.</p> |
</td> | </td> | ||
</tr> | </tr> | ||
| Line 700: | Line 950: | ||
</table> | </table> | ||
<ul> | <ul> | ||
| − | <li>The list of drugs contains products in the groups Gonadotropin, GnRH | + | <li>The list of drugs contains products in the groups Gonadotropin, GnRH Analogon, hCG, Progesterone, Gestagen, Estrogen, Antiestrogen and Pill according to the current Red List<sup>®</sup>.</li> |
</ul> | </ul> | ||
<ul> | <ul> | ||
| Line 706: | Line 956: | ||
</ul> | </ul> | ||
<ul> | <ul> | ||
| − | <li>If you do not wish to use this drug, | + | <li>If you do not wish to use this drug, uncheck the box <strong>Active</strong> or double-click on the drug to open the drug editor. There you can uncheck the box <strong>Active</strong>. Now, the drug will not be available for selection in any window of the program.</li> |
</ul> | </ul> | ||
<ul> | <ul> | ||
| − | <li>Press the column header to sort the entries according to their names, to reverse the sorting or to filter the list.</li> | + | <li>Press the column header to sort the entries according to their names, to reverse the sorting or to filter the list. <a href="/index.php?title=Welcome_to_MedITEX_IVF#Managing_Lists">Read here</a> how to manage lists.</li> |
</ul> | </ul> | ||
| − | <table border="0"> | + | <table style="margin-left: auto; margin-right: auto;" border="0"> |
<tbody> | <tbody> | ||
<tr> | <tr> | ||
| − | <td>[[Image:Drugs11.png|none|740px|thumb|left|link=http://wiki.meditex-software.com/images/Drugs11.png| ]]</td> | + | <td>[[Image:Drugs11.png|none|740px|thumb|left|link=http://wiki.meditex-software.com/images/Drugs11.png| Active drugs.]]</td> |
| + | </tr> | ||
| + | </tbody> | ||
| + | </table> | ||
| + | <p> </p> | ||
| + | <table style="margin-left: auto; margin-right: auto;" border="0"> | ||
| + | <tbody> | ||
| + | <tr> | ||
| + | <td><a href="/index.php?title=How_to_add_new_drugs%3F"><img src="/images/howto48.png" alt="" width="48" height="48" /></a></td> | ||
| + | <td><a href="/index.php?title=How_to_add_new_drugs%3F">Click here</a> to read more about adding new drugs.</td> | ||
</tr> | </tr> | ||
</tbody> | </tbody> | ||
| Line 725: | Line 984: | ||
</tbody> | </tbody> | ||
</table> | </table> | ||
| + | <p> </p> | ||
<p> </p> | <p> </p> | ||
<h2>Material</h2> | <h2>Material</h2> | ||
| − | <p>To edit the Settings of Material click on the menu item <strong>System -> Configuration -> Settings -> Material | + | <p>To edit the <strong>Settings </strong>of <strong>Material </strong>click on the menu item <strong>System -> Configuration</strong><strong> / administration</strong><strong> -> Settings -> Material</strong>.</p> |
| − | <p>In the section<strong> | + | <p>In the section<strong> Material</strong> you can enter data concerning material groups, manufacturers and products. You can also create different batches and <strong>activate</strong> them for a certain period of time.</p> |
<h3>Articles / Batches</h3> | <h3>Articles / Batches</h3> | ||
| − | <p>To edit the Settings of Articles / Batches click on the menu item <strong>System -> Configuration -> Settings -> Material -> Articles / Batches | + | <p>To edit the <strong>Settings </strong>of <strong>Articles / Batches</strong> click on the menu item <strong>System -> Configuration</strong><strong> / administration</strong><strong> -> Settings -> Material -> Articles / Batches</strong>.</p> |
| − | <p> | + | <p>On this tab, you can add the needed materials to the list and make them available for the creation of <strong>QM fields</strong>.</p> |
| − | <table border="0"> | + | <table style="margin-left: auto; margin-right: auto;" border="0"> |
<tbody> | <tbody> | ||
<tr> | <tr> | ||
| − | <td>[[Image:Material.png|none|740px|thumb|left|link=http://wiki.meditex-software.com/images/Material.png| ]]</td> | + | <td>[[Image:Material.png|none|740px|thumb|left|link=http://wiki.meditex-software.com/images/Material.png| Articles / Batches.]]</td> |
</tr> | </tr> | ||
</tbody> | </tbody> | ||
</table> | </table> | ||
| − | <table border="0"> | + | <p> </p> |
| + | <table style="margin-left: auto; margin-right: auto;" border="0"> | ||
<tbody> | <tbody> | ||
<tr> | <tr> | ||
| − | <td><img style="display: block; margin-left: auto; margin-right: auto;" src="/images/Plus.png" alt=" | + | <td><img style="display: block; margin-left: auto; margin-right: auto;" src="/images/Plus.png" alt="" /></td> |
| − | <td>Press this button on the | + | <td>Press this button on the right to <strong>add a new article</strong>/<strong>batch</strong>.</td> |
</tr> | </tr> | ||
<tr> | <tr> | ||
| Line 749: | Line 1,010: | ||
<td> | <td> | ||
<p>Delete it with this button.</p> | <p>Delete it with this button.</p> | ||
| − | <p>This is only possible if articles have not been assigned to QM | + | <p>This is only possible if articles have not been assigned to <strong>QM fields</strong> or are being used. Should this be the case, deactivate the item by unchecking the box <strong>Active</strong>. This data will then be hidden without being deleted.</p> |
<p>Articles can only be deleted if they have not yet been used.</p> | <p>Articles can only be deleted if they have not yet been used.</p> | ||
</td> | </td> | ||
| Line 755: | Line 1,016: | ||
</tbody> | </tbody> | ||
</table> | </table> | ||
| − | <p> | + | <p> </p> |
| + | <table style="margin-left: auto; margin-right: auto;" border="0"> | ||
| + | <tbody> | ||
| + | <tr> | ||
| + | <td><a href="/index.php?title=How_to_add_material_articles_/_batches%3F"><img src="/images/howto48.png" alt="" width="48" height="48" /></a></td> | ||
| + | <td><a href="/index.php?title=How_to_add_material_articles_/_batches%3F">Click here</a> to read more about adding new material and articles.</td> | ||
| + | </tr> | ||
| + | </tbody> | ||
| + | </table> | ||
<h3>Manufacturer</h3> | <h3>Manufacturer</h3> | ||
| − | <p>To edit the Settings of Manufacturer click on the menu item <strong>System -> Configuration -> Settings -> Material -> Manufacturer | + | <p>To edit the <strong>Settings </strong>of <strong>Manufacturer </strong>click on the menu item <strong>System -> Configuration</strong><strong> / administration</strong><strong> -> Settings -> Material -> Manufacturer</strong>.</p> |
| − | <p>You can see a list of all existing manufactures | + | <p>You can see a list of all existing manufactures on the tab <strong>Manufacturer</strong>.</p> |
| − | <table border="0"> | + | <table style="margin-left: auto; margin-right: auto;" border="0"> |
<tbody> | <tbody> | ||
<tr> | <tr> | ||
| − | <td>[[Image:Material2.png|none|740px|thumb|left|link=http://wiki.meditex-software.com/images/Material2.png| ]]</td> | + | <td>[[Image:Material2.png|none|740px|thumb|left|link=http://wiki.meditex-software.com/images/Material2.png| Manufacturer.]]</td> |
</tr> | </tr> | ||
</tbody> | </tbody> | ||
</table> | </table> | ||
| + | <p> </p> | ||
<table border="0"> | <table border="0"> | ||
<tbody> | <tbody> | ||
<tr> | <tr> | ||
| − | <td><img style="display: block; margin-left: auto; margin-right: auto;" src="/images/Plus.png" alt=" | + | <td><img style="display: block; margin-left: auto; margin-right: auto;" src="/images/Plus.png" alt="" /></td> |
| − | <td>Press this button on the top right to add a new manufacturer.</td> | + | <td>Press this button on the top right to <strong>add a new manufacturer</strong>.</td> |
</tr> | </tr> | ||
<tr> | <tr> | ||
| Line 776: | Line 1,046: | ||
<td> | <td> | ||
<p>Delete it with this button.</p> | <p>Delete it with this button.</p> | ||
| − | <p>This is only possible if manufactures have not been assigned to QM | + | <p>This is only possible if manufactures have not been assigned to <strong>QM fields</strong> or are being used. Should this be the case, deactivate the item by unchecking the box <strong>Active</strong>. This data will then be hidden without being deleted.</p> |
<p>Manufacturers can only be deleted if they have not yet been used.</p> | <p>Manufacturers can only be deleted if they have not yet been used.</p> | ||
</td> | </td> | ||
| Line 782: | Line 1,052: | ||
</tbody> | </tbody> | ||
</table> | </table> | ||
| − | <p> | + | <p> </p> |
| + | <table style="margin-left: auto; margin-right: auto;" border="0"> | ||
| + | <tbody> | ||
| + | <tr> | ||
| + | <td><a href="/index.php?title=How_to_add_material_manufacturer%3F"><img src="/images/howto48.png" alt="" width="48" height="48" /></a></td> | ||
| + | <td><a href="/index.php?title=How_to_add_material_manufacturer%3F">Click here</a> to read more about adding new manufacturers.</td> | ||
| + | </tr> | ||
| + | </tbody> | ||
| + | </table> | ||
<h3>Groups</h3> | <h3>Groups</h3> | ||
| − | <p>To edit the Settings of Groups click on the menu item <strong>System -> Configuration -> Settings -> Material -> Groups | + | <p>To edit the <strong>Settings </strong>of <strong>Groups </strong>click on the menu item <strong>System -> Configuration</strong><strong> / administration</strong><strong> -> Settings -> Material -> Groups</strong>.</p> |
| − | <p> | + | <p>On this tab, you can create a new material group, for example probes. Here you can see a list of all existing groups.</p> |
| − | <table border="0" width=" | + | <table style="margin-left: auto; margin-right: auto;" border="0" width="644" height="38"> |
<tbody> | <tbody> | ||
<tr> | <tr> | ||
| − | <td>[[Image:Material1.png|none|740px|thumb|left|link=http://wiki.meditex-software.com/images/Material1.png| ]]</td> | + | <td>[[Image:Material1.png|none|740px|thumb|left|link=http://wiki.meditex-software.com/images/Material1.png| Groups.]]</td> |
</tr> | </tr> | ||
</tbody> | </tbody> | ||
</table> | </table> | ||
| + | <p> </p> | ||
<table border="0"> | <table border="0"> | ||
<tbody> | <tbody> | ||
<tr> | <tr> | ||
| − | <td><img style="display: block; margin-left: auto; margin-right: auto;" src="/images/Plus.png" alt=" | + | <td><img style="display: block; margin-left: auto; margin-right: auto;" src="/images/Plus.png" alt="" /></td> |
| − | <td>Press this button on the top right to create a new group.</td> | + | <td>Press this button on the top right to <strong>create a new group</strong>.</td> |
</tr> | </tr> | ||
<tr> | <tr> | ||
| Line 803: | Line 1,082: | ||
<td> | <td> | ||
<p>Delete a group with this button.</p> | <p>Delete a group with this button.</p> | ||
| − | <p>This is only possible if groups have not been assigned to QM fields | + | <p>This is only possible if groups have not been assigned to<strong> QM fields</strong> or are being used. Should this be the case, deactivate the item by unchecking the box <strong>Active</strong>. This data will then be hidden without being deleted.</p> |
<p>Groups can only be deleted if they have not yet been used.</p> | <p>Groups can only be deleted if they have not yet been used.</p> | ||
</td> | </td> | ||
| Line 809: | Line 1,088: | ||
</tbody> | </tbody> | ||
</table> | </table> | ||
| − | <p> | + | <p> </p> |
| + | <table style="margin-left: auto; margin-right: auto;" border="0"> | ||
| + | <tbody> | ||
| + | <tr> | ||
| + | <td><a href="/index.php?title=How_to_add_material_groups%3F"><img src="/images/howto48.png" alt="" width="48" height="48" /></a></td> | ||
| + | <td><a href="/index.php?title=How_to_add_material_groups%3F">Click here</a> to read more about adding new manufacturers.</td> | ||
| + | </tr> | ||
| + | </tbody> | ||
| + | </table> | ||
<table style="float: right;" border="0"> | <table style="float: right;" border="0"> | ||
<tbody> | <tbody> | ||
| Line 817: | Line 1,104: | ||
</tbody> | </tbody> | ||
</table> | </table> | ||
| + | <p> </p> | ||
<p> </p> | <p> </p> | ||
<p> </p> | <p> </p> | ||
<h2>Lab</h2> | <h2>Lab</h2> | ||
| − | <p>To edit the Settings of Lab click on the menu item <strong>System -> Configuration -> Settings -> Lab | + | <p>To edit the <strong>Settings </strong>of <strong>Lab </strong>click on the menu item <strong>System -> Configuration</strong><strong> / administration</strong><strong> -> Settings -> Lab</strong>.</p> |
| − | <table border="0"> | + | <table style="margin-left: auto; margin-right: auto;" border="0"> |
<tbody> | <tbody> | ||
<tr> | <tr> | ||
| − | <td>[[Image:Lab.png|none|740px|thumb|left|link=http://wiki.meditex-software.com/images/Lab.png| ]]</td> | + | <td>[[Image:Lab.png|none|740px|thumb|left|link=http://wiki.meditex-software.com/images/Lab.png| List of lab values.]]</td> |
</tr> | </tr> | ||
</tbody> | </tbody> | ||
</table> | </table> | ||
| − | + | <p><strong>Explanation of the columns</strong>:</p> | |
| − | <p><strong> | + | |
<ul> | <ul> | ||
| − | <li>Area: | + | <li><strong>Area</strong>: type of the lab value like: Hormones, Serology, Clinical chemistry, Genetics or Microbiology. </li> |
| − | <li>Group:</li> | + | <li><strong>Group</strong>: <span id="result_box" class="short_text" lang="en"><span class="hps">defines the group</span>s <span class="hps">of laboratory values as: Blood count, Coagulation, Genotype, Family history, etc.<br /></span></span></li> |
| − | <li>Param. short name: </li> | + | <li><strong>Param. short name</strong>: abbreviation of the parameter name.</li> |
| − | <li>Parameter name:</li> | + | <li><strong>Parameter name</strong>: <span id="result_box" class="short_text" lang="en"><span class="hps">full name</span> <span class="hps">of the parameter.</span></span></li> |
| − | <li>Unit:</li> | + | <li><strong>Unit</strong>: value specified unit. This can be customized in the laboratory parameter editor.</li> |
| − | <li>Reference unit:</li> | + | <li><strong>Reference unit</strong>: through the button <strong>Restore reference units</strong> all changed parameters units are adjusted to the value of the reference units.</li> |
| − | <li>Show in main window:</li> | + | <li><strong>Show in main window</strong>: if this box is checked, the laboratory value is displayed in the <strong>Lab test</strong> in the main window.</li> |
| − | <li>Show in cycle overview:</li> | + | <li><strong>Show in cycle overview</strong>: if this box is checked, the laboratory value is displayed in the <strong>Cycle </strong>overview.</li> |
| − | <li>Use for multiple entry in female lab:</li> | + | <li><strong>Use for multiple entry in female lab</strong>: when activating this field, the parameter appears in the list of female multiple entry.</li> |
| − | <li>Use for multiple entry in male lab:</li> | + | <li><strong>Use for multiple entry in male lab</strong>: when activating this field, the parameter appears in the list of male multiple entry.</li> |
| − | <li>Finding | + | <li><strong>Finding validity period</strong>: decide here on the findings validity of the selected parameters.</li> |
</ul> | </ul> | ||
| + | <table border="0"> | ||
| + | <tbody> | ||
| + | <tr> | ||
| + | <td>[[Image:Lab2.PNG|none|740px|thumb|left|link=http://wiki.meditex-software.com/images/Lab2.PNG| Lab order templates.]]<br /><br /></td> | ||
| + | </tr> | ||
| + | </tbody> | ||
| + | </table> | ||
<p> </p> | <p> </p> | ||
<p> </p> | <p> </p> | ||
| + | <table style="margin-left: auto; margin-right: auto;" border="0" width="528" height="85"> | ||
| + | <tbody> | ||
| + | <tr> | ||
| + | <td><img style="display: block; margin-left: auto; margin-right: auto;" src="/images/Plus.png" alt="" /></td> | ||
| + | <td>Press this button on the top right to add a new laboratory value.</td> | ||
| + | </tr> | ||
| + | <tr> | ||
| + | <td style="text-align: center;"><img src="/images/DeleteX.png" alt="" width="26" height="24" /></td> | ||
| + | <td>Delete an existing laboratory value with this button.</td> | ||
| + | </tr> | ||
| + | <tr> | ||
| + | <td style="text-align: center;"><img src="/images/RestoreLab.png" alt="" width="200" height="28" /></td> | ||
| + | <td>Through this button all changed parameters units are adjusted to the value of the reference units.</td> | ||
| + | </tr> | ||
| + | </tbody> | ||
| + | </table> | ||
<p> </p> | <p> </p> | ||
| + | <table style="margin-left: auto; margin-right: auto;" border="0"> | ||
| + | <tbody> | ||
| + | <tr> | ||
| + | <td><a href="/index.php?title=How_to_add_/_edit_a_laboratory_parameter%3F"><img src="/images/howto48.png" alt="" width="48" height="48" /></a></td> | ||
| + | <td><a href="/index.php?title=How_to_add_/_edit_a_laboratory_parameter%3F">Click here</a> to read more about adding laboratory parameters.</td> | ||
| + | </tr> | ||
| + | </tbody> | ||
| + | </table> | ||
<table style="float: right;" border="0"> | <table style="float: right;" border="0"> | ||
<tbody> | <tbody> | ||
| Line 853: | Line 1,171: | ||
</tbody> | </tbody> | ||
</table> | </table> | ||
| + | <p> </p> | ||
| + | <p> </p> | ||
<p> </p> | <p> </p> | ||
<h2>Cryo storage</h2> | <h2>Cryo storage</h2> | ||
| − | <p>To edit the Settings of Cryo storage click on the menu item <strong>System -> Configuration -> Settings -> Cryo storage | + | <p>To edit the <strong>Settings </strong>of <strong>Cryo storage</strong> click on the menu item <strong>System -> Configuration</strong><strong> / administration</strong><strong> -> Settings -> Cryo storage</strong>.</p> |
| − | <p>In the section <strong> | + | <p>In the section <strong>Cryo storage </strong>you can manage all cryo canisters and their storage system. You can define up to three hierarchic storage levels per canister. Their filling level can be checked in the freezing section to determine free space.</p> |
| − | <table border="0"> | + | <table style="margin-left: auto; margin-right: auto;" border="0"> |
<tbody> | <tbody> | ||
<tr> | <tr> | ||
| − | <td>[[Image:CryoStorage.png|none|740px|thumb|left|link=http://wiki.meditex-software.com/images/CryoStorage.png| ]]</td> | + | <td>[[Image:CryoStorage.png|none|740px|thumb|left|link=http://wiki.meditex-software.com/images/CryoStorage.png| Cryo storage dimensioning.]]</td> |
</tr> | </tr> | ||
</tbody> | </tbody> | ||
</table> | </table> | ||
<p> </p> | <p> </p> | ||
| − | <table border="0"> | + | <table border="0" width="741" height="103"> |
<tbody> | <tbody> | ||
<tr> | <tr> | ||
| − | <td><img style="display: block; margin-left: auto; margin-right: auto;" src="/images/Plus.png" alt=" | + | <td style="text-align: center;"><img src="/images/CryoFreeze.png" alt="" /></td> |
| + | <td> | ||
| + | <p><strong>Freeze with cryo storage</strong>:</p> | ||
| + | You can choose which type you will freeze in your cryostorage: samples of women, samples of men, or both. This information is important because it is displayed in the <a href="/index.php?title=Cryo_storage#Cryostorage_overview">Cryo storage Overview</a>.</td> | ||
| + | </tr> | ||
| + | <tr> | ||
| + | <td style="text-align: center;"><img src="/images/ChangeLocation1.png" alt="" width="276" height="33" /></td> | ||
| + | <td>Here you can switch between your different cryo storage locations, if you have more then one.</td> | ||
| + | </tr> | ||
| + | <tr> | ||
| + | <td style="text-align: center;"><img src="/images/ChangeLocation.png" alt="" /></td> | ||
| + | <td>Modify the location of the selected container.</td> | ||
| + | </tr> | ||
| + | <tr> | ||
| + | <td><img style="display: block; margin-left: auto; margin-right: auto;" src="/images/Plus.png" alt="" /></td> | ||
<td> | <td> | ||
<p>Press this button to add a new unit.</p> | <p>Press this button to add a new unit.</p> | ||
| − | <p> | + | <p>For more information about adding a new unit, read <a href="/index.php?title=How_to_add_a_new_canister_to_the_cryo_storage%3F">here</a>.</p> |
</td> | </td> | ||
</tr> | </tr> | ||
| Line 879: | Line 1,213: | ||
</tr> | </tr> | ||
<tr> | <tr> | ||
| − | <td | + | <td style="text-align: center;"><img src="/images/MaxNum.png" alt="" width="369" height="28" /></td> |
| − | <td> | + | <td>Enter here the maximum number of frozen straws in the last level. It helps you for searching an empty place, if you are freeze a new straw in the freezing section.</td> |
</tr> | </tr> | ||
</tbody> | </tbody> | ||
</table> | </table> | ||
<p> </p> | <p> </p> | ||
| − | <table border="0"> | + | <table style="margin-left: auto; margin-right: auto;" border="0"> |
<tbody> | <tbody> | ||
<tr> | <tr> | ||
| − | <td | + | <td colspan="2">[[Image:CryoStoreDim.png|none|740px|thumb|left|link=http://wiki.meditex-software.com/images/CryoStoreDim.png|]]</td> |
| − | + | ||
| − | + | ||
| − | + | ||
| − | </td> | + | |
</tr> | </tr> | ||
| − | < | + | </tbody> |
| − | < | + | </table> |
| − | < | + | <p><strong>Storage dimensioning:</strong></p> |
| − | < | + | <ul> |
| + | <li>When a new unit is created, the following fields have to be filled: | ||
<ul> | <ul> | ||
<li>Description</li> | <li>Description</li> | ||
| Line 903: | Line 1,234: | ||
<li>Storage levels</li> | <li>Storage levels</li> | ||
</ul> | </ul> | ||
| − | </ | + | </li> |
| − | </ | + | </ul> |
| + | <ul> | ||
| + | <li><strong>Type</strong>: you can also determine whether oocytes and embryos ("Ooc./emb.") or sperms (“Sperm”) will be stored in a given unit.</li> | ||
| + | </ul> | ||
| + | <ul> | ||
| + | <li>It is possible to modify the name of the allocation units. Select an existing unit by clicking on it in the column <strong>Allocation unit</strong> and edit <strong>Description</strong>, <strong>Type </strong>and<strong> Storage levels</strong> accordingly.</li> | ||
| + | </ul> | ||
| + | <table style="margin-left: auto; margin-right: auto;" border="0"> | ||
| + | <tbody> | ||
<tr> | <tr> | ||
| − | <td><img src="/images/ | + | <td><a href="/index.php?title=How_to_add_a_new_canister_to_the_cryo_storage%3F"><img src="/images/howto48.png" alt="" width="48" height="48" /></a></td> |
| − | <td> | + | <td><a href="/index.php?title=How_to_add_a_new_canister_to_the_cryo_storage%3F">Click here</a> to learn how to add a new canister to the <strong>Cryo storage</strong>.</td> |
| − | < | + | |
| − | < | + | |
| − | </td> | + | |
</tr> | </tr> | ||
</tbody> | </tbody> | ||
</table> | </table> | ||
| − | |||
| − | |||
| − | |||
<table style="float: right;" border="0"> | <table style="float: right;" border="0"> | ||
<tbody> | <tbody> | ||
| Line 927: | Line 1,260: | ||
<p> </p> | <p> </p> | ||
<h2>Incubator</h2> | <h2>Incubator</h2> | ||
| − | + | <p>To edit the <strong>Settings </strong>of <strong>Incubator </strong>click on the menu item <strong>System -> Configuration</strong><strong> / administration</strong><strong> -> Settings -> Incubator -> Incubator</strong>.</p> | |
| − | <p>To edit the Settings of Incubator click on the menu item <strong>System -> Configuration -> Settings -> Incubator -> Incubator | + | <table style="margin-left: auto; margin-right: auto;" border="0"> |
| − | <table border="0"> | + | |
<tbody> | <tbody> | ||
<tr> | <tr> | ||
| − | <td>[[Image:Incubator.png|none|740px|thumb|left|link=http://wiki.meditex-software.com/images/Incubator.png| ]]</td> | + | <td>[[Image:Incubator.png|none|740px|thumb|left|link=http://wiki.meditex-software.com/images/Incubator.png| Incubator settings.]]</td> |
</tr> | </tr> | ||
</tbody> | </tbody> | ||
</table> | </table> | ||
| + | <p><strong>Incubator administration:</strong></p> | ||
| + | <ul> | ||
| + | <li><strong>Active</strong>: here you can see whether the incubator is set to <strong>Active</strong>.</li> | ||
| + | <li><strong>Manufacturer</strong>: registered <strong>Manufacturer </strong>of the incubator.</li> | ||
| + | <li><strong>Model</strong>:<span id="result_box" class="short_text" lang="en"><span class="hps"> model</span>/type <span class="hps">of the incubator.</span></span></li> | ||
| + | <li><strong>Location of incubator</strong>:<span id="result_box" class="short_text" lang="en"><span class="hps"> the place </span>where<span class="hps"> the</span> <span class="hps">incubator</span> <span class="hps">is used.</span></span></li> | ||
| + | <li><strong>Description</strong>: special or specific notes about the incubator.</li> | ||
| + | <li><strong>Incubator no</strong>: enter a number to each incubator in order to distinguish them.</li> | ||
| + | </ul> | ||
<p> </p> | <p> </p> | ||
| − | < | + | <p><strong>Incubator documents:</strong></p> |
| − | <p> | + | <p>You can see the documents of a selected incubator.<strong><br /></strong></p> |
| − | < | + | <ul> |
| − | < | + | <li><strong>Date</strong>: <span id="result_box" class="short_text" lang="en"><span class="hps">creation date</span> <span class="hps">of the document.</span></span></li> |
| − | < | + | <li><strong>Description</strong>: short description with important information.</li> |
| − | < | + | <li><strong>Filename</strong>: <span id="result_box" class="short_text" lang="en"><span class="hps">name</span> <span class="hps">of the stored</span> <span class="hps">protocol.</span></span></li> |
| − | < | + | <li><strong>Protocol</strong>: <span id="result_box" class="short_text" lang="en">stored notes.<span> <br /></span></span></li> |
| − | < | + | </ul> |
| − | <p> | + | <p><br />Get more information about the adding and editing an incubator, .</p> |
| − | < | + | <table style="margin-left: auto; margin-right: auto;" border="0"> |
| − | < | + | <tbody> |
| + | <tr> | ||
| + | <td><a href="/index.php?title=How_to_add_/_edit_an_incubator%3F"><img src="/images/howto48.png" alt="" width="48" height="48" /></a></td> | ||
| + | <td><a href="/index.php?title=How_to_add_/_edit_an_incubator%3F">Click here</a> to read more about adding incubators.</td> | ||
| + | </tr> | ||
| + | </tbody> | ||
| + | </table> | ||
<table style="float: right;" border="0"> | <table style="float: right;" border="0"> | ||
<tbody> | <tbody> | ||
| Line 955: | Line 1,302: | ||
</tbody> | </tbody> | ||
</table> | </table> | ||
| + | <p> </p> | ||
| + | <p> </p> | ||
<p> </p> | <p> </p> | ||
<h2>Free / QM fields</h2> | <h2>Free / QM fields</h2> | ||
| − | <p>To edit the Settings of Free / QM fields click on the menu item <strong>System -> Configuration -> Settings -> Free / QM fields.<br /></strong></p> | + | <p>To edit the <strong>Settings </strong>of <strong>Free / QM fields</strong> click on the menu item <strong>System -> Configuration</strong><strong> / administration</strong><strong> -> Settings -> Free / QM fields</strong>.<strong><br /></strong></p> |
<ul> | <ul> | ||
| − | <li>Here you can configure all QM and free fields. QM | + | <li>Here you can configure all <strong>QM </strong>and <strong>free fields</strong>. <strong>QM</strong> stands for Quality Management and gives you an option to document all the extra information relevant to you with the help of <strong>QM fields</strong>. </li> |
</ul> | </ul> | ||
<ul> | <ul> | ||
| − | <li><strong>Staff</strong>, <strong>material</strong>, <strong>times</strong> and further <strong>free</strong> <strong>fields</strong> can be assigned to any QM field – and therefore every associated input area - in the settings.</li> | + | <li><strong>Staff</strong>, <strong>material</strong>, <strong>times</strong> and further <strong>free</strong> <strong>fields</strong> can be assigned to any <strong>QM field</strong> – and therefore every associated input area - in the settings.</li> |
</ul> | </ul> | ||
| − | <table border="0"> | + | <table style="margin-left: auto; margin-right: auto;" border="0"> |
<tbody> | <tbody> | ||
<tr> | <tr> | ||
| − | <td>[[Image:QMFieldsS.png|none|740px|thumb|left|link=http://wiki.meditex-software.com/images/QMFieldsS.png| ]]</td> | + | <td>[[Image:QMFieldsS.png|none|740px|thumb|left|link=http://wiki.meditex-software.com/images/QMFieldsS.png| Settings of free / QM fields.]]</td> |
</tr> | </tr> | ||
</tbody> | </tbody> | ||
</table> | </table> | ||
<p> </p> | <p> </p> | ||
| − | <p> | + | <p>Buttons with a blue dotted frame have special functionalities. Click on it to have more information.</p> |
| − | <table border="0"> | + | <table style="margin-left: auto; margin-right: auto;" border="0"> |
<tbody> | <tbody> | ||
<tr> | <tr> | ||
| − | <td><img style="display: block; margin-left: auto; margin-right: auto;" src="/images/Plus.png" alt=" | + | <td><img style="display: block; margin-left: auto; margin-right: auto;" src="/images/Plus.png" alt="" /></td> |
| − | <td>This button is placed at the | + | <td>This button is placed at the <strong>QM assignment selection</strong>. It allows you to define or add new sub items.<br /></td> |
</tr> | </tr> | ||
<tr> | <tr> | ||
| − | <td><img style="display: block; margin-left: auto; margin-right: auto;" src="/images/DeleteX.png" alt=" | + | <td><img style="display: block; margin-left: auto; margin-right: auto;" src="/images/DeleteX.png" alt="" /></td> |
| − | <td>This button is placed at the | + | <td>This button is placed at the <strong>QM assignment selection</strong>. You can delete articles from this area.<br /></td> |
</tr> | </tr> | ||
<tr> | <tr> | ||
<td><img style="display: block; margin-left: auto; margin-right: auto;" src="/images/LeftRight.png" alt="" width="29" height="64" /></td> | <td><img style="display: block; margin-left: auto; margin-right: auto;" src="/images/LeftRight.png" alt="" width="29" height="64" /></td> | ||
| − | <td>Use this buttons between | + | <td>Use this buttons between <strong>QM domain assignment</strong> and <strong>QM assignment selection</strong> to assign a selected entry (right) to a <strong>QM field</strong> (left) or delete an entry from the <strong>QM domain assignment</strong> (left).<br /></td> |
</tr> | </tr> | ||
<tr> | <tr> | ||
| − | <td><a href="/index.php?title=How_to_configure_items%3F"><img style="display: block; margin-left: auto; margin-right: auto;" src="/images/QMEdit.png" alt="" width="24" height="23" /></a></td> | + | <td><a href="/index.php?title=How_to_configure_items%3F"><img style="display: block; margin-left: auto; margin-right: auto; border: 2px dotted blue;" src="/images/QMEdit.png" alt="" width="24" height="23" /></a></td> |
| − | <td><strong>Configuration | + | <td><strong>Configuration</strong>: add or edit members of staff, material or values.</td> |
</tr> | </tr> | ||
<tr> | <tr> | ||
| Line 995: | Line 1,344: | ||
</tr> | </tr> | ||
<tr> | <tr> | ||
| − | <td><img style="display: block; margin-left: auto; margin-right: auto;" src="/images/O.png" alt=" | + | <td><img style="display: block; margin-left: auto; margin-right: auto;" src="/images/O.png" alt="" /></td> |
| − | <td><strong>Staff | + | <td><strong>Staff</strong>: type of personnel.</td> |
</tr> | </tr> | ||
<tr> | <tr> | ||
<td><img style="display: block; margin-left: auto; margin-right: auto;" src="/images/L.png" alt="" /></td> | <td><img style="display: block; margin-left: auto; margin-right: auto;" src="/images/L.png" alt="" /></td> | ||
| − | <td><strong>Material | + | <td><strong>Material</strong>: materials and batch numbers.</td> |
</tr> | </tr> | ||
<tr> | <tr> | ||
<td><img style="display: block; margin-left: auto; margin-right: auto;" src="/images/F.png" alt="" /></td> | <td><img style="display: block; margin-left: auto; margin-right: auto;" src="/images/F.png" alt="" /></td> | ||
| − | <td><strong>Free fields | + | <td><strong>Free fields</strong>: any additional information.<br /></td> |
</tr> | </tr> | ||
</tbody> | </tbody> | ||
</table> | </table> | ||
| + | <p> </p> | ||
<p> </p> | <p> </p> | ||
<table border="0"> | <table border="0"> | ||
<tbody> | <tbody> | ||
<tr> | <tr> | ||
| − | <td><img src="/images/QMDomanissignment.png" alt=" | + | <td><img style="display: block; margin-left: auto; margin-right: auto;" src="/images/QMDomanissignment.png" alt="" /></td> |
| − | <td>< | + | <td> |
| − | < | + | <p><strong>QM fields:</strong></p> |
| + | <ul> | ||
| + | <li>A list of all <strong>QM fields</strong> in MedITEX IVF.</li> | ||
| + | </ul> | ||
| + | <ul> | ||
| + | <li>The number and description of<strong> QM fields</strong> cannot be changed by the user.</li> | ||
| + | </ul> | ||
| + | <ul> | ||
| + | <li>In the example, the field <strong>Follicle aspiration</strong> is selected.</li> | ||
| + | </ul> | ||
| + | <br /></td> | ||
</tr> | </tr> | ||
<tr> | <tr> | ||
| − | <td> | + | <td><img src="/images/QMDomanis.png" alt="" /></td> |
| − | + | ||
| − | + | ||
| − | + | ||
| − | + | ||
| − | </td> | + | |
<td> | <td> | ||
<p style="text-align: justify;"><strong>Items assigned to the selected QM field:</strong></p> | <p style="text-align: justify;"><strong>Items assigned to the selected QM field:</strong></p> | ||
| − | < | + | <ul> |
| − | < | + | <li>In this column, you can see all items assigned to the selected <strong>QM field</strong> (<strong>Follicle aspiration</strong>).</li> |
| + | </ul> | ||
| + | <ul> | ||
| + | <li>Entries are separated in the three types, which are represented by symbols.</li> | ||
| + | </ul> | ||
<p style="text-align: justify;"> </p> | <p style="text-align: justify;"> </p> | ||
<p style="text-align: justify;"> </p> | <p style="text-align: justify;"> </p> | ||
</td> | </td> | ||
| + | </tr> | ||
| + | <tr> | ||
| + | <td><img style="display: block; margin-left: auto; margin-right: auto;" src="/images/QMDomanissignmentSelection.png" alt="" /></td> | ||
<td> | <td> | ||
<p style="text-align: justify;"><strong>Pool of all available items:</strong></p> | <p style="text-align: justify;"><strong>Pool of all available items:</strong></p> | ||
| − | |||
| − | |||
| − | |||
| − | |||
| − | |||
| − | |||
| − | |||
| − | |||
| − | |||
| − | |||
| − | |||
<ul> | <ul> | ||
| + | <li>This column displays all positions that have already been defined for all <strong>QM domains</strong> (<strong>QM fields</strong>).</li> | ||
</ul> | </ul> | ||
<ul> | <ul> | ||
| − | <li> | + | <li>They represent a range of items that can be assigned according to the user needs.</li> |
| − | + | ||
| − | + | ||
| − | + | ||
| − | + | ||
| − | + | ||
| − | </li> | + | |
</ul> | </ul> | ||
| + | <br /></td> | ||
| + | </tr> | ||
| + | </tbody> | ||
| + | </table> | ||
| + | <p>Press the column header to sort the items by their names, type or description.</p> | ||
| + | <table style="margin-left: auto; margin-right: auto;" border="0"> | ||
| + | <tbody> | ||
| + | <tr> | ||
| + | <td><a href="/index.php?title=MedITEX_IVF_how_to#QM_.2F_free_fields"><img src="/images/howto48.png" alt="" width="48" height="48" /></a><br /></td> | ||
| + | <td> | ||
| + | <p>There are several options available to edit the items assigned to a <strong>QM field</strong>. Read more about it on our <strong><a href="/index.php?title=MedITEX_IVF_how_to#QM_.2F_free_fields">How to</a></strong> section.</p> | ||
| + | </td> | ||
| + | </tr> | ||
| + | <tr> | ||
| + | <td><img src="/images/hint48.png" alt="" width="48" height="48" /></td> | ||
| + | <td> | ||
<p><strong>Tips for managing QM fields:</strong></p> | <p><strong>Tips for managing QM fields:</strong></p> | ||
<ul> | <ul> | ||
<li>Access to settings and the possibility to modify the program should only be given to the <strong>MedITEX Administrator/Representative</strong>.</li> | <li>Access to settings and the possibility to modify the program should only be given to the <strong>MedITEX Administrator/Representative</strong>.</li> | ||
| − | <li>Try to avoid the frequent adding and removing of items in the column <strong> | + | <li>Try to avoid the frequent adding and removing of items in the column <strong>QM assignment selection</strong>. Instead, try to create a logical system in which <strong>existing</strong> items can be modified in the column <strong>QM assignment selection</strong> (for example, modifying of material and staff).</li> |
<li><strong>Update</strong> the QM settings regularly.</li> | <li><strong>Update</strong> the QM settings regularly.</li> | ||
| − | <li><strong>Deleting </strong>items in the column <strong> | + | <li><strong>Deleting </strong>items in the column <strong>QM assignment selection</strong> can be risky. Try to avoid this and instead only remove assigned items from the column<strong> QM domain assignment </strong>(right arrow between columns).</li> |
<li>You do not have to define times in the settings. After pressing the QM fields in the program, you can <strong>determine a start and end time</strong>.</li> | <li>You do not have to define times in the settings. After pressing the QM fields in the program, you can <strong>determine a start and end time</strong>.</li> | ||
| − | <li>You do not have to define comments in the settings. After pressing the QM fields in the program, you can <strong>add a comment</strong> to all items.</li> | + | <li>You do not have to define comments in the settings. After pressing the <strong>QM fields</strong> in the program, you can <strong>add a comment</strong> to all items.</li> |
| − | <li>Not matter if staff, material or free field | + | <li>Not matter if staff, material or free field, you can add staff and a list of values to any item. <strong>Combine materials and staff in one entry</strong>.</li> |
</ul> | </ul> | ||
| − | < | + | </td> |
| + | </tr> | ||
| + | </tbody> | ||
| + | </table> | ||
| + | <p> </p> | ||
<table style="float: right;" border="0"> | <table style="float: right;" border="0"> | ||
<tbody> | <tbody> | ||
Latest revision as of 11:32, 28 January 2019
 |
Define your individual structure.
The MedITEX IVF settings are of utmost importance. They allow you to adapt the program to your center's specific conditions and circumstances.
This includes adding or editing existing drugs, manage materials and interfaces to accounting and laboratory programs, definition of incubators, and also organize the cryo storage. The definition of QM/free fields and the content of selected system tables are also managed in the settings.
It is crucial to define the settings fully and correctly before using MedITEX IVF.
Contents |
Clinic
To edit the Settings of Clinic, click on the menu item System -> Configuration / administration -> Settings -> Clinic.
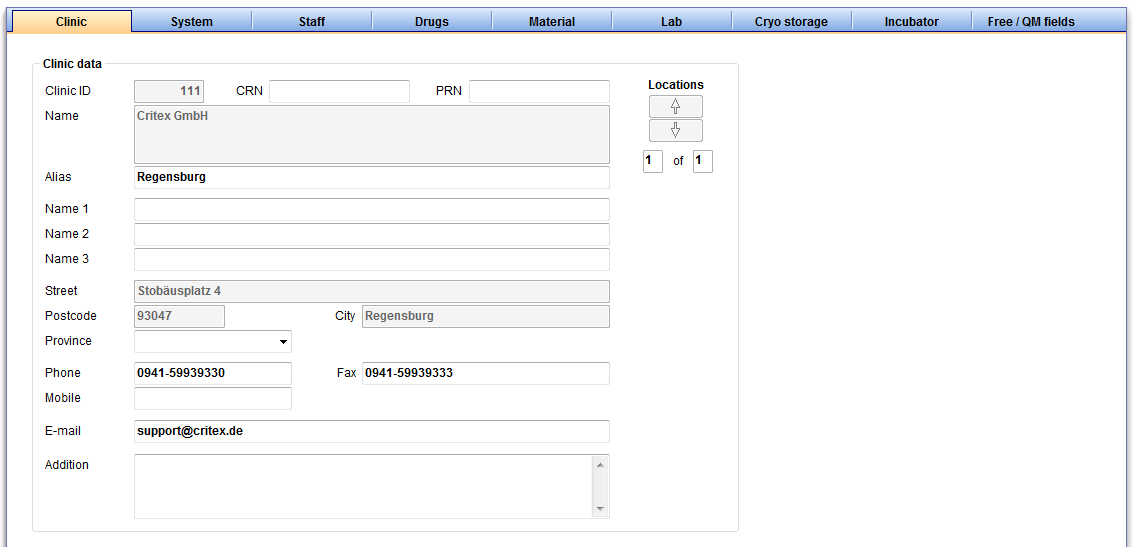 |
- Here you can enter the contact details about your clinic and see your clinic ID.
- Enter and edit the alias of your clinic, as well as the names of the main clinician and other data.
- If there are several clinics, you can switch with the "location" button between them.
- The disabled areas are filled by MedITEX. If you wish to change, please contact us.
| <a href="#top">Back to top</a> |
System
To edit the Settings of System click on the menu item System -> Configuration / administration-> Settings -> System -> General.
General
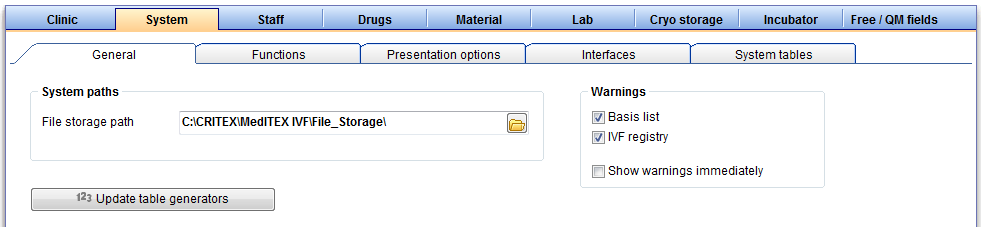 |
- System paths: here you can define which file paths are used for the interfaces of accounting and laboratory programs, as well as the location where the program manages file storage and digital documents. In order to change file paths, click the directory symbol on the right side of the respective row. A dialog window will open and you can change the file path accordingly.
- Update table generators: with this button, you can update your table generators. to use this function, please make sure that no one is using the program and all users are logged off the system.
- Warnings: you can set the relevant warnings for your clinic (for example “Basis list”). Warnings defined by German IVF Registry (DIR) are relevant only for clinics based in Germany.
In the area "Warnings" you can individually choose the field catalogues that are relevant to your centre. MedITEX IVF can then selectively indicate erroneous entries or missing information with red warnings.
As MedITEX IVF checks data in real time, warnings are immediately shown when switching to another input mask. Deselecting the box “Show warnings immediately” can disable this option.
- Only change the warning settings if you are absolutely sure what you are doing. Otherwise, incorrect entries may go unnoticed.
| <a href="#top">Back to top</a> |
Functions
General
To edit the Settings of General functions click on the menu item System -> Configuration / administration -> Settings -> System -> Functions -> General.
 |
| <img src="/images/SFGeneral2.png" alt="" width="488" height="148" /> |
Generate patient ID automatically
|
| <img src="/images/SFGeneral3.png" alt="" width="483" height="165" /> |
Automatic anonymous IDs
|
| <img src="/images/SFGeneral4.png" alt="" width="491" height="90" /> |
Logging of data changes
|
| <img src="/images/SFGeneral5.png" alt="" width="490" height="117" /> |
Screenshot functionality / notebook
|
| <img src="/images/SFGeneral7.png" alt="" /> |
Barcode / RFID
|
| <img src="/images/SFGeneral8.png" alt="" /> |
Mediaplayer settings
|
| <a href="#top">Back to top</a> |
Automatic ID generation
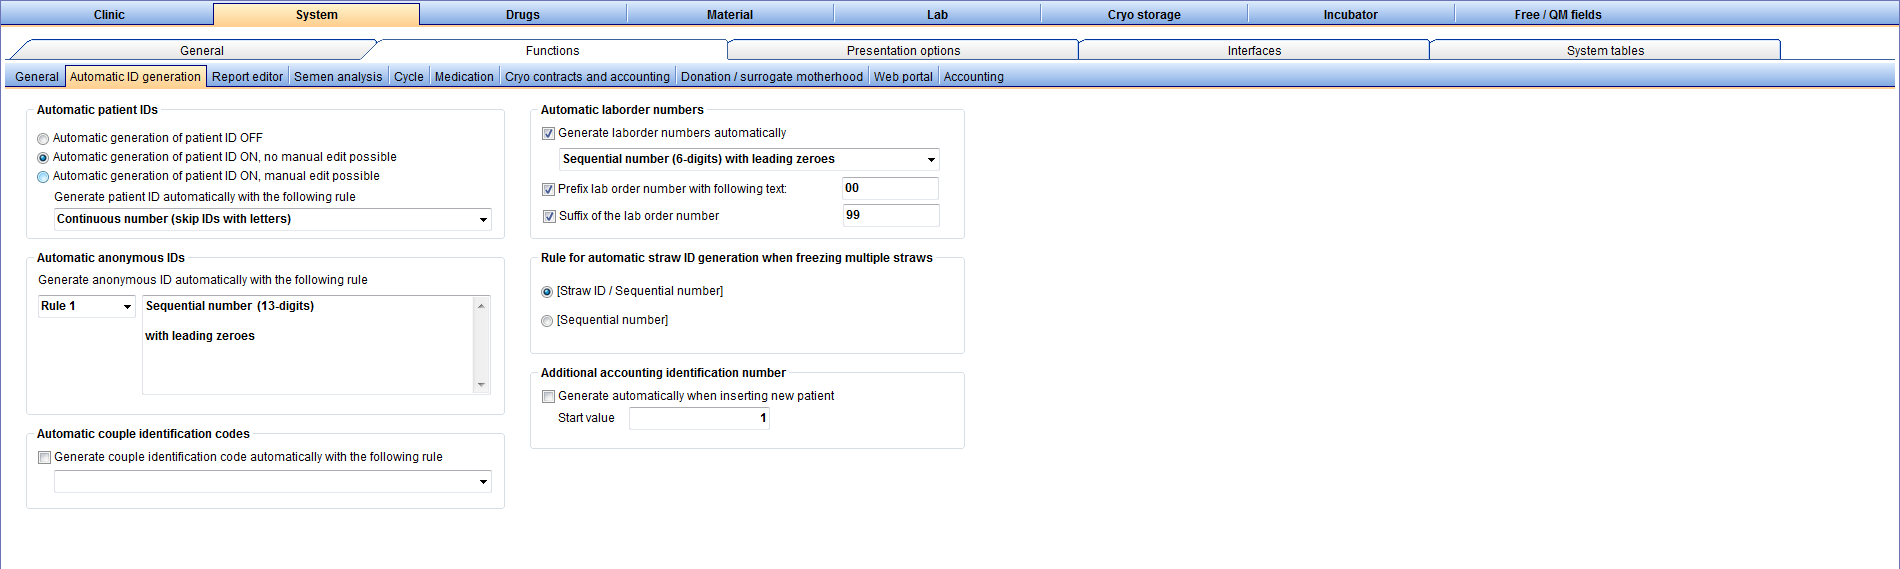 |
Report editor
This section describes the settings for the Report editor.
| <a href="/index.php?title=Queries_of_Report_editor"><img src="/images/plus48.png" alt="" width="48" height="48" /></a> | <a href="/index.php?title=Queries_of_Report_editor">Click here</a> if you want to get more information about queries. |
To edit the Settings of the Report editor click on the menu item System -> Configuration / administration -> Settings -> System -> Functions -> Report editor.
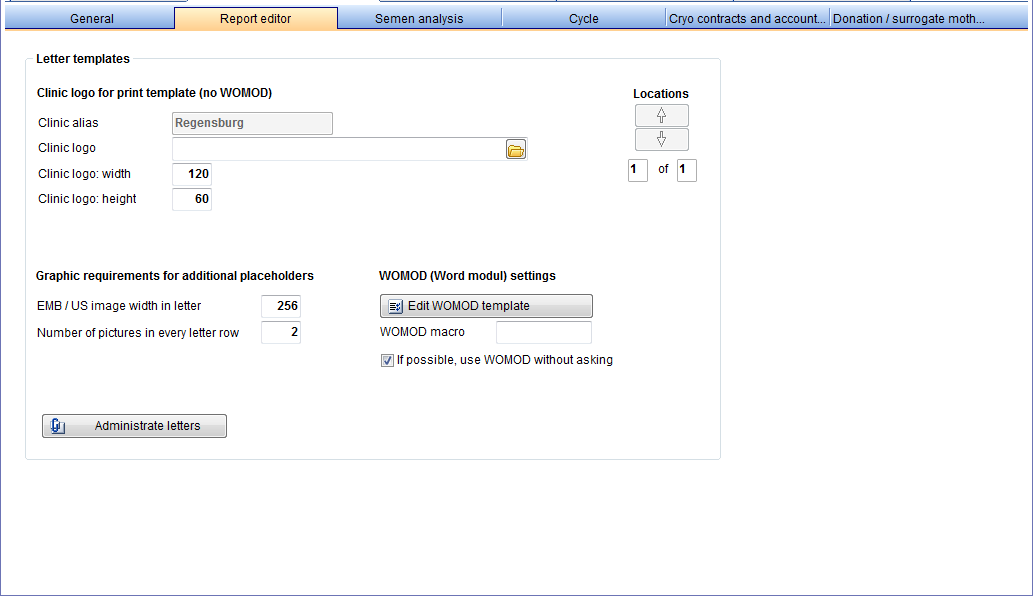 |
Letter templates: here you can define the properties of your logo for letter templates.
- Locations: if your centre operates at multiple places, you can create custom templates for each location. Move with the arrow keys between the individual centres.
- Graphic requirements for additional placeholders: define the size of embryos/ultrasound pictures used in your letters and how many pictures can be shown in one row. This will make sure you will always have an identical and clear typeface.
- WOMOD settings: create/edit the template of letters.
- Administrate letters: This button takes you to the configuration of the letters.
| <a href="/index.php?title=Result_management#Administrate_letters"><img src="/images/plus48.png" alt="" width="48" height="48" /></a> | <a href="/index.php?title=Result_management#Administrate_letters">Click here</a> if you want to get more information about the buttom Administrate letters. |
| <a href="#top">Back to top</a> |
Semen analysis
To edit the Settings of Semen analysis click on the menu item System -> Configuration / administration -> Settings -> System -> Functions -> Semen analysis.
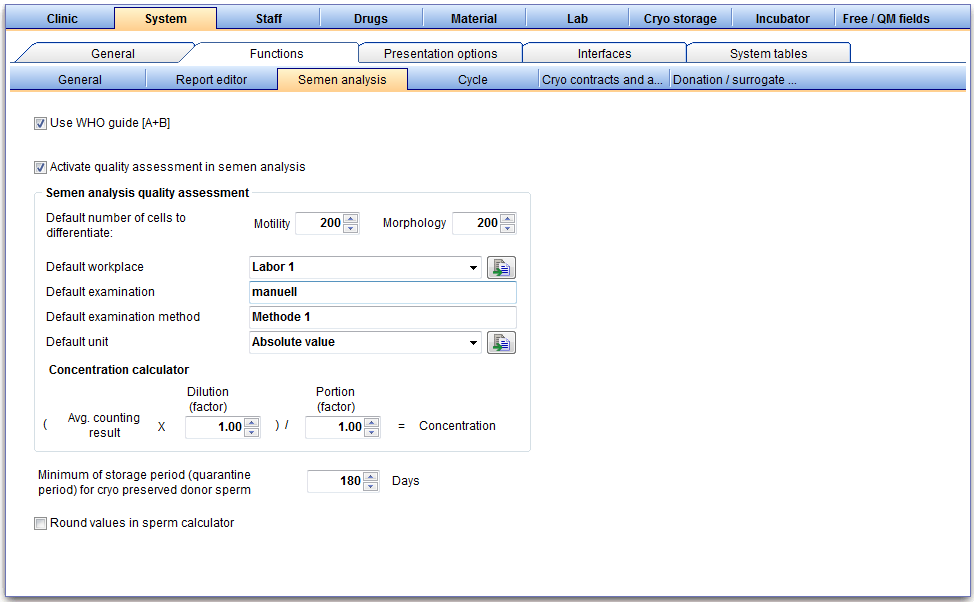 |
-
Use WHO guide [A+B]: Determines if your clinic is documenting three instead of four motility parameters - progressive motile (PR), locally motile (NP) and immotile (IM), according to current WHO instructions for semen analysis (parameters A and B together as PR, C and D separated as NP and IM).
- Info for MedITEX customers in Germany: if you check this box, the values A (fast) and B (slow prog. motile) will be automatically calculated and submitted to DIR in the following way:
A = 1/3 of AB
B = 2/3 of AB
This rule is according to the agreement with DIR, because DIR is still collecting all four parameters separately.
- Semen analysis quality assessment: activates and deactivates quality assessment and add your data.
- Add the names of your workplaces, examinations, examination methods and units. You need it for the calculation and validation in the semen analysis.
- Choose your counting unit and adapt the dilution factor and the portion factor, if it is necessary.
- <a href="/index.php?title=MedITEX_IVF_Settings#System_tables"><img style="border: 2px dotted blue; float: left;" src="/images/EditSemen.png" alt="" width="31" height="26" /></a> Go to the system tables for adding or editing a workplace/unit. Subsequently, the newly added workplace/unit can be directly chosen from the list.
- Minimum of storage period: days for the quarantine period for cryopreserved sperm. Donor sperm, in which a laboratory value of HEP B, HEP C, TPHA and HIV is positive, or those that have not yet reached the quarantine period cannot be thawed or used.
| <a href="/index.php?title=Documenting_a_new_sample#Documenting_a_semen_analysis"><img src="/images/plus48.png" alt="" width="48" height="48" /></a> | <a href="/index.php?title=Documenting_a_new_sample#Documenting_a_semen_analysis">Click here</a> for more information about the documentation of semen analysis. |
| <a href="#top">Back to top</a> |
Cycle
To edit the Settings of Cycles click on the menu item System -> Configuration / administration -> Settings -> System -> Functions -> Cycle.
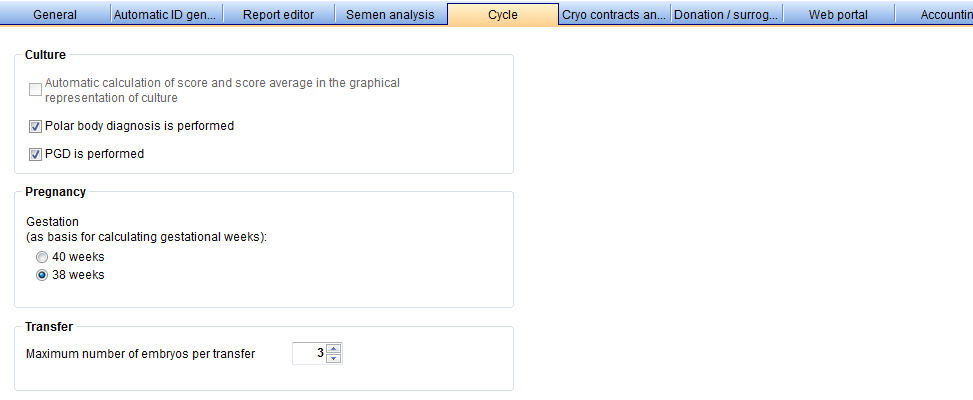 |
- <a href="/index.php?title=Cycle_Culture">Culture</a>: activates the automatic calculation of score and score average in the <a href="/index.php?title=Cycle_Culture#Graphical_representation">Graphical representation</a> of culture for a cycle.
- <a href="/index.php?title=Cycle_Pregnancy">Pregnancy</a>: gestational weeks throughout the program will be calculated based on this setting. You can choose between 40 or 38 weeks.
- <a href="/index.php?title=Cycle_Transfer">Transfer</a>: the maximum number of embryos per transfer. Observe the legal requirements of your country.
| <a href="#top">Back to top</a> |
Medication
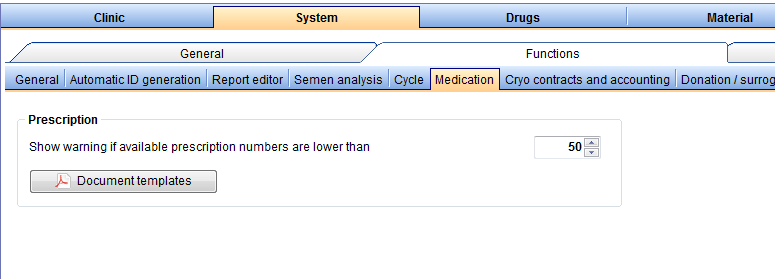 |
Cryo contracts and accounting
To edit the Settings of Cryo contracts and accounting click on the menu item System -> Configuration / administration -> Settings -> System -> Functions -> Cryo contracts and accounting.
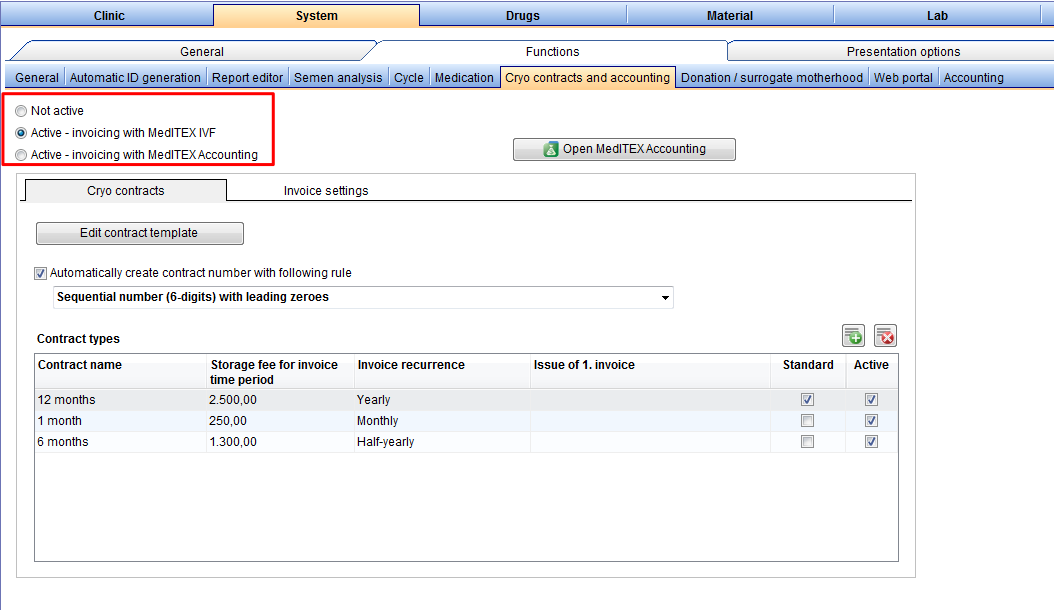 |
- Activate cryo contracts and accounting: by default, this option is checked. It enables the creation of cryo contracts and invoices for a patient. If this option is unchecked, all contract and invoice functionalities will be disabled throughout the program.
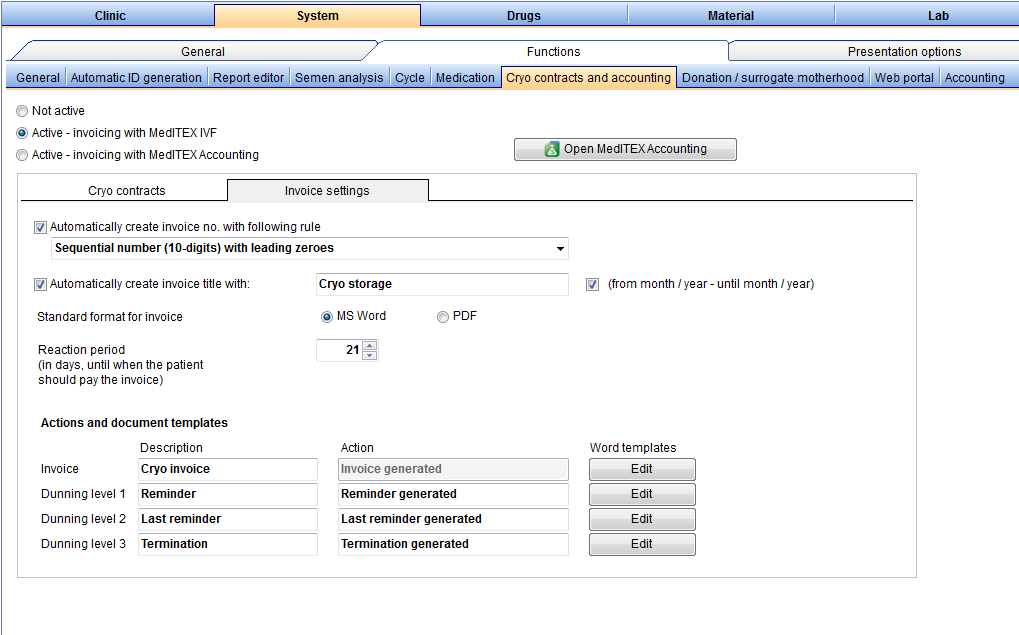 |
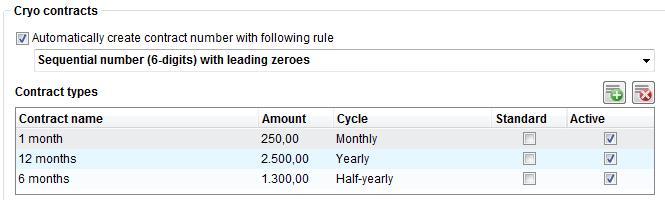 |
- Automatically create contract number: if this option is checked, it will apply a predefined rule to generate a number once every <a href="/index.php?title=Create_a_new_entry_in_demographics">cryo contract</a> is created in the <a href="/index.php?title=Demographics">demographics</a>.
-
Contract types: a list with all types of contracts that can be issued. With the "Plus" button, you can add a new type of contract. Do this by specifying the name, frequency and amount in the new window. Here, you can also set whether a contract is used as a Standard (template for every contract) or Active (visible templates for choosing in the cryo mask). To edit an existing contract, double-click the desired row. Deleting a contract is only possible if it is not being used.
- Edit contract template: opens MS Word to enable creation and editing of templates used for cryo contracts. Only change the content of these templates and never the grey colour placeholders. The program requires them for the correct transferring of data.
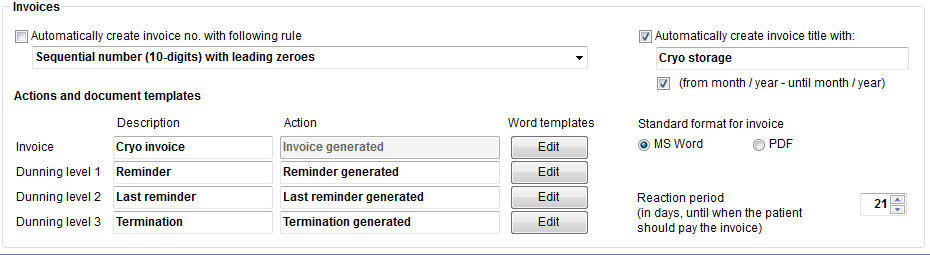 |
| Automatically create invoice number: If this option is checked, it will apply a predefined rule to generate a number once <a href="/index.php?title=How_to_create_a_new_cryo_invoice%3F"> every invoice is created</a>. |
Actions and document templates:
- Invoice: the first invoice created.
- Dunning level 1: first document emitted if payment for the invoice has not been done.
- Dunning level 2: second document emitted if payment for the invoice has not been done.
- Dunning level 3: third and final document emitted if payment for the invoice has not been done.
- Description: describes the content of the document. This information appears when navigating through Administration of documents for a patient.
- Action: describes what action is taken when creating the document. This information appears when navigating through Outstanding invoices and on individual invoices for a patient.
- Word templates: option to create and edit template of documents. A few options are available when clicking the Edit button: Create new document prompts for a Template name and opens MSWord so it is possible to create a brand new document. To edit, delete or rename an existing template, select the desired template and choose one of the options.
- Automatically create invoice title: sets the name for the created invoice according to the information provided by this setting. If this option is unchecked, when creating a new invoice, no name will be automatically created, although it will still be possible to click on the auto generate button or enter the desired name. If (from month / year – until month / year) is checked, it also includes month and year to the name.
-
Standard format for invoice: choose a default format for your invoices.
-
Reaction period: the amount of days the patient has to pay an invoice.
| <img src="/images/plus48.png" alt="" width="48" height="48" /> | <a href="/index.php?title=MedITEX_IVF_Settings#Cryo_storage">Click here</a> to read more about the settings of the Cryo storage. |
| <a href="/index.php?title=Cryo_storage">Click here</a> to read more about Cryo storage. | |
| <a href="/index.php?title=Cryo_contracts_and_accounting">Click here</a> to read more about Cryo contracts and accounting. | |
| <a href="/index.php?title=MedITEX_IVF_how_to#Cryo_contracts_and_invoicing"><img src="/images/howto48.png" alt="" width="48" height="48" /></a> | <a href="/index.php?title=MedITEX_IVF_how_to#Cryo_contracts_and_invoicing">Click here</a> to read our How to page. |
| <a href="#top">Back to top</a> |
Donation / surrogate motherhood
To edit the Settings of Donation / surrogate motherhood click on the menu item System -> Configuration / administration -> Settings -> System -> Functions -> Donation / surrogate motherhood.
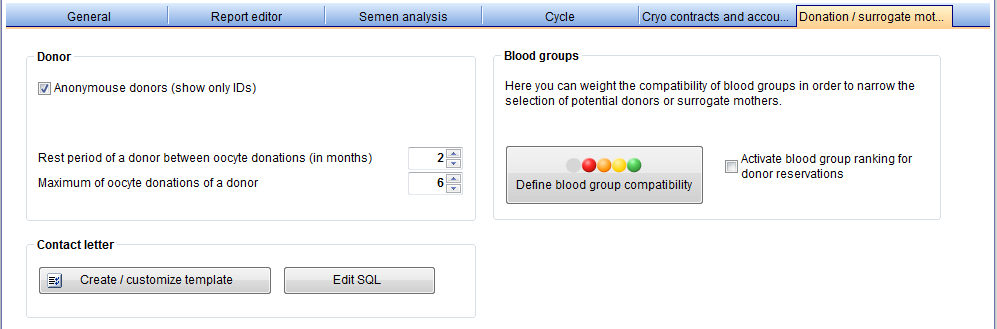 |
| <img style="display: block; margin-left: auto; margin-right: auto;" src="/images/DonationDonor.png" alt="" width="458" height="181" /> |
Donor:
|
| <img style="display: block; margin-left: auto; margin-right: auto;" src="/images/DonationCreateButton.png" alt="" width="241" height="30" />
<img style="display: block; margin-left: auto; margin-right: auto;" src="/images/DonationSQLButton.png" alt="" width="156" height="30" /> |
Contact letter:
|
| <img style="display: block; margin-left: auto; margin-right: auto;" src="/images/DonationBlood.png" alt="" width="458" height="180" /> |
Blood groups ranking for donor reservations: activates the blood group ranking for donor reservations. If you link a donor, you can see how good the compatibility of the blood groups is.
Define blood group compatibility. With this button, you can choose the compatibilities of blood groups. The following window will be opened: |
| <img style="display: block; margin-left: auto; margin-right: auto;" src="/images/BloodGroups.png" alt="" width="695" height="514" />
Weight of compatibility: choose the weight of the compatibility with colours. The description of the colours is explained at the top of this window. Click on the fields in the table and choose the appropriate colour. |
|
| <img style="display: block; margin-left: auto; margin-right: auto;" src="/images/Initialize1.png" alt="" /> | Initialise: with this button you can initialise the table settings. Without settings makes the whole table empty. With settings makes the main diagonal green. Set all combinations with will fill the whole table with your chosen colour and Standard will fill the table with good compatibility. |
| <img style="display: block; margin-left: auto; margin-right: auto;" src="/images/BloodGroups2.png" alt="" width="231" height="27" /> | Mirror modifications automatically mirrors modifications to automatically reflect the set points on the diagonal of the table. |
| <img style="display: block; margin-left: auto; margin-right: auto;" src="/images/plus48.png" alt="" width="48" height="48" /> | <a href="/index.php?title=Search_for_suitable_patient#Search_area">Click here</a> to go directly to the search for donor page, where you can use this feature. |
| <a href="#top">Back to top</a> |
Witnessing
To edit the Settings of Witnessing click on the menu item System -> Configuration / administration -> Settings -> System -> Functions -> Witnessing.
 |
1. To activate Witnessing, select Witnessing active.
2. Three identification methods are available to choose from:
- Login/Password
- Fingerprint
- Barcode
3. MedITEX actions with Witnessing possibility:
- Create/Update of semen analysis
- New cryopreservation of a sperm
- Removal of a straw
- Removal of an oocyte/embryo
- New cryopreservation of an oocyte/embryo
4. Multiple Witnessing actions can be chosen:
- Active: Activate Witnessing for a specific MedITEX action.
- Create document: Save the witnessing report as a Word document.
- Save as PDF: Save the witnessing report as a PDF file.
- Open document after create.
- Template: Open the report template, if a template was created.
| <a href="/index.php?title=Witnessing"><img src="/images/plus48.png" alt="" width="48" height="48" /></a> | <a href="/index.php?title=Witnessing">Click here</a> for more information about the witnessing process. |
| <a href="#top">Back to top</a> |
Web portal
To edit the Settings of Web portal click on the menu item System -> Configuration / administration -> Settings -> System -> Functions -> Web portal.
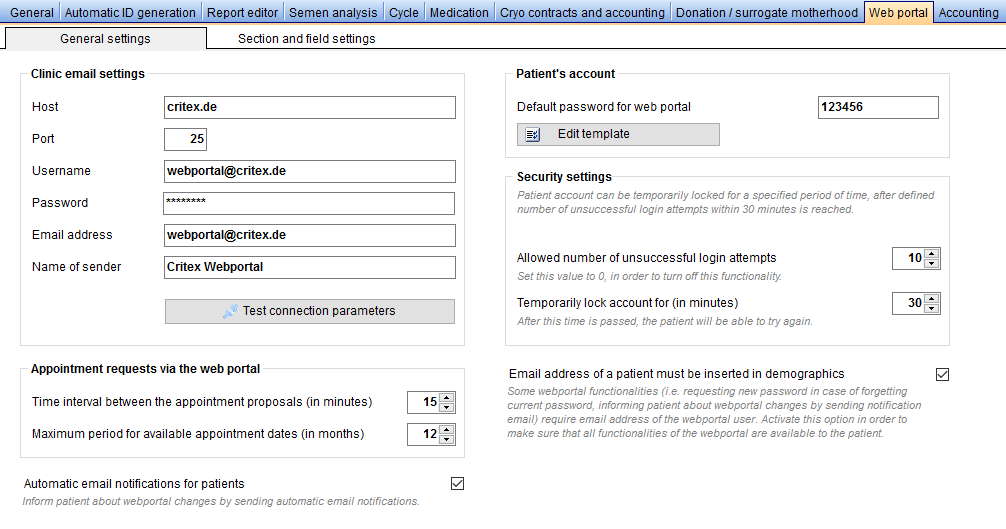 |
| <img style="display: block; margin-left: auto; margin-right: auto;" src="/images/WebPortalEmailSettings.png" alt="" /> |
|
This portion of the configuration corresponds to the email services provided by the portal.
|
| <img style="display: block; margin-left: auto; margin-right: auto;" src="/images/WebPortalSectionSettings.png" alt="" width="483" height="441" /> |
|
In this section of the configuration:
|
| <a href="#top">Back to top</a> |
Digital Signature
To edit the System settings of the Digital Signature, click on the Digital signature tab sheet under System -> Configuration / administration -> Settings -> Functions.
1. Certificate settings:
Two options are available to set up a certificate:
a. Reading a certificate from smart card:
When a smart card is plugged in, MediTEX reads its certificate and offers to sign it.
The Show only certificates which are suitable for digital signing option filters unsuitable certificates. E.g.: a server authentication certificate will not be offered. It is recommended to check this option.
b. Creating a certificate within personal settings:
In order to use this option, the settings for Clinic certificate must be filled with the paths of the clinic certificate and the certificate key files (both should be saved on the server). You can see how long the certificate is valid.
The clinic certificate is needed as a root certificate for every user certificate: Every user must create his own certificate with a password under Personal settings. The user’s certificate needs to have a root certificate. This is needed to authenticate the user as a staff of the clinic. The user certificate is valid as long as the clinic certificate is.
| <img src="/images/a.jpg" alt="" width="642" height="274" /> |
2. Signing process settings:
a. Signature default type:
There are two different types of digital signatures:
- PDF (PAdES): it is the usual digital signature. The signed file will be saved as PDF.
- P7M (CAdES): it is another kind of digital signature. The signed file will be saved as P7M. An additional software is needed to open P7M files.
This setting will be displayed as default during the signing process, it can be changed at the moment of signing.
b. Unsigned files:
This setting allows the user to choose whether the unsigned files are deleted, or are kept in the patient file storage (only if they are doc(x) files).
| <img src="/images/signing_process.jpg" alt="" width="627" height="173" /> |
| <a href="/index.php?title=Digital_Signature"><img src="/images/plus48.png" alt="" width="48" height="48" /></a> | <a href="/index.php?title=Digital_Signature">Click here</a> for more information about the signing process. |
| <a href="#top">Back to top</a> |
Presentation options
General
To edit the Settings of the overall Presentation options click on the menu item System -> Configuration / administration -> Settings -> System -> Presentation options -> General.
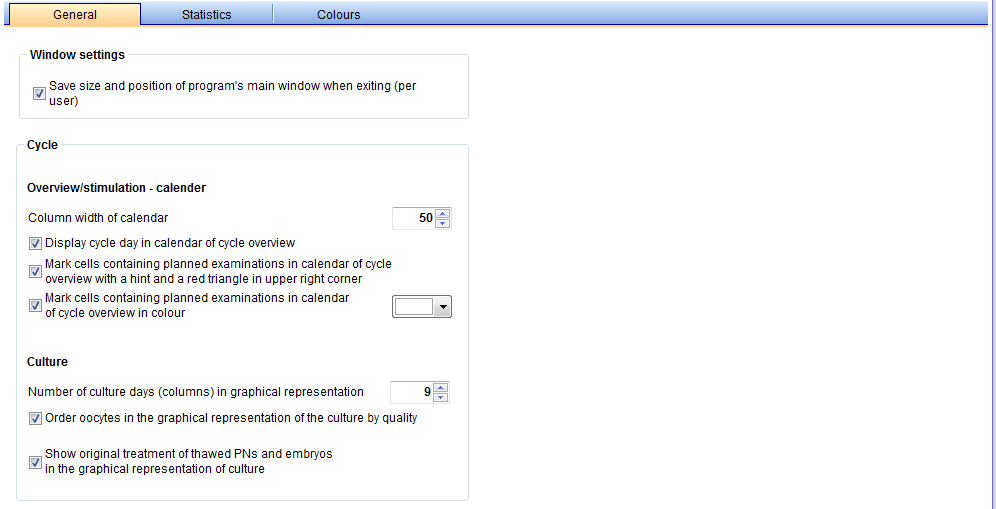 |
- Window settings: here you can set whether the view of the main window (height, width, position) will be stored and should be resorted at the next login. This option saves the presentation of the program individually for each user. So different users might have slightly different interfaces.
- <a href="/index.php?title=Cycle_Overview">Cycle</a>: settings for changing the interface of the calendar.
-
<a href="/index.php?title=Cycle_Culture">Culture</a>: under culture, you can choose the number of days at the graphical representation.
- You can set the sorting of oocytes and embryos of the culture window. You can choose between sorting according to quality (the best first) or according to the relative oocyte ID.
- Displays the original treatment of the thawed PNs and embryos in the graph view.
| <a href="#top">Back to top</a> |
Statistics
To edit the Settings of Statistics click on the menu item System -> Configuration / administration -> Settings -> System -> Presentation options -> Statistics.
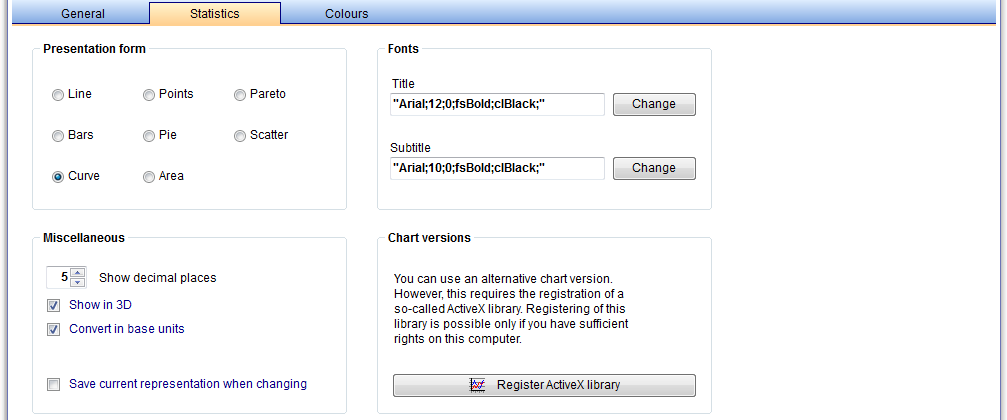 |
|
In the section Statistics, you can determine how your charts will be displayed in the reports. With this setting, your reports will always be consistent. |
| <a href="#top">Back to top</a> |
Colours
To edit the Settings of Colours click on the menu item System -> Configuration / administration -> Settings -> System -> Presentation options -> Colours.
You can use colours in the different sections of MedITEX IVF, for example in the section <a href="/index.php?title=Cryo_storage">Cryo storage</a>.
 |
|
| <img style="display: block; margin-left: auto; margin-right: auto;" src="/images/ColourUse.png" alt="" width="180" height="27" /> | Check this option if you wish to use custom colours only. |
Choose a colour:
- You can choose a colour by scrolling through the entire colour palette. If you wish to use standardized colour values, you can enter RGB values numerically. The currently selected colour will be shown in a small preview window.
- Click OK and the colour will be displayed in the list on the left side. The colour code of your operating system will be used for the description of the colour.
- To change the description, click on the text next to the colour.
| <a href="#top">Back to top</a> |
Interfaces
Only change the interface settings if you are sure what these changes will do in the program. Otherwise there may be functionality errors or complete failure of certain functions.
Internal
To edit the Settings of Internal interfaces click on the menu item System -> Configuration / administration -> Settings -> System -> Interfaces -> Internal.
 |
| In order to change file paths, click the directory symbol on the right side of the respective row. A dialog window will open and you can change the file path accordingly. |
External
To edit the Settings of External interfaces click on the menu item System -> Configuration / administration -> Settings -> System -> Interfaces -> External.
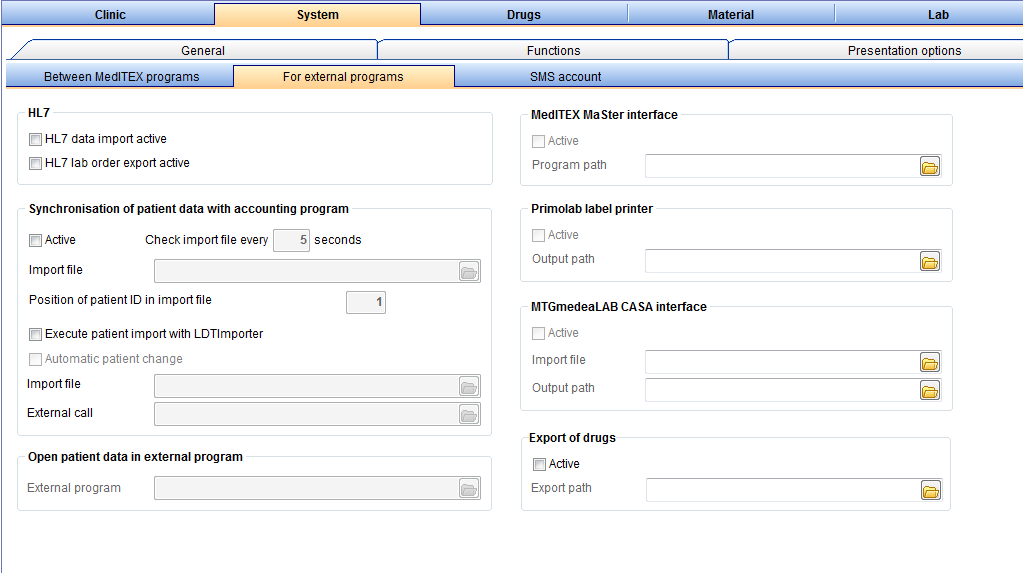 |
|
On this page you should include the path for importing or exporting Data from different programs. In order to change file paths, click the directory button on the right side of the respective row. A dialog window will open and you can change the file path accordingly. |
| <a href="#top">Back to top</a> |
SMS Account
 |
System tables
To edit the Settings of System tables click on the menu item System -> Configuration / administration -> Settings -> System -> System tables.
In the section System tables you can modify different values within the program accordingly. You can, for example, define additional measures for a cycle. These can then be shown as a selection field in the cycle.
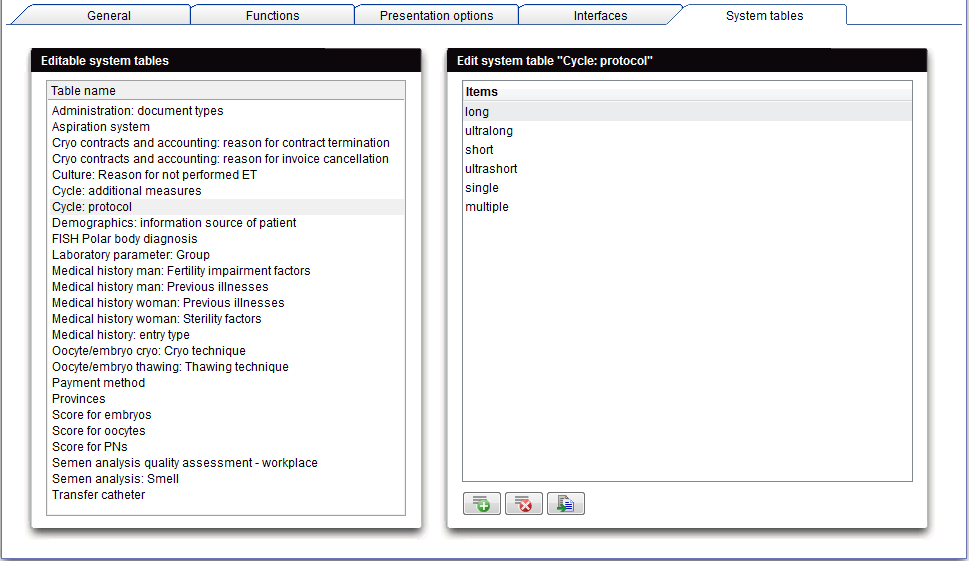 |
| <img style="display: block; margin-left: auto; margin-right: auto;" src="/images/Plus.png" alt="" width="23" height="23" /> |
Press New entry and enter the additional measure in the new line. Subsequently, the new additional measure will be displayed. The program will order the list alphabetically. |
| <img style="display: block; margin-left: auto; margin-right: auto;" src="/images/EditSemen.png" alt="" width="28" height="26" /> <img style="display: block; margin-left: auto; margin-right: auto;" src="/images/DeleteX.png" alt="" width="28" height="24" /> |
You can edit or delete the contents of the tables at any time. However, the predefined entries cannot be edited or deleted. |
There is one exception:
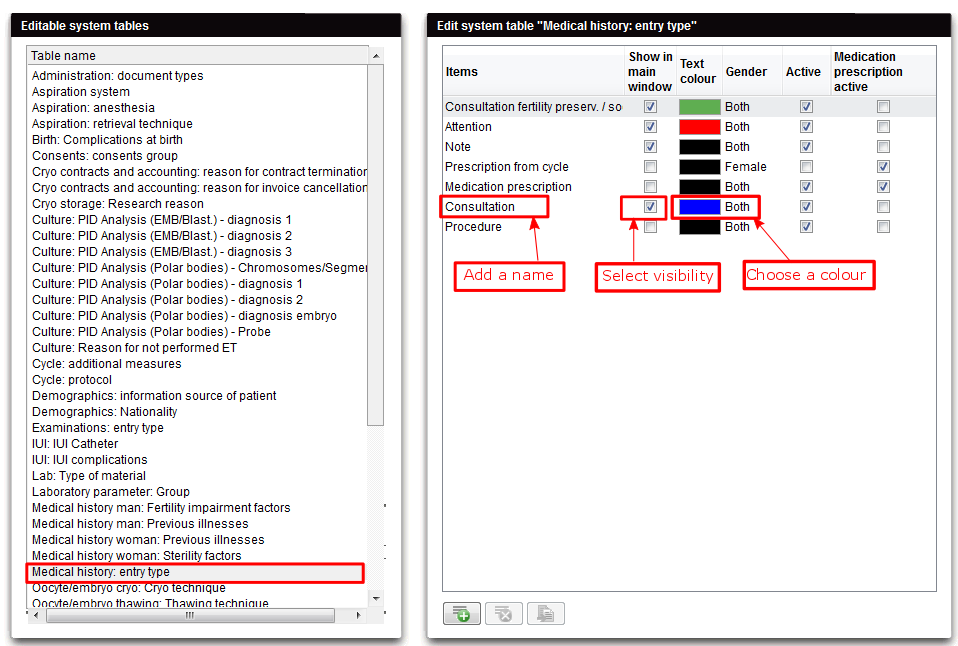 |
At the table Medical history: entry type you have more functionalities, as in the others. Here you can add additionally a text colour and if the Item should be shown in the main window.
| <img src="/images/tablesmedical1.png" alt="" width="532" height="130" /> | Here we are in the main window. You can see the different types of informations in their colours. |
You can also go to the system tables from the medical history page:
| <img src="/images/tablesmedical2.png" alt="" width="227" height="174" /> |
To edit the entries of medical history
In this list you can see all existing possibilities for entries at the medical history area. |
| <a href="#top">Back to top</a> |
Staff
To edit the Settings of Staff click on the menu item System -> Configuration / administration -> Settings -> Staff.
 |
| <a href="#top">Back to top</a> |
Drugs
To edit the Settings of Drugs click on the menu item System -> Configuration / administration -> Settings -> Drugs.
The section Drugs contains a fixed list of the most important products used in the field of reproductive medicine.
Besides, you can also define additional long-term and pill products that are used in your medical centre.
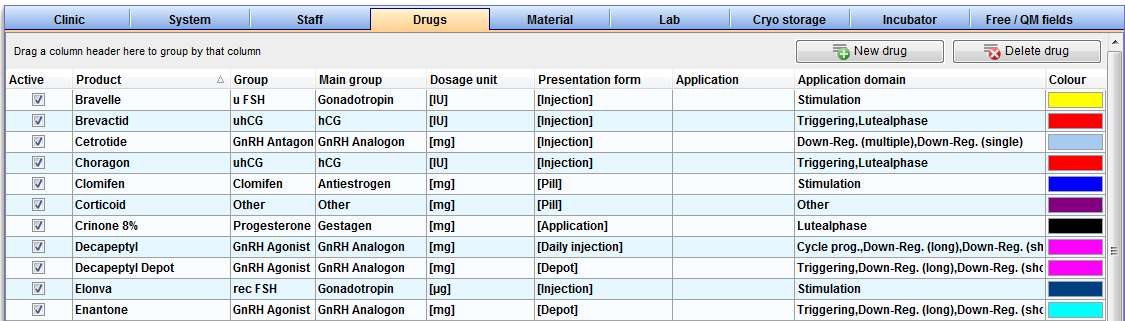 |
| <img style="display: block; margin-left: auto; margin-right: auto;" src="/images/NewDrug.png" alt="" width="154" height="26" /> |
New drug: add a new drug. |
| <img style="display: block; margin-left: auto; margin-right: auto;" src="/images/DeleteDrug.png" alt="" width="152" height="25" /> |
Delete drug: only drugs you have added yourself can be deleted by pressing this button. |
- The list of drugs contains products in the groups Gonadotropin, GnRH Analogon, hCG, Progesterone, Gestagen, Estrogen, Antiestrogen and Pill according to the current Red List®.
- The list of drugs is provided and updated by CRITEX and cannot be changed by the user.
- If you do not wish to use this drug, uncheck the box Active or double-click on the drug to open the drug editor. There you can uncheck the box Active. Now, the drug will not be available for selection in any window of the program.
- Press the column header to sort the entries according to their names, to reverse the sorting or to filter the list. <a href="/index.php?title=Welcome_to_MedITEX_IVF#Managing_Lists">Read here</a> how to manage lists.
 |
| <a href="/index.php?title=How_to_add_new_drugs%3F"><img src="/images/howto48.png" alt="" width="48" height="48" /></a> | <a href="/index.php?title=How_to_add_new_drugs%3F">Click here</a> to read more about adding new drugs. |
| <a href="#top">Back to top</a> |
Material
To edit the Settings of Material click on the menu item System -> Configuration / administration -> Settings -> Material.
In the section Material you can enter data concerning material groups, manufacturers and products. You can also create different batches and activate them for a certain period of time.
Articles / Batches
To edit the Settings of Articles / Batches click on the menu item System -> Configuration / administration -> Settings -> Material -> Articles / Batches.
On this tab, you can add the needed materials to the list and make them available for the creation of QM fields.
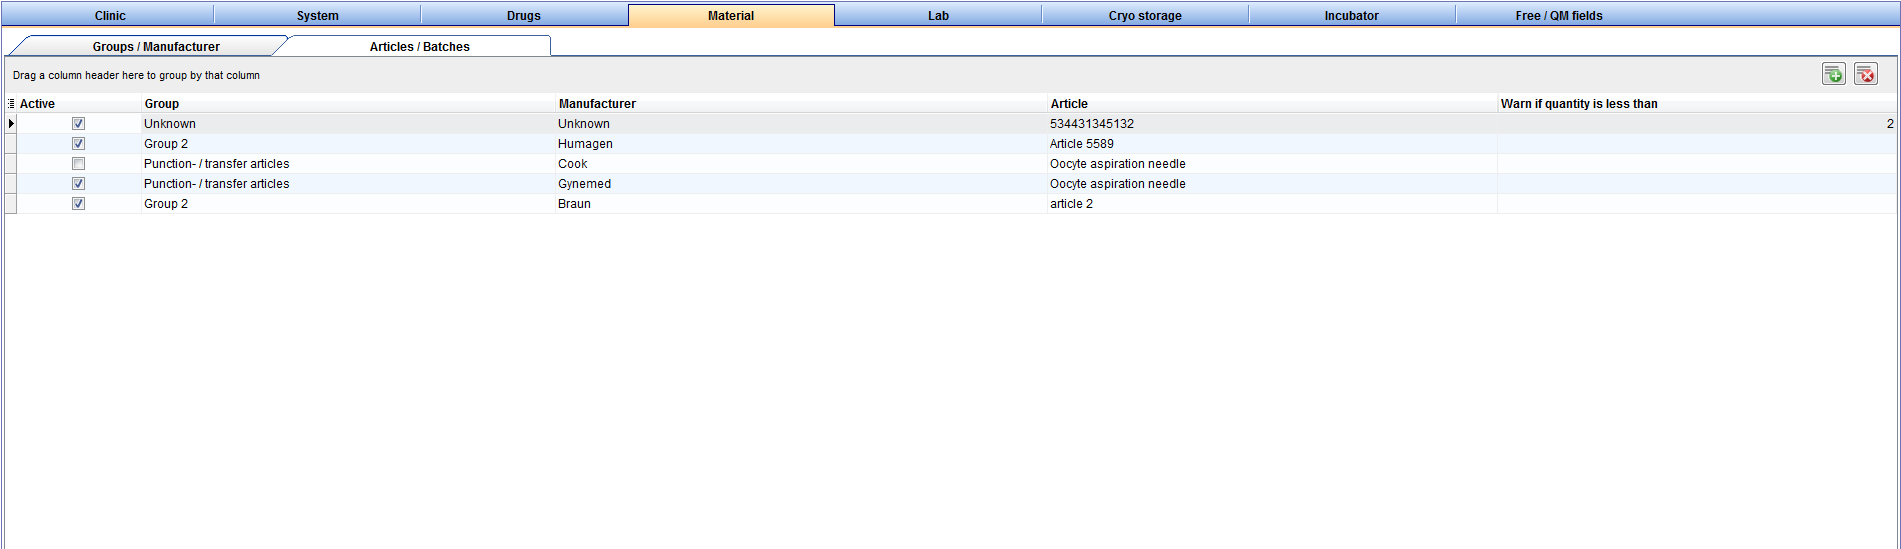 |
| <img style="display: block; margin-left: auto; margin-right: auto;" src="/images/Plus.png" alt="" /> | Press this button on the right to add a new article/batch. |
| <img style="display: block; margin-left: auto; margin-right: auto;" src="/images/DeleteX.png" alt="" width="26" height="24" /> |
Delete it with this button. This is only possible if articles have not been assigned to QM fields or are being used. Should this be the case, deactivate the item by unchecking the box Active. This data will then be hidden without being deleted. Articles can only be deleted if they have not yet been used. |
| <a href="/index.php?title=How_to_add_material_articles_/_batches%3F"><img src="/images/howto48.png" alt="" width="48" height="48" /></a> | <a href="/index.php?title=How_to_add_material_articles_/_batches%3F">Click here</a> to read more about adding new material and articles. |
Manufacturer
To edit the Settings of Manufacturer click on the menu item System -> Configuration / administration -> Settings -> Material -> Manufacturer.
You can see a list of all existing manufactures on the tab Manufacturer.
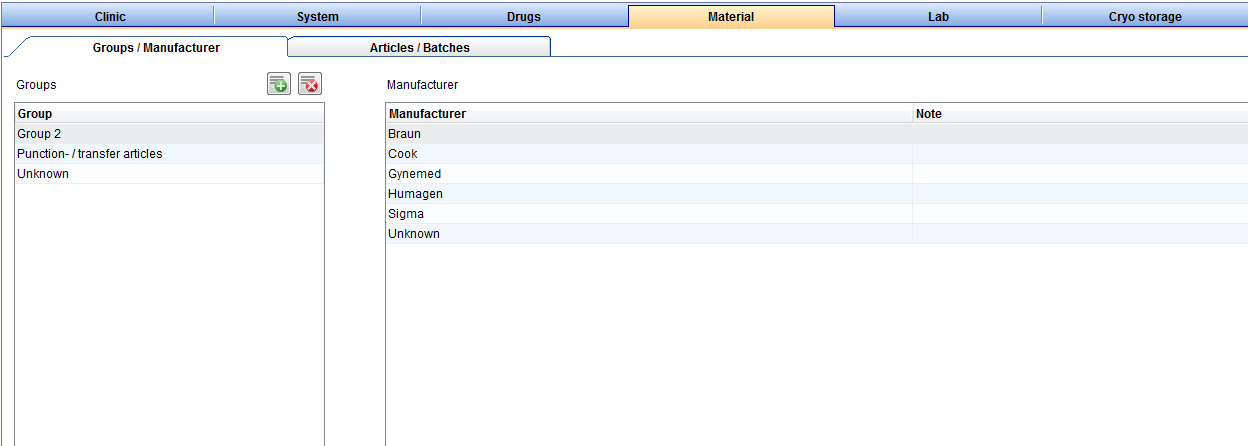 |
| <img style="display: block; margin-left: auto; margin-right: auto;" src="/images/Plus.png" alt="" /> | Press this button on the top right to add a new manufacturer. |
| <img style="display: block; margin-left: auto; margin-right: auto;" src="/images/DeleteX.png" alt="" width="26" height="24" /> |
Delete it with this button. This is only possible if manufactures have not been assigned to QM fields or are being used. Should this be the case, deactivate the item by unchecking the box Active. This data will then be hidden without being deleted. Manufacturers can only be deleted if they have not yet been used. |
| <a href="/index.php?title=How_to_add_material_manufacturer%3F"><img src="/images/howto48.png" alt="" width="48" height="48" /></a> | <a href="/index.php?title=How_to_add_material_manufacturer%3F">Click here</a> to read more about adding new manufacturers. |
Groups
To edit the Settings of Groups click on the menu item System -> Configuration / administration -> Settings -> Material -> Groups.
On this tab, you can create a new material group, for example probes. Here you can see a list of all existing groups.
 |
| <img style="display: block; margin-left: auto; margin-right: auto;" src="/images/Plus.png" alt="" /> | Press this button on the top right to create a new group. |
| <img style="display: block; margin-left: auto; margin-right: auto;" src="/images/DeleteX.png" alt="" width="26" height="24" /> |
Delete a group with this button. This is only possible if groups have not been assigned to QM fields or are being used. Should this be the case, deactivate the item by unchecking the box Active. This data will then be hidden without being deleted. Groups can only be deleted if they have not yet been used. |
| <a href="/index.php?title=How_to_add_material_groups%3F"><img src="/images/howto48.png" alt="" width="48" height="48" /></a> | <a href="/index.php?title=How_to_add_material_groups%3F">Click here</a> to read more about adding new manufacturers. |
| <a href="#top">Back to top</a> |
Lab
To edit the Settings of Lab click on the menu item System -> Configuration / administration -> Settings -> Lab.
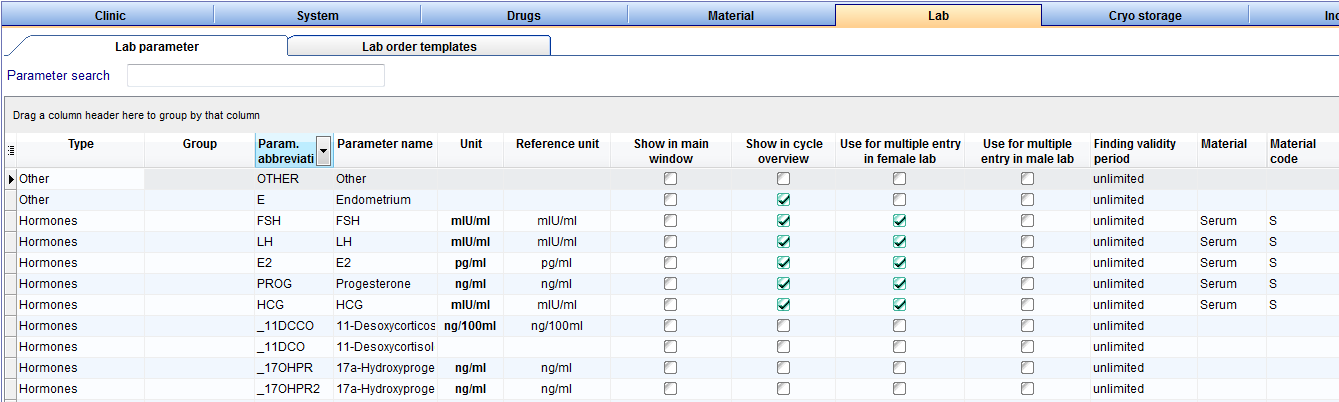 |
Explanation of the columns:
- Area: type of the lab value like: Hormones, Serology, Clinical chemistry, Genetics or Microbiology.
- Group: defines the groups of laboratory values as: Blood count, Coagulation, Genotype, Family history, etc.
- Param. short name: abbreviation of the parameter name.
- Parameter name: full name of the parameter.
- Unit: value specified unit. This can be customized in the laboratory parameter editor.
- Reference unit: through the button Restore reference units all changed parameters units are adjusted to the value of the reference units.
- Show in main window: if this box is checked, the laboratory value is displayed in the Lab test in the main window.
- Show in cycle overview: if this box is checked, the laboratory value is displayed in the Cycle overview.
- Use for multiple entry in female lab: when activating this field, the parameter appears in the list of female multiple entry.
- Use for multiple entry in male lab: when activating this field, the parameter appears in the list of male multiple entry.
- Finding validity period: decide here on the findings validity of the selected parameters.
 |
| <img style="display: block; margin-left: auto; margin-right: auto;" src="/images/Plus.png" alt="" /> | Press this button on the top right to add a new laboratory value. |
| <img src="/images/DeleteX.png" alt="" width="26" height="24" /> | Delete an existing laboratory value with this button. |
| <img src="/images/RestoreLab.png" alt="" width="200" height="28" /> | Through this button all changed parameters units are adjusted to the value of the reference units. |
| <a href="/index.php?title=How_to_add_/_edit_a_laboratory_parameter%3F"><img src="/images/howto48.png" alt="" width="48" height="48" /></a> | <a href="/index.php?title=How_to_add_/_edit_a_laboratory_parameter%3F">Click here</a> to read more about adding laboratory parameters. |
| <a href="#top">Back to top</a> |
Cryo storage
To edit the Settings of Cryo storage click on the menu item System -> Configuration / administration -> Settings -> Cryo storage.
In the section Cryo storage you can manage all cryo canisters and their storage system. You can define up to three hierarchic storage levels per canister. Their filling level can be checked in the freezing section to determine free space.
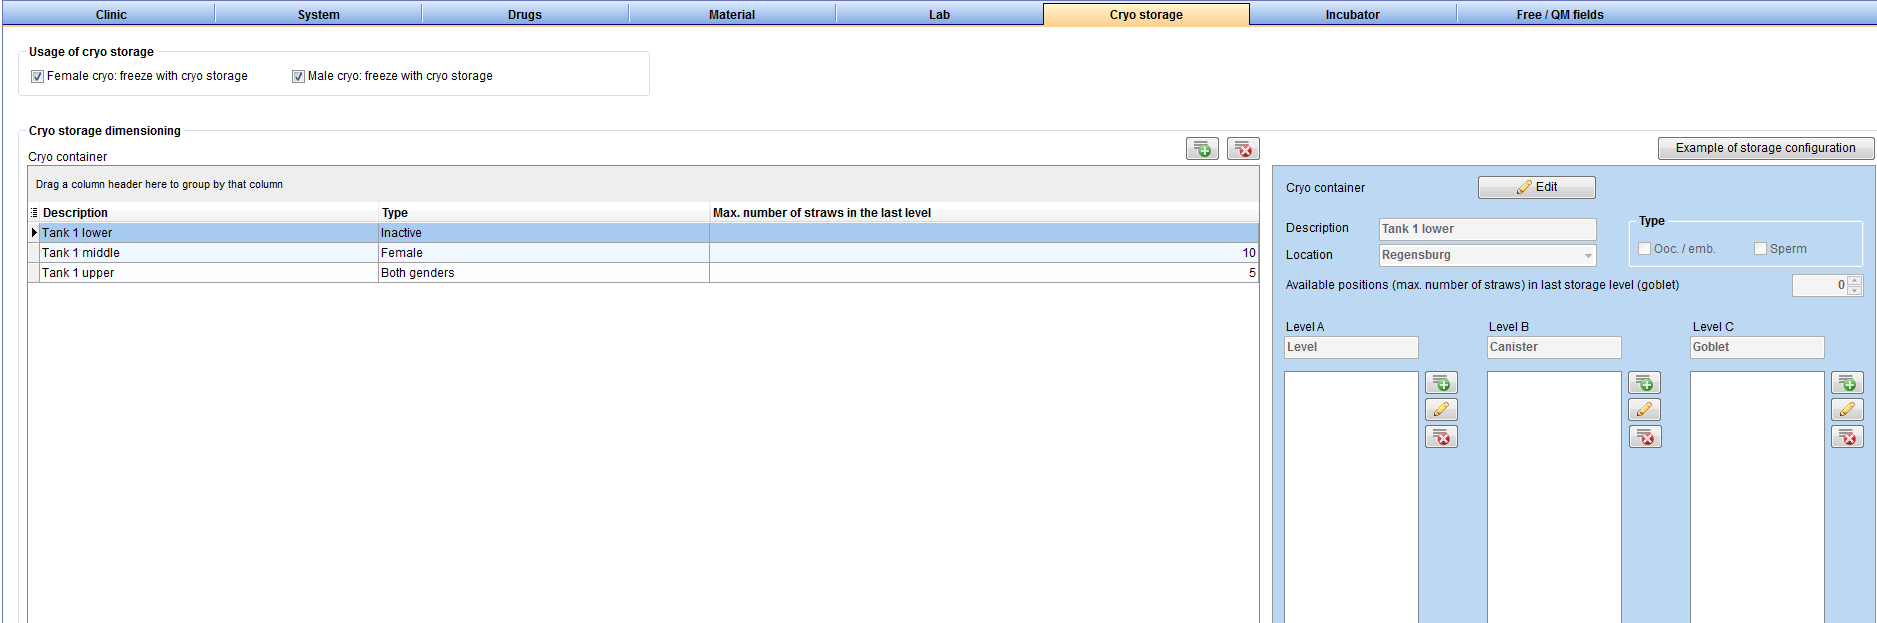 |
| <img src="/images/CryoFreeze.png" alt="" /> |
Freeze with cryo storage: You can choose which type you will freeze in your cryostorage: samples of women, samples of men, or both. This information is important because it is displayed in the <a href="/index.php?title=Cryo_storage#Cryostorage_overview">Cryo storage Overview</a>. |
| <img src="/images/ChangeLocation1.png" alt="" width="276" height="33" /> | Here you can switch between your different cryo storage locations, if you have more then one. |
| <img src="/images/ChangeLocation.png" alt="" /> | Modify the location of the selected container. |
| <img style="display: block; margin-left: auto; margin-right: auto;" src="/images/Plus.png" alt="" /> |
Press this button to add a new unit. For more information about adding a new unit, read <a href="/index.php?title=How_to_add_a_new_canister_to_the_cryo_storage%3F">here</a>. |
| <img style="display: block; margin-left: auto; margin-right: auto;" src="/images/DeleteX.png" alt="" width="26" height="24" /> | Select the unit you wish to delete and click this button. |
| <img src="/images/MaxNum.png" alt="" width="369" height="28" /> | Enter here the maximum number of frozen straws in the last level. It helps you for searching an empty place, if you are freeze a new straw in the freezing section. |
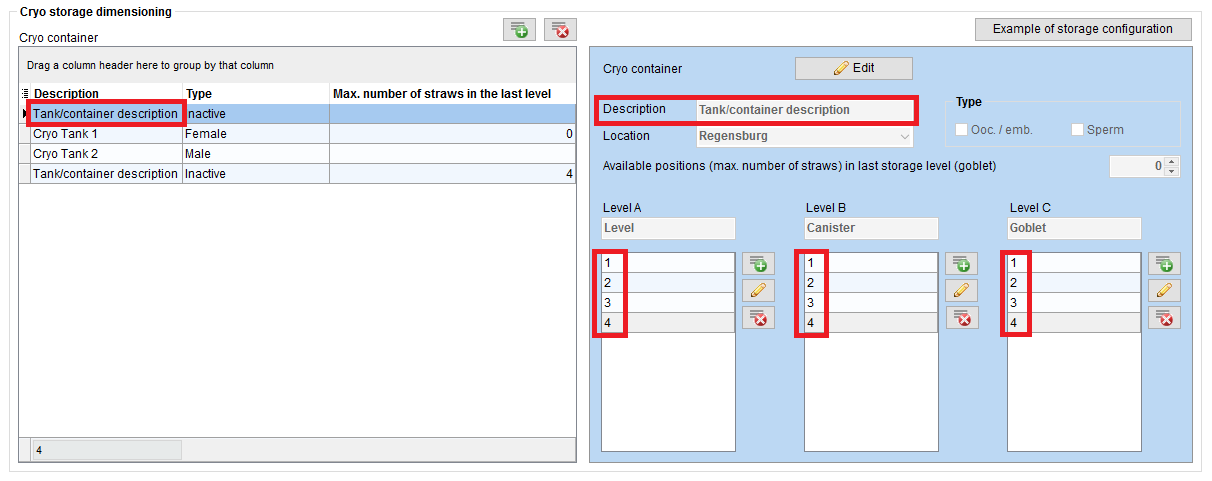 |
Storage dimensioning:
- When a new unit is created, the following fields have to be filled:
- Description
- Type
- Storage levels
- Type: you can also determine whether oocytes and embryos ("Ooc./emb.") or sperms (“Sperm”) will be stored in a given unit.
- It is possible to modify the name of the allocation units. Select an existing unit by clicking on it in the column Allocation unit and edit Description, Type and Storage levels accordingly.
| <a href="/index.php?title=How_to_add_a_new_canister_to_the_cryo_storage%3F"><img src="/images/howto48.png" alt="" width="48" height="48" /></a> | <a href="/index.php?title=How_to_add_a_new_canister_to_the_cryo_storage%3F">Click here</a> to learn how to add a new canister to the Cryo storage. |
| <a href="#top">Back to top</a> |
Incubator
To edit the Settings of Incubator click on the menu item System -> Configuration / administration -> Settings -> Incubator -> Incubator.
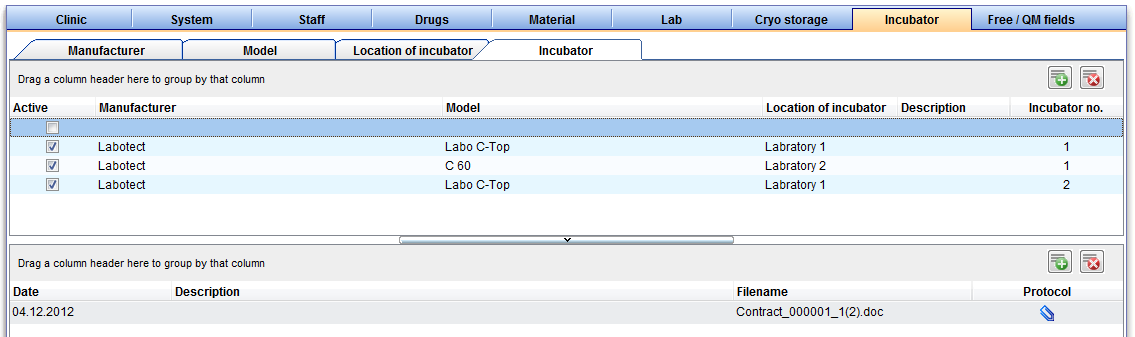 |
Incubator administration:
- Active: here you can see whether the incubator is set to Active.
- Manufacturer: registered Manufacturer of the incubator.
- Model: model/type of the incubator.
- Location of incubator: the place where the incubator is used.
- Description: special or specific notes about the incubator.
- Incubator no: enter a number to each incubator in order to distinguish them.
Incubator documents:
You can see the documents of a selected incubator.
- Date: creation date of the document.
- Description: short description with important information.
- Filename: name of the stored protocol.
- Protocol: stored notes.
Get more information about the adding and editing an incubator, .
| <a href="/index.php?title=How_to_add_/_edit_an_incubator%3F"><img src="/images/howto48.png" alt="" width="48" height="48" /></a> | <a href="/index.php?title=How_to_add_/_edit_an_incubator%3F">Click here</a> to read more about adding incubators. |
| <a href="#top">Back to top</a> |
Free / QM fields
To edit the Settings of Free / QM fields click on the menu item System -> Configuration / administration -> Settings -> Free / QM fields.
- Here you can configure all QM and free fields. QM stands for Quality Management and gives you an option to document all the extra information relevant to you with the help of QM fields.
- Staff, material, times and further free fields can be assigned to any QM field – and therefore every associated input area - in the settings.
 |
Buttons with a blue dotted frame have special functionalities. Click on it to have more information.
| <img style="display: block; margin-left: auto; margin-right: auto;" src="/images/Plus.png" alt="" /> | This button is placed at the QM assignment selection. It allows you to define or add new sub items. |
| <img style="display: block; margin-left: auto; margin-right: auto;" src="/images/DeleteX.png" alt="" /> | This button is placed at the QM assignment selection. You can delete articles from this area. |
| <img style="display: block; margin-left: auto; margin-right: auto;" src="/images/LeftRight.png" alt="" width="29" height="64" /> | Use this buttons between QM domain assignment and QM assignment selection to assign a selected entry (right) to a QM field (left) or delete an entry from the QM domain assignment (left). |
| <a href="/index.php?title=How_to_configure_items%3F"><img style="display: block; margin-left: auto; margin-right: auto; border: 2px dotted blue;" src="/images/QMEdit.png" alt="" width="24" height="23" /></a> | Configuration: add or edit members of staff, material or values. |
| Three QM types: | |
| <img style="display: block; margin-left: auto; margin-right: auto;" src="/images/O.png" alt="" /> | Staff: type of personnel. |
| <img style="display: block; margin-left: auto; margin-right: auto;" src="/images/L.png" alt="" /> | Material: materials and batch numbers. |
| <img style="display: block; margin-left: auto; margin-right: auto;" src="/images/F.png" alt="" /> | Free fields: any additional information. |
| <img style="display: block; margin-left: auto; margin-right: auto;" src="/images/QMDomanissignment.png" alt="" /> |
QM fields:
|
| <img src="/images/QMDomanis.png" alt="" /> |
Items assigned to the selected QM field:
|
| <img style="display: block; margin-left: auto; margin-right: auto;" src="/images/QMDomanissignmentSelection.png" alt="" /> |
Pool of all available items:
|
Press the column header to sort the items by their names, type or description.
| <a href="/index.php?title=MedITEX_IVF_how_to#QM_.2F_free_fields"><img src="/images/howto48.png" alt="" width="48" height="48" /></a> |
There are several options available to edit the items assigned to a QM field. Read more about it on our <a href="/index.php?title=MedITEX_IVF_how_to#QM_.2F_free_fields">How to</a> section. |
| <img src="/images/hint48.png" alt="" width="48" height="48" /> |
Tips for managing QM fields:
|
| <a href="/index.php?title=MedITEX_IVF_manual">Back to the MedITEX IVF menu </a> | <a href="#top">Back to top</a> |