Male examinations
From MedITEX - Wiki
(Difference between revisions)
| Line 1: | Line 1: | ||
| − | <table border="0" width="10" height="24"> | + | <table style="margin-left: auto; margin-right: auto;" border="0" width="10" height="24"> |
<tbody> | <tbody> | ||
<tr> | <tr> | ||
| Line 6: | Line 6: | ||
</tbody> | </tbody> | ||
</table> | </table> | ||
| + | <p style="text-align: justify;"> </p> | ||
<p style="text-align: justify;">The Examinations page is divided in two main parts:</p> | <p style="text-align: justify;">The Examinations page is divided in two main parts:</p> | ||
<ul> | <ul> | ||
| Line 12: | Line 13: | ||
</ul> | </ul> | ||
<p style="text-align: justify;"><em>Note: If the summary of previous pregnancies is clicked a window showing the outcome of the previous pregnancies will pop up. </em></p> | <p style="text-align: justify;"><em>Note: If the summary of previous pregnancies is clicked a window showing the outcome of the previous pregnancies will pop up. </em></p> | ||
| + | <p> </p> | ||
<h2>Buttons</h2> | <h2>Buttons</h2> | ||
<p>Some buttons have special functionalities. Click on it to have more information.</p> | <p>Some buttons have special functionalities. Click on it to have more information.</p> | ||
| Line 17: | Line 19: | ||
<tbody> | <tbody> | ||
<tr> | <tr> | ||
| − | <td><a href="/index.php?title=MedITEX_IVF_manual"><img style="display: block; margin-left: auto; margin-right: auto;" src="/images/homeico.jpg" alt="" width="70" height="37" /></a></td> | + | <td><a href="/index.php?title=MedITEX_IVF_manual"><img style="display: block; margin-left: auto; margin-right: auto; border: 2px dotted blue;" src="/images/homeico.jpg" alt="" width="70" height="37" /></a></td> |
| − | <td><span><strong> | + | <td><span><strong>Home button:</strong> click on this icon to go to the starting window.</span></td> |
</tr> | </tr> | ||
<tr> | <tr> | ||
| − | <td><a href="/index.php?title=Male_examinations#New_examination_window_.28example_male_finding.29:"><img style="display: block; margin-left: auto; margin-right: auto;" src="/images/NewEx.png" alt="" width="112" height="34" /></a></td> | + | <td><a href="/index.php?title=Male_examinations#New_examination_window_.28example_male_finding.29:"><img style="display: block; margin-left: auto; margin-right: auto; border: 2px dotted blue;" src="/images/NewEx.png" alt="" width="112" height="34" /></a></td> |
| − | <td><strong>New examination: </strong> | + | <td><strong>New examination:</strong> document the findings of an examination.</td> |
</tr> | </tr> | ||
<tr> | <tr> | ||
| Line 63: | Line 65: | ||
<p> </p> | <p> </p> | ||
<h2 style="text-align: left;">New examination window (example male finding):</h2> | <h2 style="text-align: left;">New examination window (example male finding):</h2> | ||
| − | <table border="0"> | + | <table style="margin-left: auto; margin-right: auto;" border="0"> |
<tbody> | <tbody> | ||
<tr> | <tr> | ||
Revision as of 16:54, 17 January 2013
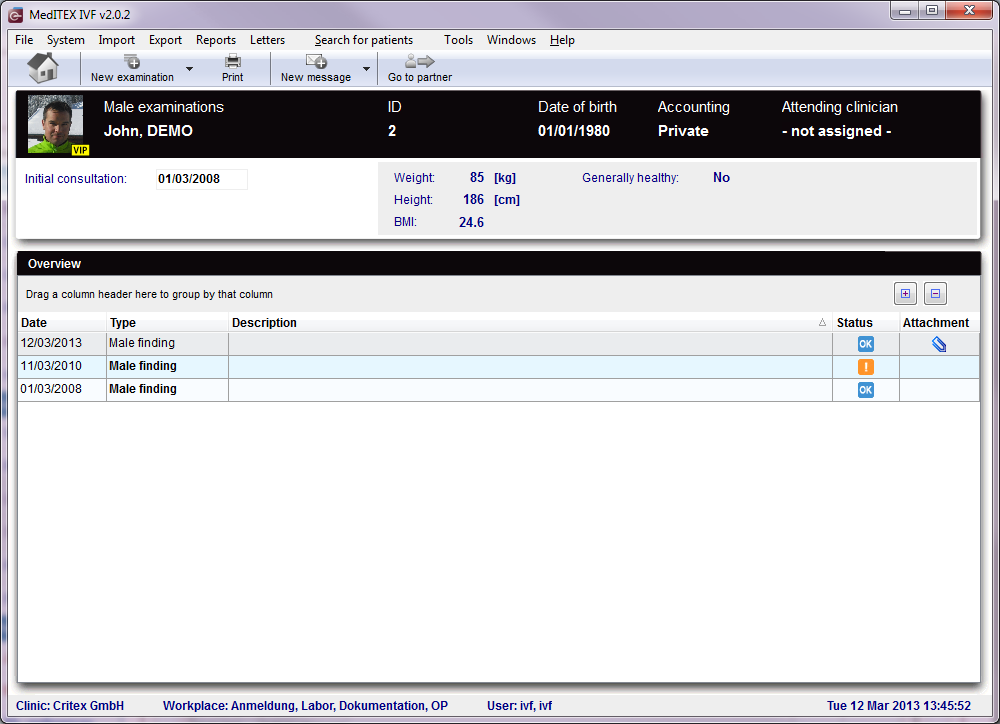 |
The Examinations page is divided in two main parts:
- The upper contains a summary of previous pregnancies (only for the female patient) and some anthropometric data.
- The lower section contains a list of all Examinations performed.
Note: If the summary of previous pregnancies is clicked a window showing the outcome of the previous pregnancies will pop up.
Buttons
Some buttons have special functionalities. Click on it to have more information.
| <a href="/index.php?title=MedITEX_IVF_manual"><img style="display: block; margin-left: auto; margin-right: auto; border: 2px dotted blue;" src="/images/homeico.jpg" alt="" width="70" height="37" /></a> | Home button: click on this icon to go to the starting window. |
| <a href="/index.php?title=Male_examinations#New_examination_window_.28example_male_finding.29:"><img style="display: block; margin-left: auto; margin-right: auto; border: 2px dotted blue;" src="/images/NewEx.png" alt="" width="112" height="34" /></a> | New examination: document the findings of an examination. |
| <img style="display: block; margin-left: auto; margin-right: auto;" src="/images/print.jpg" alt="" width="70" height="35" /> | Print: Click on this icon to print the list of Medical Histories and messages. |
| <img style="display: block; margin-left: auto; margin-right: auto;" src="/images/NewMessage.png" alt="" width="106" height="39" /> | New message: click on this button to send a message to the patient. This message can be an SMS, an email or a web portal message. |
| <img style="display: block; margin-left: auto; margin-right: auto;" src="/images/gotoparico.jpg" alt="" width="80" height="35" /> |
Go to partner: Click here to go to the partner's examinations. |
| <img style="display: block; margin-left: auto; margin-right: auto;" src="/images/PM.png" alt="" width="65" height="27" /> |
With these two buttons you can decide how much rows you see in the list. (Expand all rows, Collapse all rows) |
Clickable areas
| <img src="/images/Initial.png" alt="" width="240" height="33" /> | Here you can add the date of initial consultation. |
| <img src="/images/AreaNon.png" alt="" width="360" height="74" /> | It is no clickable area. You can see informations about the physique of the patient. |
New examination window (example male finding):
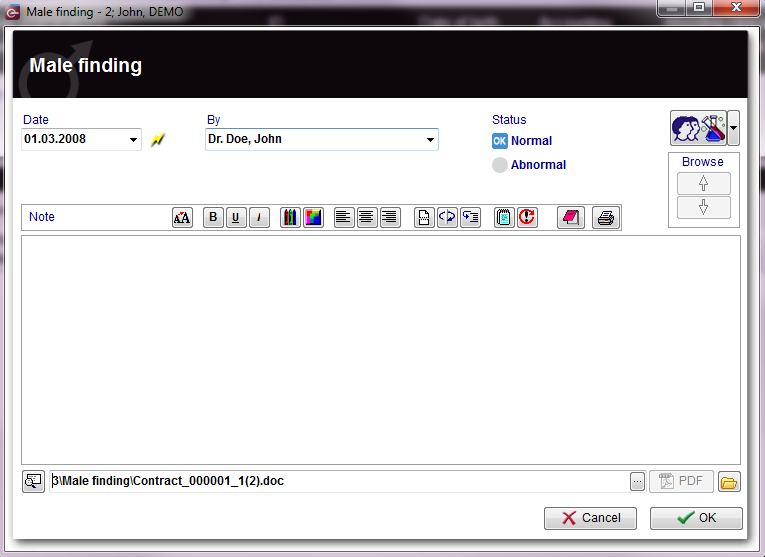 |
Explaination of the fields/icons:
- Date: date of the registration of the document. If the lightning icon is clicked will be selected the current date.
- By: author of the document or of the notes
- QM: QM field icon can be used to access the QM fields associated to this document
- Browse: clicking on the arrows will scroll the documents archived upwards or downwards
- Text area: a "WordPad" like tool that can be used to input a text.
- Container for pictures and documents: pictures and files can be easily linked to the document by dragging and dropping them into the blue box. Then they can be opened doble clicking on the icon.
- Open patient directory: opens the directory that contains all the files related to the patient
- Add document: allows to browse the directories and to add a single document
- Open document: always to open the document added.
Note: the only difference between female and male patient is that for the male patient is available only the option "Male Findings"
| <a href="/index.php?title=MedITEX_IVF_manual">Back to the MedITEX IVF menu </a> | <a href="#top">Back to top</a> |