Lab diagnostics female
From MedITEX - Wiki
(Difference between revisions)
| Line 1: | Line 1: | ||
<ul> | <ul> | ||
</ul> | </ul> | ||
| − | <p>In the section <strong> | + | <p>In the section <strong>Lab Diagnostics</strong>, you can enter all patient-related lab results. These include hormones, clinical chemistry and serology, genetics and microbiology.</p> |
<table border="0"> | <table border="0"> | ||
<tbody> | <tbody> | ||
| Line 11: | Line 11: | ||
</tbody> | </tbody> | ||
</table> | </table> | ||
| + | <p style="text-align: justify;"> </p> | ||
<p style="text-align: justify;"><strong>The Lab diagnostics page is divided in two main parts:</strong></p> | <p style="text-align: justify;"><strong>The Lab diagnostics page is divided in two main parts:</strong></p> | ||
<ul> | <ul> | ||
| Line 23: | Line 24: | ||
<li>All entries can be edited again by double-clicking them. You can delete an entry by selecting it and pressing the "DEL" key on your keyboard.</li> | <li>All entries can be edited again by double-clicking them. You can delete an entry by selecting it and pressing the "DEL" key on your keyboard.</li> | ||
</ul> | </ul> | ||
| + | <p style="text-align: justify;"> </p> | ||
<h2 style="text-align: justify;">Buttons</h2> | <h2 style="text-align: justify;">Buttons</h2> | ||
<table border="0"> | <table border="0"> | ||
<tbody> | <tbody> | ||
<tr> | <tr> | ||
| − | <td><span style="font-size: small;"><a href="/index.php?title=MedITEX_IVF_manual"><img style="display: block; margin-left: auto; margin-right: auto;" src="/images/homeico.jpg" alt="" width="70" height="37" /></a></span></td> | + | <td><span style="font-size: small;"><a href="/index.php?title=MedITEX_IVF_manual"><img style="display: block; margin-left: auto; margin-right: auto; border: 2px dotted blue;" src="/images/homeico.jpg" alt="" width="70" height="37" /></a></span></td> |
| − | <td><strong> | + | <td><strong>Home button:</strong> click on this icon to go to the starting window.</td> |
</tr> | </tr> | ||
<tr> | <tr> | ||
| − | <td><span style="font-size: small;"><a href="/index.php?title=Documenting_a_new_sample"><img style="display: block; margin-left: auto; margin-right: auto;" src="/images/newsampico.jpg" alt="" width="92" height="35" /></a></span></td> | + | <td><span style="font-size: small;"><a href="/index.php?title=Documenting_a_new_sample"><img style="display: block; margin-left: auto; margin-right: auto; border: 2px dotted blue;" src="/images/newsampico.jpg" alt="" width="92" height="35" /></a></span></td> |
<td><strong>New sample:</strong> click on this icon to document a new sample.</td> | <td><strong>New sample:</strong> click on this icon to document a new sample.</td> | ||
</tr> | </tr> | ||
<tr> | <tr> | ||
| − | <td><span style="font-size: small;"><a href="/index.php?title=Documenting_a_new_sample#Documenting_a_new_.22multiple.22_entry.C2.A0"><img style="display: block; margin-left: auto; margin-right: auto;" src="/images/multentrico.jpg" alt="" width="79" height="35" /></a></span></td> | + | <td><span style="font-size: small;"><a href="/index.php?title=Documenting_a_new_sample#Documenting_a_new_.22multiple.22_entry.C2.A0"><img style="display: block; margin-left: auto; margin-right: auto; border: 2px dotted blue;" src="/images/multentrico.jpg" alt="" width="79" height="35" /></a></span></td> |
<td><strong>Multiple entry:</strong> click on this icon to document many new samples at a time.</td> | <td><strong>Multiple entry:</strong> click on this icon to document many new samples at a time.</td> | ||
</tr> | </tr> | ||
| Line 43: | Line 45: | ||
</tr> | </tr> | ||
<tr> | <tr> | ||
| − | <td><span style="font-size: small;"><a href="/index.php?title=Lab_diagnostics#Creating_graphical_representation_of_lab_values"><img style="display: block; margin-left: auto; margin-right: auto;" src="/images/statico.jpg" alt="" width="60" height="35" /></a></span></td> | + | <td><span style="font-size: small;"><a href="/index.php?title=Lab_diagnostics#Creating_graphical_representation_of_lab_values"><img style="display: block; margin-left: auto; margin-right: auto; border: 2px dotted blue;" src="/images/statico.jpg" alt="" width="60" height="35" /></a></span></td> |
<td><strong>Statistics:</strong> click on this icon to create a graphical representation of lab values.</td> | <td><strong>Statistics:</strong> click on this icon to create a graphical representation of lab values.</td> | ||
</tr> | </tr> | ||
| Line 66: | Line 68: | ||
</tbody> | </tbody> | ||
</table> | </table> | ||
| + | <p> </p> | ||
<h2>Clickable areas</h2> | <h2>Clickable areas</h2> | ||
<p>Some clickable areas have special functionalities. Click on it to have more information.</p> | <p>Some clickable areas have special functionalities. Click on it to have more information.</p> | ||
| Line 79: | Line 82: | ||
</tr> | </tr> | ||
<tr> | <tr> | ||
| − | <td><a href="/index.php?title=Create_a_new_entry_in_medical_history#Documenting_previous_pregnancies"><img src="/images/PreviousPreg.png" alt=" | + | <td><a href="/index.php?title=Create_a_new_entry_in_medical_history#Documenting_previous_pregnancies"><img style="display: block; margin-left: auto; margin-right: auto; border: 2px dotted blue;" src="/images/PreviousPreg.png" alt="" /></a></td> |
<td><strong>Previous pregnancies:</strong> click on this link to open a window showing more info related to <a href="/index.php?title=Create_a_new_entry_in_medical_history#Documenting_previous_pregnancies">previous pregnancies'</a> outcome.</td> | <td><strong>Previous pregnancies:</strong> click on this link to open a window showing more info related to <a href="/index.php?title=Create_a_new_entry_in_medical_history#Documenting_previous_pregnancies">previous pregnancies'</a> outcome.</td> | ||
</tr> | </tr> | ||
| Line 86: | Line 89: | ||
<p style="text-align: justify;"> </p> | <p style="text-align: justify;"> </p> | ||
<h2>Lists</h2> | <h2>Lists</h2> | ||
| − | <table border="0"> | + | <table style="margin-left: auto; margin-right: auto;" border="0"> |
<tbody> | <tbody> | ||
<tr> | <tr> | ||
| Line 105: | Line 108: | ||
<li><strong>Attachment: </strong>contract or other documents about the lab value.</li> | <li><strong>Attachment: </strong>contract or other documents about the lab value.</li> | ||
</ul> | </ul> | ||
| − | |||
<ul> | <ul> | ||
</ul> | </ul> | ||
Revision as of 16:23, 17 January 2013
In the section Lab Diagnostics, you can enter all patient-related lab results. These include hormones, clinical chemistry and serology, genetics and microbiology.
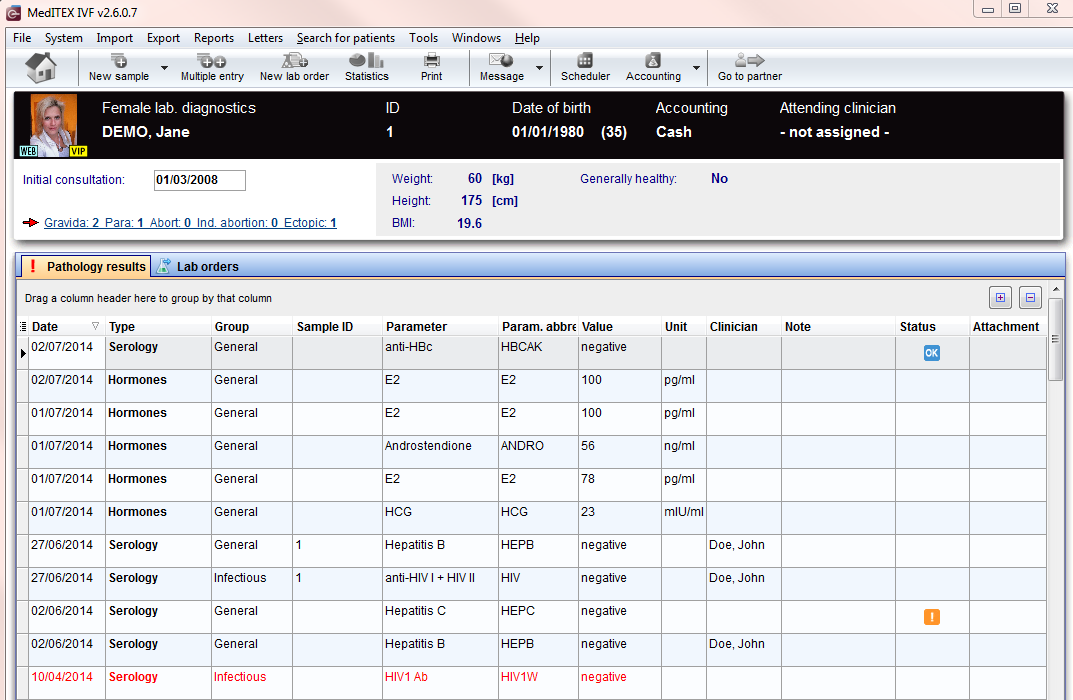 |
The Lab diagnostics page is divided in two main parts:
- The upper contains a summary of previous pregnancies (only for the female patient) and some anthropometric data.
- The lower section contains a list of all Lab exames performed and, for the male patient, a section containing a list of all the spermiogram performed.
Note: If the summary of previous pregnancies is clicked a window showing the outcome of the previous pregnancies will pop up.
- All lab results will be shown in the overview of the main window "Pathology results" (sorted by date). Ther respective statuses can be seen on the right side of the overview.
- Entries in the overview can be sorted or filtered by clicking the column headers. They can also be grouped by dragging them to the desired position. The changes will be saved and thus not be lost.
- All entries can be edited again by double-clicking them. You can delete an entry by selecting it and pressing the "DEL" key on your keyboard.
Buttons
| <a href="/index.php?title=MedITEX_IVF_manual"><img style="display: block; margin-left: auto; margin-right: auto; border: 2px dotted blue;" src="/images/homeico.jpg" alt="" width="70" height="37" /></a> | Home button: click on this icon to go to the starting window. |
| <a href="/index.php?title=Documenting_a_new_sample"><img style="display: block; margin-left: auto; margin-right: auto; border: 2px dotted blue;" src="/images/newsampico.jpg" alt="" width="92" height="35" /></a> | New sample: click on this icon to document a new sample. |
| <a href="/index.php?title=Documenting_a_new_sample#Documenting_a_new_.22multiple.22_entry.C2.A0"><img style="display: block; margin-left: auto; margin-right: auto; border: 2px dotted blue;" src="/images/multentrico.jpg" alt="" width="79" height="35" /></a> | Multiple entry: click on this icon to document many new samples at a time. |
| <img style="display: block; margin-left: auto; margin-right: auto;" src="/images/LabOrder.png" alt="" /> | Lab order: here you can appoint / send laboratory orders. |
| <a href="/index.php?title=Lab_diagnostics#Creating_graphical_representation_of_lab_values"><img style="display: block; margin-left: auto; margin-right: auto; border: 2px dotted blue;" src="/images/statico.jpg" alt="" width="60" height="35" /></a> | Statistics: click on this icon to create a graphical representation of lab values. |
| <img style="display: block; margin-left: auto; margin-right: auto;" src="/images/print.jpg" alt="" width="70" height="35" /> | Print: click on this icon to print the list of lab samples. |
| <img style="display: block; margin-left: auto; margin-right: auto;" src="/images/NewMessage.png" alt="" width="106" height="39" /> | New message: click on this button to send a message to the patient. This message can be an SMS, an email or a web portal message. |
| <img style="display: block; margin-left: auto; margin-right: auto;" src="/images/gotoparico.jpg" alt="" width="80" height="35" /> | Go to partner: click here to go to the partner's Lab diagnostics. |
| <img style="display: block; margin-left: auto; margin-right: auto;" src="/images/PM.png" alt="" width="65" height="27" /> |
with these two buttons you can decide how much rows you see in the list. (Expand all rows, Collapse all rows) |
Clickable areas
Some clickable areas have special functionalities. Click on it to have more information.
| <img src="/images/Initial.png" alt="" width="240" height="33" /> | Here you can add the date of initial consultation. |
| <img src="/images/AreaNon.png" alt="" width="360" height="74" /> | It is no clickable area. You can see informations about the physique of the patient. |
| <a href="/index.php?title=Create_a_new_entry_in_medical_history#Documenting_previous_pregnancies"><img style="display: block; margin-left: auto; margin-right: auto; border: 2px dotted blue;" src="/images/PreviousPreg.png" alt="" /></a> | Previous pregnancies: click on this link to open a window showing more info related to <a href="/index.php?title=Create_a_new_entry_in_medical_history#Documenting_previous_pregnancies">previous pregnancies'</a> outcome. |
Lists
 |
- Date: date of the analisys.
- Type: area of the lab value like Hormones, Serology, Clinical chemistry, Genetics or Microbiology.
- Sample ID: ID of the single lab sample.
- Parameter: shortname of the parameter.
- Value: result value of the laboratory sample.
- Unit: default units for the parameter
- Note: add here important notes.
- Description: add a description here.
- Status: lab results that are particularly important, clinically relevant or that still need to be modified can be given the satus "Abnormal".
- Attachment: contract or other documents about the lab value.
| <a href="/index.php?title=MedITEX_IVF_manual">Back to the MedITEX IVF menu </a> | <a href="#top">Back to top</a> |