How to print letters?
From MedITEX - Wiki
| Line 76: | Line 76: | ||
</table> | </table> | ||
<p> </p> | <p> </p> | ||
| − | <p>Report editor will open.</p> | + | <p><strong>Report editor</strong> will open.</p> |
<p>First you will need to open and run the query where the letter is generated from.</p> | <p>First you will need to open and run the query where the letter is generated from.</p> | ||
<table style="margin-left: auto; margin-right: auto;" border="0"> | <table style="margin-left: auto; margin-right: auto;" border="0"> | ||
| Line 101: | Line 101: | ||
<tr> | <tr> | ||
<td> | <td> | ||
| − | < | + | <ul> |
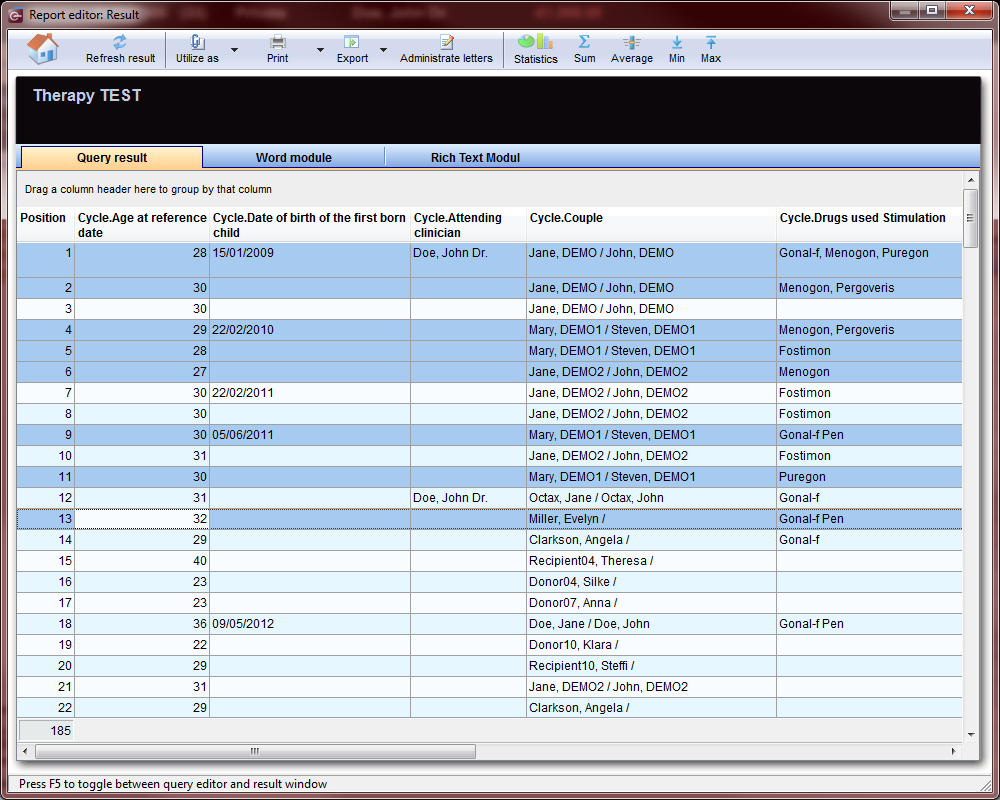
| − | < | + | <li>In the <strong>Query result</strong>, where you can see all data selected from the query, you have to select all letters that must be printed.</li> |
| − | < | + | </ul> |
| − | < | + | <ul> |
| + | <li>It is important to know that each row in this list will result in an individual letter. So if you have 185 results like the image below, you will be printing all 185 letters if you select all rows.</li> | ||
| + | </ul> | ||
| + | <ul> | ||
| + | <li>To select rows, you can hold the <strong>Ctrl </strong>key in your keyboard and click on each one that needs to be printed. You can also select several letters by holding the <strong>Shift</strong> key, but instead of selecting individual rows, it will select all rows between to cells.</li> | ||
| + | </ul> | ||
| + | <ul> | ||
| + | <li>If you wish to print letters for all rows, hold <strong>Shift</strong> and click on the first letter. Scroll down to the botton of the list and while still pressing <strong>Shift</strong>, click on the last row. Now all rows are selected.</li> | ||
| + | </ul> | ||
</td> | </td> | ||
</tr> | </tr> | ||
| Line 112: | Line 120: | ||
<tr> | <tr> | ||
<td> | <td> | ||
| − | < | + | <ul> |
| − | < | + | <li>After selecting the necessary rows, switch to the <strong>WOMOD</strong> tab.</li> |
| − | < | + | </ul> |
| + | <ul> | ||
| + | <li>On the <strong>WOMOD </strong>tab, click on the arrow next to the print buttom and select <strong>Print serial letters</strong>.</li> | ||
| + | </ul> | ||
| + | <ul> | ||
| + | <li>The letters will be saved in the <strong>File storage</strong> for each patient where the letter was created and will be immediately printed. This time, <strong>Microsoft Word </strong>will not open.</li> | ||
| + | </ul> | ||
</td> | </td> | ||
</tr> | </tr> | ||
<tr> | <tr> | ||
| − | <td | + | <td><img style="display: block; margin-left: auto; margin-right: auto;" src="/images/letters10.png" alt="" width="668" height="400" /></td> |
| − | + | ||
| − | </td> | + | |
</tr> | </tr> | ||
</tbody> | </tbody> | ||
</table> | </table> | ||
| − | |||
<table style="float: right;" border="0"> | <table style="float: right;" border="0"> | ||
<tbody> | <tbody> | ||
Revision as of 17:09, 18 July 2013
In MedITEX IVF you can print individual letters for a single patient or couple, or serial letters for as many patients as you need.
Here is how you perform such tasks.
Individual letters
Once you have created letters using the Report editor and saved it for future use inside MedITEX IVF, you can print it using the Letters option from the menu bar. Follow the steps below:
| <a href="/index.php?title=How_to_create_a_new_query%3F"><img src="/images/howto48.png" alt="" width="48" height="48" /></a> | <a href="/index.php?title=How_to_create_a_new_query%3F">Click here</a> if you do not know how to create letters. |
| <a href="/index.php?title=Result_management"><img src="/images/plus48.png" alt="" width="48" height="48" /></a> | <a href="/index.php?title=Result_management">Click here</a> if you don't know how to customize the letter. |
Letters generated from a template in Report editor have to be assigned to a specific area in MedITEX IVF (explained <a href="/index.php?title=Result_management#Using_letters_as_standard_templates">here</a>).
For the purpose of this example, we are going to use an Administration letter.
|
| <img style="display: block; margin-left: auto; margin-right: auto;" src="/images/letters8.png" alt="" width="574" height="332" /> |
|
| <img src="/images/hint48.png" alt="" width="48" height="48" /> | You only need to assign the letter to one of the areas in MedITEX IVF once, or if you made changes to the query. |
Serial letters
Serial letters can only be opened from within Report editor.
To open Report editor, go to Reports -> Report editor in the menu bar.
| <img style="display: block; margin-left: auto; margin-right: auto;" src="/images/ReportEd.png" alt="" /> |
Report editor will open.
First you will need to open and run the query where the letter is generated from.
| <a href="/index.php?title=How_to_load_a_query%3F"><img src="/images/howto48.png" alt="" width="48" height="48" /></a> | <a href="/index.php?title=How_to_load_a_query%3F">Click here</a> if you do not know how to load the query. |
After the query is loaded and is running, you will be directed to the Result window.
| <a href="/index.php?title=Result_management"><img src="/images/plus48.png" alt="" width="48" height="48" /></a> | <a href="/index.php?title=Result_management">Click here</a> to know more about the Result management. |
|
 |
|
| <img style="display: block; margin-left: auto; margin-right: auto;" src="/images/letters10.png" alt="" width="668" height="400" /> |
| <a href="/index.php?title=MedITEX_IVF_how_to">Back to How to</a> | <a href="#top">Back to top</a> |