Gestione risultati
From MedITEX - Wiki
| (22 intermediate revisions by one user not shown) | |||
| Line 2: | Line 2: | ||
<tbody> | <tbody> | ||
<tr> | <tr> | ||
| − | <td>[[Image: | + | <td>[[Image:Gestione_Risultati_1_IT.PNG|none|740px|thumb|left|link=http://wiki.meditex-software.com//images/Gestione_Risultati_1_IT.PNG| ]]</td> |
</tr> | </tr> | ||
</tbody> | </tbody> | ||
</table> | </table> | ||
| − | <p> | + | <p>Dopo aver Eseguito una Query la finastra dei <strong>Risultati</strong> si apre.</p> |
<p> </p> | <p> </p> | ||
| − | <h2> | + | <h2>Pulsanti</h2> |
| − | <p> | + | <p>Pulsanti con il contorno blu tratteggiato sono selezionabili.</p> |
<table style="margin-left: auto; margin-right: auto;" border="0"> | <table style="margin-left: auto; margin-right: auto;" border="0"> | ||
<tbody> | <tbody> | ||
<tr> | <tr> | ||
| − | <td><a href="/index.php?title= | + | <td><a href="/index.php?title=MedITEX_IVF_Pagina_Principale"><img style="display: block; margin-left: auto; margin-right: auto; border: 2px dotted blue;" src="/images/HomeRE.png" alt="" width="70" height="35" /></a></td> |
| − | <td> | + | <td>Cliccando questo pulsante si ritorna alla pagina principale di MedITEX IVF.</td> |
</tr> | </tr> | ||
<tr> | <tr> | ||
| − | <td><img style="display: block; margin-left: auto; margin-right: auto;" src="/images/ | + | <td><img style="display: block; margin-left: auto; margin-right: auto;" src="/images/Gestione_Risultati_2_IT.PNG" alt="" width="103" height="36" /></td> |
| − | <td> | + | <td>Se valori di uno o più campi ella query vengono modificati, la finestra dei risultati può essere <strong>aggiornata</strong> premendo questo pulsante, senza dover rieseguire lan query.</td> |
</tr> | </tr> | ||
<tr> | <tr> | ||
| − | <td><img style="display: block; margin-left: auto; margin-right: auto;" src="/images/ | + | <td><img style="display: block; margin-left: auto; margin-right: auto;" src="/images/Gestione_Risultati_3_IT.PNG" alt="" /></td> |
| − | <td> | + | <td>Arraverso questo pulsante sarà possibile impostare la query come <strong>work list</strong> nella sezione liste o utilizzarla come <strong>lettera </strong>in una delle sezioni di MedITEX IVF.</td> |
</tr> | </tr> | ||
<tr> | <tr> | ||
| − | <td><img style="display: block; margin-left: auto; margin-right: auto;" src="/images/ | + | <td><img style="display: block; margin-left: auto; margin-right: auto;" src="/images/Gestione_Risultati_4_IT.PNG" alt="" width="88" height="37" /></td> |
| − | <td> | + | <td>Risultati della query possono essere stampati come tabella o come lettere singole o seriali, in basa alla tab attiva (Risultati Query, modulo Word o modiulo Rich text).</td> |
</tr> | </tr> | ||
<tr> | <tr> | ||
| − | <td><img style="display: block; margin-left: auto; margin-right: auto;" src="/images/ | + | <td><img style="display: block; margin-left: auto; margin-right: auto;" src="/images/Gestione_Risultati_5_IT.PNG" alt="" width="70" height="36" /></td> |
| − | <td> | + | <td>Cliccando questo pulsante la tabella dei risultati può essere <strong>esportata</strong> in fiversi formati (Excel, CSV, HTML, TXT, PDF e XML).</td> |
</tr> | </tr> | ||
<tr> | <tr> | ||
| − | <td style="text-align: center;"><a href="/index.php?title= | + | <td style="text-align: center;"><a href="/index.php?title=Gestione_risultati#Gestione_lettere"><img style="display: block; margin-left: auto; margin-right: auto; border: 2px dotted blue;" src="/images/Gestione_Risultati_6_IT.PNG" alt="" width="91" height="37" /></a></td> |
| − | <td> | + | <td>Cliccando questo pulsante si potrà accedere alla finestra <strong>Configurazione</strong>.</td> |
</tr> | </tr> | ||
<tr> | <tr> | ||
| − | <td style="text-align: center;"><a href="/index.php?title= | + | <td style="text-align: center;"><a href="/index.php?title=Gestione_risultati#Analisi_statistiche"><img style="display: block; margin-left: auto; margin-right: auto; border: 2px dotted blue;" src="/images/Gestione_Risultati_7_IT.PNG" alt="" width="68" height="40" /></a></td> |
| − | <td> | + | <td>questo pulsante può essere utilizzato per <strong>creare grafici</strong>.</td> |
</tr> | </tr> | ||
<tr> | <tr> | ||
| − | <td style="text-align: center;"><img src="/images/ | + | <td style="text-align: center;"><img src="/images/Gestione_Risultati_8_IT.PNG" alt="" width="54" height="38" /></td> |
| − | <td> | + | <td>La <strong>somma dei valori</strong> di una colonna sarà calcolata.</td> |
</tr> | </tr> | ||
<tr> | <tr> | ||
| − | <td style="text-align: center;"><img src="/images/ | + | <td style="text-align: center;"><img src="/images/Gestione_Risultati_9_IT.PNG" alt="" width="47" height="37" /></td> |
| − | <td> | + | <td>La <strong>media dei valori</strong> di una colonna sarà calcolata.</td> |
</tr> | </tr> | ||
<tr> | <tr> | ||
| − | <td style="text-align: center;"><img src="/images/ | + | <td style="text-align: center;"><img src="/images/Gestione_Risultati_10_IT.PNG" alt="" width="34" height="37" /></td> |
| − | <td> | + | <td>Il <strong>valore minimo</strong> di una colonna verrà visualizzato alla base della colonna stessa.</td> |
</tr> | </tr> | ||
<tr> | <tr> | ||
| − | <td style="text-align: center;"><img src="/images/ | + | <td style="text-align: center;"><img src="/images/Gestione_Risultati_11_IT.PNG" alt="" width="38" height="36" /></td> |
| − | <td> | + | <td>Il <strong>valore massimo</strong> di una colonna verrà visualizzato alla base della colonna stessa.</td> |
</tr> | </tr> | ||
</tbody> | </tbody> | ||
</table> | </table> | ||
<p> </p> | <p> </p> | ||
| − | <h2> | + | <h2>Risultati query</h2> |
| − | <p> | + | <p>Se la tab dei <strong>Risultati della query</strong> è attiva, tutti i campi precedentemente selezionati visualizzati in colonne. <strong>Ogni riga della tabella rappresenta un record</strong>.</p> |
<table style="margin-left: auto; margin-right: auto;" border="0"> | <table style="margin-left: auto; margin-right: auto;" border="0"> | ||
<tbody> | <tbody> | ||
<tr> | <tr> | ||
| − | <td>[[Image: | + | <td>[[Image:Gestione_Risultati_1_IT.PNG|none|740px|thumb|left|link=http://wiki.meditex-software.com/images/Gestione_Risultati_1_IT.PNG| ]]</td> |
</tr> | </tr> | ||
</tbody> | </tbody> | ||
</table> | </table> | ||
<p> </p> | <p> </p> | ||
| − | <h3> | + | <h3>Filtrare, raggruppare o ordinare la lista dei risultati</h3> |
| − | <p> | + | <p>La lista dei risultati può essere filtrata, raggruppata e ordinata cliccando sull'intestazione delle colonne, come spiegato <a href="/index.php?title=Benvenuti_in_MedITEX_IVF#Gestione_Liste">qui</a><strong>.</strong> Il filtro corrisponde ad una restrizione logica dei risultati visualizzati nella tabella (es. solo pazienti incinte, etc.).</p> |
<p> </p> | <p> </p> | ||
| − | <h3> | + | <h3>Analisi statistiche</h3> |
| − | <p> | + | <p>I risultati della query possono esssere utilizzati in <strong>analisi statistiche</strong>.</p> |
| − | <p> | + | <p>Ci sono<strong> due modi </strong>per creare questo tipo di analisi:</p> |
<p> </p> | <p> </p> | ||
| − | <h4> | + | <h4>Funzioni matematiche</h4> |
| − | <p> | + | <p>In questa sezione possono essere applicate su colonne alcune f<strong>unzioni matematiche di base</strong>, come <strong>somma</strong>, <strong>media</strong>, <strong>minimo</strong> e <strong>massimo</strong>, oppure si possono <strong>generare grafici</strong>.</p> |
<table border="0"> | <table border="0"> | ||
<tbody> | <tbody> | ||
<tr> | <tr> | ||
| − | <td><img src="/images/ | + | <td><img src="/images/Gestione_Risultati_12_IT.PNG" alt="" width="394" height="148" /></td> |
<td> | <td> | ||
<ul> | <ul> | ||
| − | <li> | + | <li>Cliccando<strong> </strong><img src="/images/Gestione_Risultati_8_IT.PNG" alt="" width="54" height="38" />, la <strong>somma dei valori</strong> della colonna in cui s trova la cella selezionata (numero 8, cerchiato in rosso), sarà <strong>visulaizzata alla base</strong> della stessa colonna.</li> |
</ul> | </ul> | ||
<ul> | <ul> | ||
| − | <li> | + | <li>Cliccando <img src="/images/Gestione_Risultati_9_IT.PNG" alt="" width="47" height="37" />,<strong> </strong>la<strong> media dei valori</strong> della colonna in cui s trova la cella selezionata, sarà <strong>visulaizzata alla base</strong> della stessa colonna.</li> |
</ul> | </ul> | ||
<ul> | <ul> | ||
| − | <li> | + | <li>Cliccando <img src="/images/Gestione_Risultati_10_IT.PNG" alt="" width="34" height="37" /> o <img src="/images/Gestione_Risultati_11_IT.PNG" alt="" width="38" height="36" />, il <strong>valore minimo </strong>(nell'esempio lo 0) o til <strong>valore massimo</strong> (nell'esempio l' 8) sarà <strong>visulaizzato alla base</strong> della stessa colonna.</li> |
</ul> | </ul> | ||
</td> | </td> | ||
| Line 97: | Line 97: | ||
</table> | </table> | ||
<p> </p> | <p> </p> | ||
| − | <h4> | + | <h4>Creare un grafico</h4> |
<table style="margin-left: auto; margin-right: auto;" border="0"> | <table style="margin-left: auto; margin-right: auto;" border="0"> | ||
<tbody> | <tbody> | ||
<tr> | <tr> | ||
| − | <td><img src="/images/ | + | <td><img src="/images/Gestione_Risultati_7_IT.PNG" alt="" width="68" height="40" /></td> |
| − | <td> | + | <td>Cliccando il pulsante <strong>Statistiche</strong>, la seguente finestra si aprirà:</td> |
</tr> | </tr> | ||
</tbody> | </tbody> | ||
| Line 110: | Line 110: | ||
<tr> | <tr> | ||
<td> | <td> | ||
| − | <p>[[Image: | + | <p>[[Image:Gestione_Risultati_13_IT.PNG|none|740px|thumb|left|link=http://wiki.meditex-software.com/images/Gestione_Risultati_13_IT.PNG| ]]</p> |
</td> | </td> | ||
</tr> | </tr> | ||
| Line 116: | Line 116: | ||
</table> | </table> | ||
<p> </p> | <p> </p> | ||
| − | <p> | + | <p>Per l'<strong>asse x</strong> è possibile selezionare qualsiasi colonna della tabella dei risultati.</p> |
| − | <p> | + | <p>Per l'<strong>asse y</strong>, invece, sarà possibile selezionare campi (colonne) a cui sono associati valori numerici (numeri interi o decimali).</p> |
| − | <p> | + | <p>Le statistiche disponibili sono di <strong>tipo descrittivo</strong>: istogrammi, grafici a torta, a linee o singoli punti. </p> |
| − | <p> | + | <p>L'<strong>interpretazione</strong> dei valori <strong>dell'asse y</strong> dipende esclusivamente dalla scala di misurazione dei dati utilizzati (i dati sono, tuttavia, visualizzati come se appartenessero all'intervallo di scala).</p> |
<p> </p> | <p> </p> | ||
<table border="0"> | <table border="0"> | ||
<tbody> | <tbody> | ||
<tr> | <tr> | ||
| − | <td colspan="2"><strong> | + | <td colspan="2"><strong>Spiegazione campi/icone:</strong></td> |
</tr> | </tr> | ||
<tr> | <tr> | ||
| − | <td>Curve, | + | <td>Curve, Barre... Pareto</td> |
| − | <td> | + | <td>Diversi tipi di <strong>layout del grafico</strong> selezianabili.</td> |
</tr> | </tr> | ||
<tr> | <tr> | ||
<td><img style="display: block; margin-left: auto; margin-right: auto;" src="/images/2D3D.png" alt="" width="59" height="28" /></td> | <td><img style="display: block; margin-left: auto; margin-right: auto;" src="/images/2D3D.png" alt="" width="59" height="28" /></td> | ||
| − | <td> | + | <td>Cliccando questi pulsanti, il grafico avrà un <strong>layout </strong><strong>2D/3D </strong>.</td> |
</tr> | </tr> | ||
<tr> | <tr> | ||
<td style="text-align: center;"><img src="/images/0,00.png" alt="" /><br /></td> | <td style="text-align: center;"><img src="/images/0,00.png" alt="" /><br /></td> | ||
| − | <td> | + | <td>Pulsante per impostare il numero di<strong> cifre decimali</strong>.</td> |
</tr> | </tr> | ||
<tr> | <tr> | ||
| − | <td style="text-align: center;"><img src="/images/ | + | <td style="text-align: center;"><img src="/images/Gestione_Risultati_14_IT.PNG" alt="" width="57" height="25" /><br /></td> |
| − | <td> | + | <td>Permette di scegliere il <strong>colore dello sfondo</strong> del grafico e della cornice. La terza opzione permette di <strong>invertire i colori</strong> tra grafico e cornice.</td> |
</tr> | </tr> | ||
<tr> | <tr> | ||
| − | <td style=" | + | <td><img style="display: block; margin-left: auto; margin-right: auto;" src="/images/Gestione_Risultati_15_IT.PNG" alt="" width="57" height="26" /></td> |
| − | <td> | + | <td>Cliccare su questo pulsante per <strong>visualizzare/nascondere la legenda</strong>.</td> |
</tr> | </tr> | ||
<tr> | <tr> | ||
| − | <td><img style="display: block; margin-left: auto; margin-right: auto;" src="/images/ | + | <td><img style="display: block; margin-left: auto; margin-right: auto;" src="/images/Gestione_Risultati_16_IT.PNG" alt="" width="57" height="25" /></td> |
| − | <td> | + | <td>Cliccare su questo pulsante per <strong>visualizzare/nascondere la barra degli strumenti</strong>.</td> |
</tr> | </tr> | ||
<tr> | <tr> | ||
| − | <td><img style="display: block; margin-left: auto; margin-right: auto;" src="/images/ | + | <td><img style="display: block; margin-left: auto; margin-right: auto;" src="/images/PlusChart.png" alt="" width="54" height="29" /></td> |
| − | <td> | + | <td>Creare un nuovo grafico. si aprirà sulla destra della finestra principale. Chiudere il grafico con la <strong>X</strong> rossa.</td> |
</tr> | </tr> | ||
<tr> | <tr> | ||
| − | <td><img style="display: block; margin-left: auto; margin-right: auto;" src="/images/ | + | <td>Parametro</td> |
| − | <td> | + | <td>Cambia i parametri del grafico.</td> |
| + | </tr> | ||
| + | <tr> | ||
| + | <td>Periodo di tempo</td> | ||
| + | <td>Imposta un periodo.</td> | ||
| + | </tr> | ||
| + | <tr> | ||
| + | <td><img style="display: block; margin-left: auto; margin-right: auto;" src="/images/Gestione_Risultati_17_IT.PNG" alt="" width="30" height="26" /></td> | ||
| + | <td>Distribuzione dei valori dell'asse X.</td> | ||
</tr> | </tr> | ||
<tr> | <tr> | ||
| − | <td> | + | <td><img style="display: block; margin-left: auto; margin-right: auto;" src="/images/Gestione_Risultati_18_IT.PNG" alt="" width="55" height="27" /></td> |
| − | <td> | + | <td>Distribuzione dei valori dell'asse Y come funzione dei valori dell'asse X</td> |
</tr> | </tr> | ||
<tr> | <tr> | ||
| − | <td> | + | <td><img style="display: block; margin-left: auto; margin-right: auto;" src="/images/Gestione_Risultati_19_IT.PNG" alt="" width="29" height="26" /></td> |
| − | <td> | + | <td>Distribuzione dei valori dell'asse Y.</td> |
</tr> | </tr> | ||
<tr> | <tr> | ||
<td style="text-align: center;"><img src="/images/Ed.png" alt="" /></td> | <td style="text-align: center;"><img src="/images/Ed.png" alt="" /></td> | ||
| − | <td> | + | <td>Cliccare su questo pulsante per <strong>modificare i titoli del grafico</strong>.</td> |
</tr> | </tr> | ||
<tr> | <tr> | ||
<td style="text-align: center;"><img src="/images/ed1.png" alt="" width="24" height="22" /></td> | <td style="text-align: center;"><img src="/images/ed1.png" alt="" width="24" height="22" /></td> | ||
| − | <td> | + | <td>Cliccare su questo pulsante per modificare<strong> carattere </strong>e<strong> colore </strong>dei titoli e legenda del grafico.</td> |
</tr> | </tr> | ||
<tr> | <tr> | ||
<td style="text-align: center;"><img src="/images/ed2.png" alt="" width="24" height="22" /></td> | <td style="text-align: center;"><img src="/images/ed2.png" alt="" width="24" height="22" /></td> | ||
| − | <td> | + | <td>Cliccare su questo pulsante per <strong>visualizzare/nascondere</strong><strong> la barra dei colori/design e la legenda</strong>. Scegliendo l'opzione <strong>Editor Dati </strong>sarà possibile <strong>modificare i valori</strong> del grafico.</td> |
</tr> | </tr> | ||
<tr> | <tr> | ||
<td style="text-align: center;"><img src="/images/ed3.png" alt="" width="24" height="22" /></td> | <td style="text-align: center;"><img src="/images/ed3.png" alt="" width="24" height="22" /></td> | ||
| − | <td> | + | <td>Cliccare su questo pulsante per <strong>modificare le opzioni di visualizzazione.</strong></td> |
</tr> | </tr> | ||
<tr> | <tr> | ||
| − | <td><img style="display: block; margin-left: auto; margin-right: auto;" src="/images/ | + | <td><img style="display: block; margin-left: auto; margin-right: auto;" src="/images/Gestione_Risultati_20_IT.PNG" alt="" width="82" height="24" /></td> |
<td> | <td> | ||
| − | <p><strong> | + | <p><strong>Cliccando su questo pulsante l'utente potrà:</strong></p> |
<ul> | <ul> | ||
| − | <li> | + | <li>scegliere di stampare il grafico; </li> |
| − | <li> | + | <li>inviare i dati o il grafico alla finestra di appunti;</li> |
| − | <li> | + | <li>esportare il grafico in file .chf, .xls o .csv;</li> |
| − | <li> | + | <li>importare il grafco da file .chf;</li> |
| − | <li> | + | <li>Cambiare tipo di grafico.</li> |
</ul> | </ul> | ||
</td> | </td> | ||
| Line 197: | Line 205: | ||
</tbody> | </tbody> | ||
</table> | </table> | ||
| − | |||
<table style="margin-left: auto; margin-right: auto;" border="0" width="457" height="92"> | <table style="margin-left: auto; margin-right: auto;" border="0" width="457" height="92"> | ||
<tbody> | <tbody> | ||
| Line 203: | Line 210: | ||
<td><img src="/images/hint48.png" alt="" width="48" height="48" /></td> | <td><img src="/images/hint48.png" alt="" width="48" height="48" /></td> | ||
<td> | <td> | ||
| − | <p> | + | <p>Se il vostro sistema non supporta le librerie necessarie, vi sarà presentata una versione semplificata di questo tool.</p> |
| − | <p> | + | <p>E' inoltre possibile passare da una visualizzazione grafica ad un'altra cliccando su <strong>Grafico -> Cambia tipo di grafico.</strong></p> |
| − | + | ||
| − | + | ||
| − | + | ||
| − | + | ||
| − | + | ||
</td> | </td> | ||
</tr> | </tr> | ||
| Line 215: | Line 217: | ||
</table> | </table> | ||
<p> </p> | <p> </p> | ||
| − | <h2>Word | + | <h2>Modulo Word</h2> |
| − | <p> | + | <p>Selezionando la <strong>tab Modulo Word</strong> apparirà una lista.</p> |
<table style="margin-left: auto; margin-right: auto;" border="0"> | <table style="margin-left: auto; margin-right: auto;" border="0"> | ||
<tbody> | <tbody> | ||
<tr> | <tr> | ||
| − | <td>[[Image: | + | <td>[[Image:Gestione_Risultati_21_IT.PNG|none|740px|thumb|left|link=http://wiki.meditex-software.com/images/Gestione_Risultati_21_IT.PNG| ]]</td> |
</tr> | </tr> | ||
</tbody> | </tbody> | ||
</table> | </table> | ||
<p> </p> | <p> </p> | ||
| − | <h3> | + | <h3>Spiegazione Colonne</h3> |
<table border="0"> | <table border="0"> | ||
<tbody> | <tbody> | ||
<tr> | <tr> | ||
| − | <td style="text-align: center;"><strong><span style="font-size: small;"> | + | <td style="text-align: center;"><strong><span style="font-size: small;">Segnaposto</span></strong></td> |
<td> | <td> | ||
| − | <p> | + | <p>Questa colonna elenca i <strong>segnaposti </strong>presenti nella query. Ogni segnaposto è stato generato dalla selezione <strong>dei campi durante la creazione della query</strong>. Un segnaposto può essere <strong>duplicato </strong>semplicemente facendo doppio click sul nome<strong>.</strong></p> |
| − | <p> | + | <p>Se lo stesso segnaposto deve essere presente <strong>in più parti</strong> del documento è sufficiente <strong>duplicarlo</strong>.</p> |
| − | <p> | + | <p>Il <strong>nuovo segnaposto</strong> verrà riempito con lo <strong>stesso valore</strong> del segnaposto da cui è stato creato.</p> |
</td> | </td> | ||
</tr> | </tr> | ||
<tr> | <tr> | ||
| − | <td style="text-align: center;" | + | <td style="text-align: center;"><span style="font-size: small;"><strong>Usa</strong></span></td> |
| − | <td> | + | <td>L'utente può decidere se <strong>utilizzare o meno</strong> il segnaposto nel documento. Per <strong>modificare lo stato</strong> da Si a No è sufficiente fare<strong> doppio click</strong> sulla riga del segnaposto corrispondente.</td> |
</tr> | </tr> | ||
<tr> | <tr> | ||
| − | <td style="text-align: center;"><strong><span style="font-size: small;"> | + | <td style="text-align: center;"><strong><span style="font-size: small;">Segnalibro</span></strong></td> |
| − | <td> | + | <td>Questa colonna elenca i nomi dei segnalibri inseriti nel documento <strong>Word </strong>relativo alla query. Per <strong>modificare </strong>il nome di questi segnalibri è sufficiente fare <strong>doppio click</strong>.</td> |
</tr> | </tr> | ||
<tr> | <tr> | ||
| − | <td style="text-align: center;"><strong><span style="font-size: small;"> | + | <td style="text-align: center;"><strong><span style="font-size: small;">Valore</span></strong></td> |
<td> | <td> | ||
| − | <p> | + | <p>In questa colonna vengono visualizzati i <strong>risultati</strong> di ogni<strong> segnaposto</strong> per il <strong>recor</strong>d selezionato nella lista dei risultati.</p> |
</td> | </td> | ||
</tr> | </tr> | ||
| Line 253: | Line 255: | ||
<td><img style="display: block; margin-left: auto; margin-right: auto;" src="/images/REButtons.png" alt="" /></td> | <td><img style="display: block; margin-left: auto; margin-right: auto;" src="/images/REButtons.png" alt="" /></td> | ||
<td> | <td> | ||
| − | <p> | + | <p>Con questi pulsanti è possibile cambiare il record selezionato nella lista dei risultati, i valori dei risultati visualizzati nella colonna valori cambieranno di conseguenza.</p> |
</td> | </td> | ||
</tr> | </tr> | ||
<tr> | <tr> | ||
| − | <td><img src="/images/ | + | <td><img src="/images/Gestione_Risultati_22_IT.PNG" alt="" width="198" height="23" /></td> |
<td> | <td> | ||
| − | <p><strong> | + | <p><strong>Utilizzare segnaposti aggiuntivi</strong>:</p> |
| − | <p>In | + | <p>In aggiunta ai <strong>campi selezionati</strong> durante la <strong>creazione della query</strong>, è possibile utilizzare segnaposti aggiuntivi. Questo pulsante permette all'utente di <strong>aggiugere alla lettera</strong> segnalibri contenenti:<strong> Immagini ecografiche </strong>e <strong>delle cellule</strong>, <strong>firme utenti</strong><strong>, data</strong> e<strong> ora di stampa </strong>del documento.</p> |
| − | <p> | + | <p>Quando un <strong>segnaposto</strong> viene <strong>aggiunto</strong>, apparirà nella lista assieme al suo <strong>segnalibro</strong> e potrà essere inserito nella lettera come tutti gli altri.</p> |
</td> | </td> | ||
</tr> | </tr> | ||
| Line 267: | Line 269: | ||
</table> | </table> | ||
<p> </p> | <p> </p> | ||
| − | <h3> | + | <h3>Creare una lettera</h3> |
| − | <p> | + | <p>Quando una query viene salvata per la prima volta, un modulo <strong>Word</strong> viene creato nella cartella WOMOD. Questa cartella si trova in File_Storage\Templates. Il percorso completo è inserito nelle <a href="/index.php?title=MedITEX_IVF_Impostazioni#Sistema">impostazioni</a>.</p> |
<table border="0"> | <table border="0"> | ||
<tbody> | <tbody> | ||
<tr> | <tr> | ||
| − | <td><img style="display: block; margin-left: auto; margin-right: auto;" src="/images/ | + | <td><img style="display: block; margin-left: auto; margin-right: auto;" src="/images/Gestione_Risultati_23_IT.PNG" alt="" width="150" height="34" /></td> |
<td> | <td> | ||
| − | <p> | + | <p>Premendo questo pulsante il <strong>template standard WOMOD </strong>si apre<strong>.</strong> Il template conterà i segnalibri presenti nella lista Segnalibri con il relativo segnaposto.</p> |
</td> | </td> | ||
</tr> | </tr> | ||
<tr> | <tr> | ||
<td colspan="2"> | <td colspan="2"> | ||
| − | <p> | + | <p>Se il modello di una lettera è già disponibile in formato <strong>MS Word</strong>, è possibile salvare il modello come template prima di creare la query. Il template deve essere salvato nella cartella WOMOD con lo<strong> stesso nome</strong> che verrà dato alla <strong>query</strong>.</p> |
</td> | </td> | ||
</tr> | </tr> | ||
| Line 285: | Line 287: | ||
</table> | </table> | ||
<p> </p> | <p> </p> | ||
| − | <p><strong> | + | <p><strong>Per creare una lettera:</strong></p> |
<table style="margin-left: auto; margin-right: auto;" border="0"> | <table style="margin-left: auto; margin-right: auto;" border="0"> | ||
<tbody> | <tbody> | ||
<tr> | <tr> | ||
| − | <td>[[Image: | + | <td>[[Image:Gestione_Risultati_24_IT.PNG|none|740px|thumb|left|link=http://wiki.meditex-software.com/images/Gestione_Risultati_24_IT.PNG| ]]</td> |
</tr> | </tr> | ||
<tr> | <tr> | ||
| − | <td>1. | + | <td>1. Scrivere il testo standard.</td> |
</tr> | </tr> | ||
</tbody> | </tbody> | ||
| Line 300: | Line 302: | ||
<tbody> | <tbody> | ||
<tr> | <tr> | ||
| − | <td>[[Image: | + | <td>[[Image:Gestione_Risultati_25_IT.PNG|none|350px|thumb|left|link=http://wiki.meditex-software.com/images/Gestione_Risultati_25_IT.PNG| ]]</td> |
| − | <td>[[Image: | + | <td>[[Image:Gestione_Risultati_26_IT.PNG|none|350px|thumb|left|link=http://wiki.meditex-software.com/images/Gestione_Risultati_26_IT.PNG| ]]</td> |
</tr> | </tr> | ||
<tr> | <tr> | ||
<td colspan="2"> | <td colspan="2"> | ||
| − | <p>2. | + | <p>2. <strong>Tagliare</strong> e <strong>incollare </strong>i segnalibri nella posizione corretta. Una volta spostato il segnalibro, il suo segnaposto può essere eliminato dal fondo della pagina.</p> |
</td> | </td> | ||
</tr> | </tr> | ||
| Line 314: | Line 316: | ||
<tbody> | <tbody> | ||
<tr> | <tr> | ||
| − | <td>[[Image: | + | <td>[[Image:Gestione_Risultati_27_IT.PNG|none|740px|thumb|left|link=http://wiki.meditex-software.com/images/Gestione_Risultati_27_IT.PNG| ]]</td> |
</tr> | </tr> | ||
<tr> | <tr> | ||
| − | <td>3. | + | <td>3. Una volta che tutti i segnalibri sono stati sistemati e i relativi segnaposti eliminati, la lettera può essere salvata.</td> |
</tr> | </tr> | ||
</tbody> | </tbody> | ||
| Line 325: | Line 327: | ||
<tbody> | <tbody> | ||
<tr> | <tr> | ||
| − | <td><img src="/images/ | + | <td><img src="/images/Gestione_Risultati_29_IT.PNG" alt="" width="150" height="105" /></td> |
| − | <td> | + | <td>Il <strong>testo standard</strong> di lettere già salvate può essere modificate attraverso il pulsante <strong>Modifica template</strong>.</td> |
</tr> | </tr> | ||
<tr> | <tr> | ||
| − | <td><img src="/images/ | + | <td><img src="/images/Gestione_Risultati_30_IT.PNG" alt="" width="151" height="105" /></td> |
| − | <td> | + | <td>Per visualizzare e stampare la lettera relativa al record selezionato premere <strong>Crea lettera</strong>. Una lettera con tutti i segnalibri riemtpiti si aprirà:</td> |
</tr> | </tr> | ||
<tr> | <tr> | ||
| − | <td colspan="2">[[Image: | + | <td colspan="2">[[Image:Gestione_Risultati_28_IT.PNG|none|700px|thumb|left|link=http://wiki.meditex-software.com/images/Gestione_Risultati_28_IT.PNG| ]]</td> |
</tr> | </tr> | ||
</tbody> | </tbody> | ||
</table> | </table> | ||
<p> </p> | <p> </p> | ||
| − | <h3> | + | <h3>Utilizzare una lettera come template standard</h3> |
| − | <p> | + | <p>Dopo aver creato la lettera è possibile renderla disponibile, nelle varie sezioni di MedITEX IVF, come lettera standard.</p> |
| − | <p> | + | <p>In base ai dati selezionati nella query, sezioni di MedITEX IVF si attiveranno nel menù a tendina.</p> |
<table style="margin-left: auto; margin-right: auto;" border="0"> | <table style="margin-left: auto; margin-right: auto;" border="0"> | ||
<tbody> | <tbody> | ||
<tr> | <tr> | ||
<td colspan="2"> | <td colspan="2"> | ||
| − | <p> | + | <p>Se la query contiene dati appartenenti a:</p> |
</td> | </td> | ||
</tr> | </tr> | ||
| Line 351: | Line 353: | ||
<td> | <td> | ||
<ul> | <ul> | ||
| − | <li> | + | <li>Terapia</li> |
</ul> | </ul> | ||
<ul> | <ul> | ||
| − | <li> | + | <li>OI-IUI</li> |
</ul> | </ul> | ||
<ul> | <ul> | ||
| − | <li> | + | <li>Anamnesi</li> |
</ul> | </ul> | ||
<ul> | <ul> | ||
| − | <li> | + | <li>Risultati laboratorio </li> |
</ul> | </ul> | ||
<ul> | <ul> | ||
| − | <li> | + | <li>Spermiogramma</li> |
</ul> | </ul> | ||
<ul> | <ul> | ||
| − | <li> | + | <li>Dati paziente</li> |
</ul> | </ul> | ||
<ul> | <ul> | ||
| − | <li> | + | <li>Medici di Riferimento</li> |
| + | </ul> | ||
| + | <ul> | ||
| + | <li>Diagn. Strumentale</li> | ||
</ul> | </ul> | ||
</td> | </td> | ||
<td> | <td> | ||
<ul> | <ul> | ||
| − | <li> | + | <li>sarà possibile utilizzare il documento come <strong>lettera terapia</strong>;</li> |
</ul> | </ul> | ||
<ul> | <ul> | ||
| − | <li> | + | <li>sarà possibile utilizzare il documento come <strong>lettera inseminazione</strong>;</li> |
</ul> | </ul> | ||
<ul> | <ul> | ||
| − | <li> | + | <li>sarà possibile utilizzare il documento come <strong>lettera anamnesi</strong>;</li> |
</ul> | </ul> | ||
<ul> | <ul> | ||
| − | <li> | + | <li>sarà possibile utilizzare il documento come <strong>lettera laboratorio</strong>;</li> |
</ul> | </ul> | ||
<ul> | <ul> | ||
| − | <li> | + | <li>sarà possibile utilizzare il documento come <strong>lettera spermiogramma</strong>;</li> |
</ul> | </ul> | ||
<ul> | <ul> | ||
| − | <li> | + | <li>sarà possibile utilizzare il documento come <strong>lettera amministrazione</strong>;</li> |
</ul> | </ul> | ||
<ul> | <ul> | ||
| − | <li> | + | <li>sarà possibile utilizzare il documento come <strong>lettera per medici di riferimento</strong>;</li> |
| + | </ul> | ||
| + | <ul> | ||
| + | <li>sarà possibile utilizzare il documento come <strong>lettera esami</strong>;</li> | ||
</ul> | </ul> | ||
</td> | </td> | ||
| Line 399: | Line 407: | ||
</table> | </table> | ||
<p> </p> | <p> </p> | ||
| − | <p> | + | <p>Premendo la freccia alla destra del pulsante <strong>Usa come </strong>e selezionando <strong>Modello lettera</strong> la lista delle sezioni di MedITEX in cui la lettera può essere collegata saranno attive e selezionabili. </p> |
| − | <p> | + | <p>Per il nostro esempio, è attiva solo una sezione:</p> |
<table style="margin-left: auto; margin-right: auto;" border="0"> | <table style="margin-left: auto; margin-right: auto;" border="0"> | ||
<tbody> | <tbody> | ||
<tr> | <tr> | ||
| − | <td><img src="/images/ | + | <td><img src="/images/Gestione_Risultati_31_IT.PNG" alt="" width="463" height="232" /></td> |
</tr> | </tr> | ||
</tbody> | </tbody> | ||
</table> | </table> | ||
<p> </p> | <p> </p> | ||
| − | <p> | + | <p>Nel menù principale di <strong>MedITEX IVF</strong> cliccando su <strong>Lettere </strong>si troverà (in base alla mashera di input aperta) l'elenco delle query con lettere collegate (per il nostro esempio abbiamo scelto <strong>Lettera amministrazione</strong>, la lettera sarà visibile nella sezione anagrafica).</p> |
| − | <p> | + | <p>Cliccando sul nome della lettera nel menù, porterà alla stampa del documento solamente per il <strong>paziente o terapia corrente</strong>.</p> |
| − | <p> | + | <p>Un documento Word associato alla lettera verrà generato e automaticamente copiato nella cartella del paziente e nella lista dei documenti del paziente presenti nella sezione anagrafica. Il nuovo elemento nella lista dei documenti stampati sarà assegnato come descritto <a href="/index.php?title=Gestione_risultati#Gestione_lettere">qui</a>.</p> |
<p> </p> | <p> </p> | ||
| − | <h3> | + | <h3>Stampare lettere</h3> |
| − | <p> | + | <p>Per stampare lettere create da <strong>MedITEX IVF</strong>, è necessario essere nella finestra appropriata. Per esempio, per stampare una <strong>lettera Anamnesi</strong> è necessario selezionare il paziente desiderato, cliccare su <strong>Amannesi</strong>, cliccare una volta sola sull'elemento<strong> Anamnes</strong>i da cui si vogliono estrarre i dati e generare la lettera dal menù in cima alla pagina.</p> |
<table style="margin-left: auto; margin-right: auto;" border="0"> | <table style="margin-left: auto; margin-right: auto;" border="0"> | ||
<tbody> | <tbody> | ||
<tr> | <tr> | ||
<td><a href="/index.php?title=How_to_print_letters%3F"><img src="/images/howto48.png" alt="" width="48" height="48" /></a></td> | <td><a href="/index.php?title=How_to_print_letters%3F"><img src="/images/howto48.png" alt="" width="48" height="48" /></a></td> | ||
| − | <td><a href="/index.php?title= | + | <td><a href="/index.php?title=Come_stampare_le_lettere%3F">Cliccare qui</a> per avere ulteriori informazioni sulla stampa di lettere.</td> |
</tr> | </tr> | ||
</tbody> | </tbody> | ||
</table> | </table> | ||
<p> </p> | <p> </p> | ||
| − | <h4> | + | <h4>Lettere seriali</h4> |
| − | <p><strong>Report editor</strong> | + | <p><strong>Report editor</strong> permette di stampare lettere in serie. Selezionare diverse righe dalla tab <strong>Risultati query</strong> (tenendo premuto il tasto Maiuscolo per selezionare record consecutivi selezionando il primo e l'ultimo, o il tasto CTRL per record non consecutivi), spostarsi sulla tab <strong>Modulo Word</strong> e cliccare su <strong>Stampa->lettere seriali</strong>. Le lettere saranno salvate in ogniuna delle cartelle dei pazienti selezionati e successivamente stampate.</p> |
<table style="margin-left: auto; margin-right: auto;" border="0"> | <table style="margin-left: auto; margin-right: auto;" border="0"> | ||
<tbody> | <tbody> | ||
<tr> | <tr> | ||
<td><a href="/index.php?title=How_to_print_letters%3F#Serial_letters"><img src="/images/howto48.png" alt="" width="48" height="48" /></a></td> | <td><a href="/index.php?title=How_to_print_letters%3F#Serial_letters"><img src="/images/howto48.png" alt="" width="48" height="48" /></a></td> | ||
| − | <td><a href="/index.php?title= | + | <td><a href="/index.php?title=Come_stampare_le_lettere%3F#Lettere_seriali">Cliccare qui</a> per avere ulteriori informazioni sulla stampa di lettere seriali.</td> |
</tr> | </tr> | ||
</tbody> | </tbody> | ||
</table> | </table> | ||
<p> </p> | <p> </p> | ||
| − | <h2>Rich text | + | <h2>Modulo Rich text</h2> |
| − | <p> | + | <p>Il tool Modulo rich text permette di creare documenti e lettere in maniera molto semplice. Un documento è diviso in tre sezioni: intestazione, testo e piè di pagina.</p> |
<table style="margin-left: auto; margin-right: auto;" border="0"> | <table style="margin-left: auto; margin-right: auto;" border="0"> | ||
<tbody> | <tbody> | ||
<tr> | <tr> | ||
| − | <td>[[Image: | + | <td>[[Image:Gestione_Risultati_32_IT.PNG|none|740px|thumb|left|link=http://wiki.meditex-software.com/images/Gestione_Risultati_32_IT.PNG| ]]</td> |
</tr> | </tr> | ||
</tbody> | </tbody> | ||
</table> | </table> | ||
<ul> | <ul> | ||
| − | <li> | + | <li>Nell'intestazione è possibile inserire il logo, del testo e la data.</li> |
| − | <li> | + | <li>Nel testo è possibile inserire il testo del documento che idealmente conterrà i segnalibri (il testo inserito tra due %%, es %Paziente.Nome%). Nella finestra di anteprima si può vedere come questi segnalibri veranno sostituiti con il valore presente nella tabella dei risultati. I <strong>segnalibri </strong>possono essere <strong>duplicati </strong>selezionandoli dal menù a tendina "Segnaposto" e cliccando <img src="/images/RichB.png" alt="" />. Inoltre, anche i segnaposti aggiuntivi possono essere utilizzati. </li> |
| − | <li> | + | <li>Il piè di pagina potrà contenere saluti, data e firma.</li> |
</ul> | </ul> | ||
| − | <p> | + | <p>In tutte e tre le sezioni può essere applicata la formattazione standard (dimensione carattere, allineamento, colore etc.).</p> |
| − | <p> | + | <p>Intestazione e piè di pagina possono essere salvati e importati in seguito in altri documenti.</p> |
<table style="margin-left: auto; margin-right: auto;" border="0"> | <table style="margin-left: auto; margin-right: auto;" border="0"> | ||
<tbody> | <tbody> | ||
<tr> | <tr> | ||
| − | + | <td colspan="2">[[Image:Gestione_Risultati_33_IT.PNG|none|740px|thumb|left|link=http://wiki.meditex-software.com/images/Gestione_Risultati_33_IT.PNG| Per importare intestazione e piè di pagina da un'altro documento, selezionare il documento in questione e premere <strong>Apri template.</strong>]]</td> | |
| − | + | ||
| − | + | ||
| − | + | ||
| − | <td colspan="2">[[Image: | + | |
</tr> | </tr> | ||
</tbody> | </tbody> | ||
</table> | </table> | ||
<p> </p> | <p> </p> | ||
| − | <h2> | + | <h2>Gestione lettere</h2> |
<table style="margin-left: auto; margin-right: auto;" border="0"> | <table style="margin-left: auto; margin-right: auto;" border="0"> | ||
<tbody> | <tbody> | ||
<tr> | <tr> | ||
| − | <td><img style="display: block; margin-left: auto; margin-right: auto;" src="/images/ | + | <td><img style="display: block; margin-left: auto; margin-right: auto;" src="/images/Gestione_Risultati_34_IT.PNG" alt="" width="205" height="29" /></td> |
| − | <td><a href="/index.php?title= | + | <td><a href="/index.php?title=Gestione_risultati#Gestire_lettere"><img style="display: block; margin-left: auto; margin-right: auto;" src="/images/Gestione_Risultati_6_IT.PNG" alt="" width="91" height="37" /></a></td> |
</tr> | </tr> | ||
<tr> | <tr> | ||
<td> | <td> | ||
| − | <p> | + | <p>Questo pulsante è presente nelle <a href="/index.php?title=MedITEX_IVF_Impostazioni#Report_editor">impostazioni</a>.</p> |
</td> | </td> | ||
<td> | <td> | ||
| − | <p> | + | <p>Questo pulsante è presente nella sezione dei risultati in <a href="/index.php?title=Gestione risultati#Pulsanti">report editor</a>.</p> |
</td> | </td> | ||
</tr> | </tr> | ||
<tr> | <tr> | ||
<td colspan="2"> | <td colspan="2"> | ||
| − | <p style="text-align: center;"> | + | <p style="text-align: center;">Premendo uno di questi pulsanti la finestra di Confiugurazione si apre:</p> |
</td> | </td> | ||
</tr> | </tr> | ||
| Line 488: | Line 492: | ||
<tbody> | <tbody> | ||
<tr> | <tr> | ||
| − | <td style="text-align: left;">[[Image: | + | <td style="text-align: left;">[[Image:Gestione_Risultati_35_IT.PNG|none|740px|thumb|left|link=http://wiki.meditex-software.com/images/Gestione_Risultati_35_IT.PNG| ]]</td> |
</tr> | </tr> | ||
</tbody> | </tbody> | ||
| Line 496: | Line 500: | ||
<tr> | <tr> | ||
<td><a href="/index.php?title=Configure_letters"><img src="/images/plus48.png" alt="" width="48" height="48" /></a></td> | <td><a href="/index.php?title=Configure_letters"><img src="/images/plus48.png" alt="" width="48" height="48" /></a></td> | ||
| − | <td> <a href="/index.php?title= | + | <td> <a href="/index.php?title=Configurare_lettere">Cliccare qui</a> per avere ulteriori informazioni sulla finestra in questione.</td> |
</tr> | </tr> | ||
</tbody> | </tbody> | ||
</table> | </table> | ||
<p> </p> | <p> </p> | ||
| − | <p> | + | <p>La lista a sinistra elenca le lettere rese disponibili nelle varie sezioni di MedITEX IVF. Per <strong>eliminare</strong> una lettera da questa lista, e quindi dal'elenco di lettere nella sezione di MedITEX in questione, è sufficiente selezionare la lettera dall'elenco e premere il tasto CANC.</p> |
| + | <p>Se l'utente seleziona il tipo di documento nel menù a tendina del campo <strong>tipo documento</strong>,la lettera sarà salvata nel sottomenù così denominato assieme ai documenti dello stesso genere.</p> | ||
<table border="0"> | <table border="0"> | ||
<tbody> | <tbody> | ||
| Line 507: | Line 512: | ||
<td><img style="display: block; margin-left: auto; margin-right: auto;" src="/images/AdEdDelRE.png" alt="" width="97" height="30" /></td> | <td><img style="display: block; margin-left: auto; margin-right: auto;" src="/images/AdEdDelRE.png" alt="" width="97" height="30" /></td> | ||
<td> | <td> | ||
| − | <p> | + | <p>Altri tipi di socumenti possono essere creati attraverso il pulsante <strong>Più.</strong></p> |
| − | <p> | + | <p>Al nuovo tipo di documento posstranno essere associate varie lettere di varie sezioni del programma. In ogniuna di queste sezioni si creerà il sottomenù.</p> |
| − | <p> | + | <p>Attraveso il pulsante <strong>Modifica</strong>, sarà possibile modificare il nome del tipo di documento.</p> |
| − | <p> | + | <p>Il tipo di documento può infine essere eliminato premendo il tasto<strong> X</strong> rosso.</p> |
</td> | </td> | ||
</tr> | </tr> | ||
<tr> | <tr> | ||
| − | <td><img src="/images/ | + | <td><img src="/images/Gestione_Risultati_36_IT.PNG" alt="" width="402" height="44" /></td> |
| − | <td> | + | <td>Attivare salvataggio lettera.</td> |
</tr> | </tr> | ||
<tr> | <tr> | ||
| − | <td style="text-align: center;" colspan="2"> | + | <td style="text-align: center;" colspan="2">La finestra presente sotto le opzioni<strong> Mostra segnposto / Mostra SQL-Query</strong> è utile in caso di assistenza.</td> |
</tr> | </tr> | ||
</tbody> | </tbody> | ||
| Line 525: | Line 530: | ||
<tbody> | <tbody> | ||
<tr> | <tr> | ||
| − | <td style="text-align: right;"><a href="/index.php?title= | + | <td style="text-align: right;"><a href="/index.php?title=Manuale_MedITEX">Torna al manuale MedITEX IVF</a></td> |
| − | <td style="text-align: right;"><a href="#top"> | + | <td style="text-align: right;"><a href="#top">Inizio pagina</a></td> |
</tr> | </tr> | ||
</tbody> | </tbody> | ||
Latest revision as of 10:16, 27 April 2016
 |
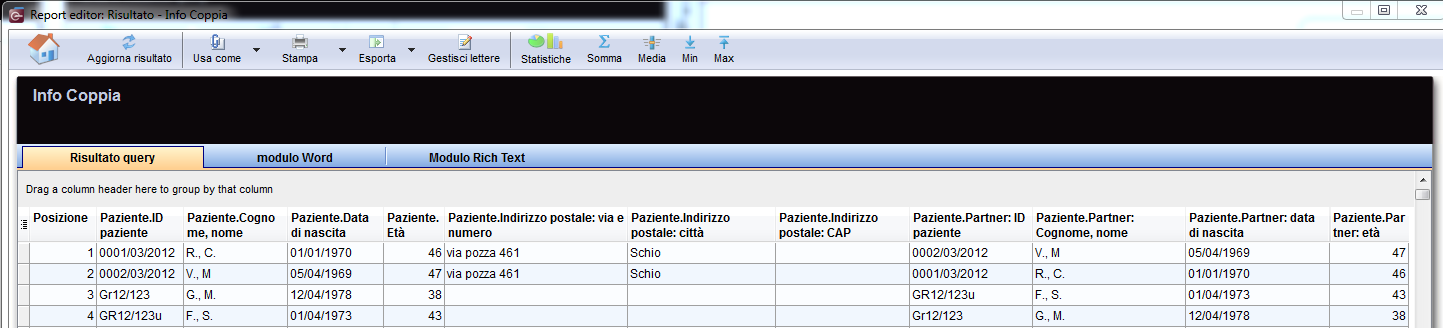
Dopo aver Eseguito una Query la finastra dei Risultati si apre.
Contents |
Pulsanti
Pulsanti con il contorno blu tratteggiato sono selezionabili.
| <a href="/index.php?title=MedITEX_IVF_Pagina_Principale"><img style="display: block; margin-left: auto; margin-right: auto; border: 2px dotted blue;" src="/images/HomeRE.png" alt="" width="70" height="35" /></a> | Cliccando questo pulsante si ritorna alla pagina principale di MedITEX IVF. |
| <img style="display: block; margin-left: auto; margin-right: auto;" src="/images/Gestione_Risultati_2_IT.PNG" alt="" width="103" height="36" /> | Se valori di uno o più campi ella query vengono modificati, la finestra dei risultati può essere aggiornata premendo questo pulsante, senza dover rieseguire lan query. |
| <img style="display: block; margin-left: auto; margin-right: auto;" src="/images/Gestione_Risultati_3_IT.PNG" alt="" /> | Arraverso questo pulsante sarà possibile impostare la query come work list nella sezione liste o utilizzarla come lettera in una delle sezioni di MedITEX IVF. |
| <img style="display: block; margin-left: auto; margin-right: auto;" src="/images/Gestione_Risultati_4_IT.PNG" alt="" width="88" height="37" /> | Risultati della query possono essere stampati come tabella o come lettere singole o seriali, in basa alla tab attiva (Risultati Query, modulo Word o modiulo Rich text). |
| <img style="display: block; margin-left: auto; margin-right: auto;" src="/images/Gestione_Risultati_5_IT.PNG" alt="" width="70" height="36" /> | Cliccando questo pulsante la tabella dei risultati può essere esportata in fiversi formati (Excel, CSV, HTML, TXT, PDF e XML). |
| <a href="/index.php?title=Gestione_risultati#Gestione_lettere"><img style="display: block; margin-left: auto; margin-right: auto; border: 2px dotted blue;" src="/images/Gestione_Risultati_6_IT.PNG" alt="" width="91" height="37" /></a> | Cliccando questo pulsante si potrà accedere alla finestra Configurazione. |
| <a href="/index.php?title=Gestione_risultati#Analisi_statistiche"><img style="display: block; margin-left: auto; margin-right: auto; border: 2px dotted blue;" src="/images/Gestione_Risultati_7_IT.PNG" alt="" width="68" height="40" /></a> | questo pulsante può essere utilizzato per creare grafici. |
| <img src="/images/Gestione_Risultati_8_IT.PNG" alt="" width="54" height="38" /> | La somma dei valori di una colonna sarà calcolata. |
| <img src="/images/Gestione_Risultati_9_IT.PNG" alt="" width="47" height="37" /> | La media dei valori di una colonna sarà calcolata. |
| <img src="/images/Gestione_Risultati_10_IT.PNG" alt="" width="34" height="37" /> | Il valore minimo di una colonna verrà visualizzato alla base della colonna stessa. |
| <img src="/images/Gestione_Risultati_11_IT.PNG" alt="" width="38" height="36" /> | Il valore massimo di una colonna verrà visualizzato alla base della colonna stessa. |
Risultati query
Se la tab dei Risultati della query è attiva, tutti i campi precedentemente selezionati visualizzati in colonne. Ogni riga della tabella rappresenta un record.
 |
Filtrare, raggruppare o ordinare la lista dei risultati
La lista dei risultati può essere filtrata, raggruppata e ordinata cliccando sull'intestazione delle colonne, come spiegato <a href="/index.php?title=Benvenuti_in_MedITEX_IVF#Gestione_Liste">qui</a>. Il filtro corrisponde ad una restrizione logica dei risultati visualizzati nella tabella (es. solo pazienti incinte, etc.).
Analisi statistiche
I risultati della query possono esssere utilizzati in analisi statistiche.
Ci sono due modi per creare questo tipo di analisi:
Funzioni matematiche
In questa sezione possono essere applicate su colonne alcune funzioni matematiche di base, come somma, media, minimo e massimo, oppure si possono generare grafici.
| <img src="/images/Gestione_Risultati_12_IT.PNG" alt="" width="394" height="148" /> |
|
Creare un grafico
| <img src="/images/Gestione_Risultati_7_IT.PNG" alt="" width="68" height="40" /> | Cliccando il pulsante Statistiche, la seguente finestra si aprirà: |
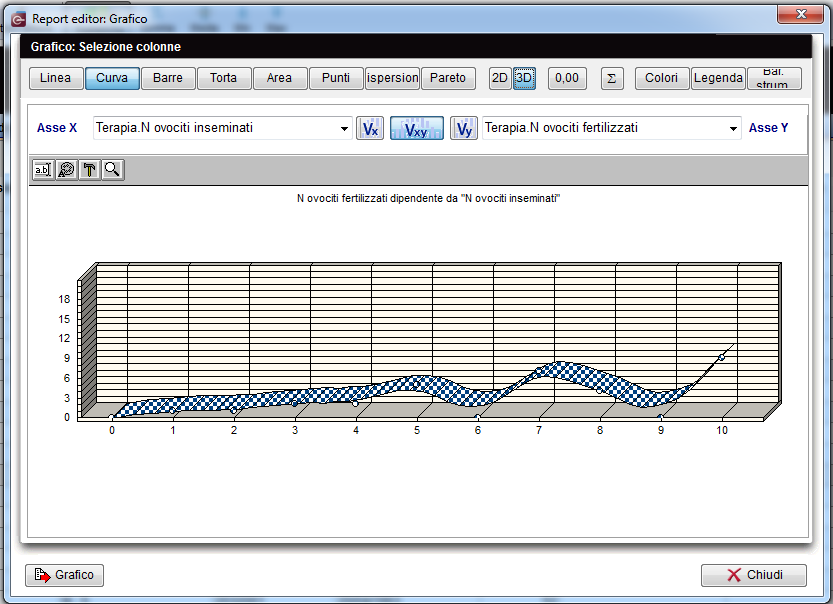 |
Per l'asse x è possibile selezionare qualsiasi colonna della tabella dei risultati.
Per l'asse y, invece, sarà possibile selezionare campi (colonne) a cui sono associati valori numerici (numeri interi o decimali).
Le statistiche disponibili sono di tipo descrittivo: istogrammi, grafici a torta, a linee o singoli punti.
L'interpretazione dei valori dell'asse y dipende esclusivamente dalla scala di misurazione dei dati utilizzati (i dati sono, tuttavia, visualizzati come se appartenessero all'intervallo di scala).
| Spiegazione campi/icone: | |
| Curve, Barre... Pareto | Diversi tipi di layout del grafico selezianabili. |
| <img style="display: block; margin-left: auto; margin-right: auto;" src="/images/2D3D.png" alt="" width="59" height="28" /> | Cliccando questi pulsanti, il grafico avrà un layout 2D/3D . |
| <img src="/images/0,00.png" alt="" /> |
Pulsante per impostare il numero di cifre decimali. |
| <img src="/images/Gestione_Risultati_14_IT.PNG" alt="" width="57" height="25" /> |
Permette di scegliere il colore dello sfondo del grafico e della cornice. La terza opzione permette di invertire i colori tra grafico e cornice. |
| <img style="display: block; margin-left: auto; margin-right: auto;" src="/images/Gestione_Risultati_15_IT.PNG" alt="" width="57" height="26" /> | Cliccare su questo pulsante per visualizzare/nascondere la legenda. |
| <img style="display: block; margin-left: auto; margin-right: auto;" src="/images/Gestione_Risultati_16_IT.PNG" alt="" width="57" height="25" /> | Cliccare su questo pulsante per visualizzare/nascondere la barra degli strumenti. |
| <img style="display: block; margin-left: auto; margin-right: auto;" src="/images/PlusChart.png" alt="" width="54" height="29" /> | Creare un nuovo grafico. si aprirà sulla destra della finestra principale. Chiudere il grafico con la X rossa. |
| Parametro | Cambia i parametri del grafico. |
| Periodo di tempo | Imposta un periodo. |
| <img style="display: block; margin-left: auto; margin-right: auto;" src="/images/Gestione_Risultati_17_IT.PNG" alt="" width="30" height="26" /> | Distribuzione dei valori dell'asse X. |
| <img style="display: block; margin-left: auto; margin-right: auto;" src="/images/Gestione_Risultati_18_IT.PNG" alt="" width="55" height="27" /> | Distribuzione dei valori dell'asse Y come funzione dei valori dell'asse X |
| <img style="display: block; margin-left: auto; margin-right: auto;" src="/images/Gestione_Risultati_19_IT.PNG" alt="" width="29" height="26" /> | Distribuzione dei valori dell'asse Y. |
| <img src="/images/Ed.png" alt="" /> | Cliccare su questo pulsante per modificare i titoli del grafico. |
| <img src="/images/ed1.png" alt="" width="24" height="22" /> | Cliccare su questo pulsante per modificare carattere e colore dei titoli e legenda del grafico. |
| <img src="/images/ed2.png" alt="" width="24" height="22" /> | Cliccare su questo pulsante per visualizzare/nascondere la barra dei colori/design e la legenda. Scegliendo l'opzione Editor Dati sarà possibile modificare i valori del grafico. |
| <img src="/images/ed3.png" alt="" width="24" height="22" /> | Cliccare su questo pulsante per modificare le opzioni di visualizzazione. |
| <img style="display: block; margin-left: auto; margin-right: auto;" src="/images/Gestione_Risultati_20_IT.PNG" alt="" width="82" height="24" /> |
Cliccando su questo pulsante l'utente potrà:
|
| <img src="/images/hint48.png" alt="" width="48" height="48" /> |
Se il vostro sistema non supporta le librerie necessarie, vi sarà presentata una versione semplificata di questo tool. E' inoltre possibile passare da una visualizzazione grafica ad un'altra cliccando su Grafico -> Cambia tipo di grafico. |
Modulo Word
Selezionando la tab Modulo Word apparirà una lista.
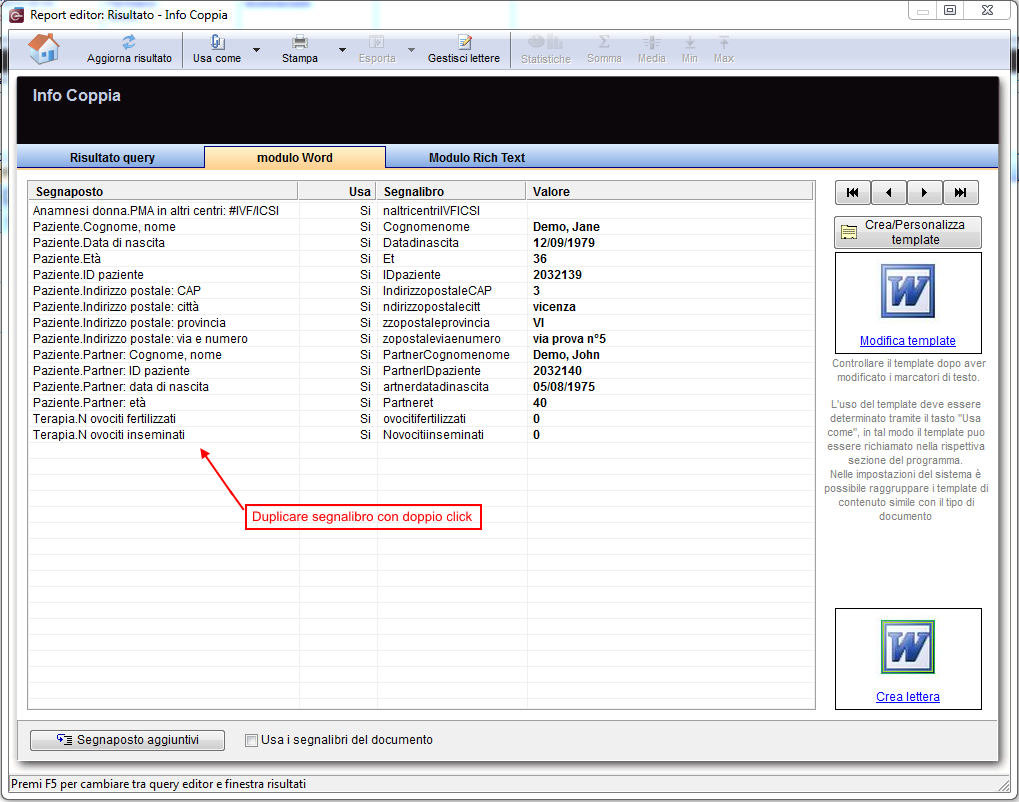 |
Spiegazione Colonne
| Segnaposto |
Questa colonna elenca i segnaposti presenti nella query. Ogni segnaposto è stato generato dalla selezione dei campi durante la creazione della query. Un segnaposto può essere duplicato semplicemente facendo doppio click sul nome. Se lo stesso segnaposto deve essere presente in più parti del documento è sufficiente duplicarlo. Il nuovo segnaposto verrà riempito con lo stesso valore del segnaposto da cui è stato creato. |
| Usa | L'utente può decidere se utilizzare o meno il segnaposto nel documento. Per modificare lo stato da Si a No è sufficiente fare doppio click sulla riga del segnaposto corrispondente. |
| Segnalibro | Questa colonna elenca i nomi dei segnalibri inseriti nel documento Word relativo alla query. Per modificare il nome di questi segnalibri è sufficiente fare doppio click. |
| Valore |
In questa colonna vengono visualizzati i risultati di ogni segnaposto per il record selezionato nella lista dei risultati. |
| <img style="display: block; margin-left: auto; margin-right: auto;" src="/images/REButtons.png" alt="" /> |
Con questi pulsanti è possibile cambiare il record selezionato nella lista dei risultati, i valori dei risultati visualizzati nella colonna valori cambieranno di conseguenza. |
| <img src="/images/Gestione_Risultati_22_IT.PNG" alt="" width="198" height="23" /> |
Utilizzare segnaposti aggiuntivi: In aggiunta ai campi selezionati durante la creazione della query, è possibile utilizzare segnaposti aggiuntivi. Questo pulsante permette all'utente di aggiugere alla lettera segnalibri contenenti: Immagini ecografiche e delle cellule, firme utenti, data e ora di stampa del documento. Quando un segnaposto viene aggiunto, apparirà nella lista assieme al suo segnalibro e potrà essere inserito nella lettera come tutti gli altri. |
Creare una lettera
Quando una query viene salvata per la prima volta, un modulo Word viene creato nella cartella WOMOD. Questa cartella si trova in File_Storage\Templates. Il percorso completo è inserito nelle <a href="/index.php?title=MedITEX_IVF_Impostazioni#Sistema">impostazioni</a>.
| <img style="display: block; margin-left: auto; margin-right: auto;" src="/images/Gestione_Risultati_23_IT.PNG" alt="" width="150" height="34" /> |
Premendo questo pulsante il template standard WOMOD si apre. Il template conterà i segnalibri presenti nella lista Segnalibri con il relativo segnaposto. |
|
Se il modello di una lettera è già disponibile in formato MS Word, è possibile salvare il modello come template prima di creare la query. Il template deve essere salvato nella cartella WOMOD con lo stesso nome che verrà dato alla query. |
|
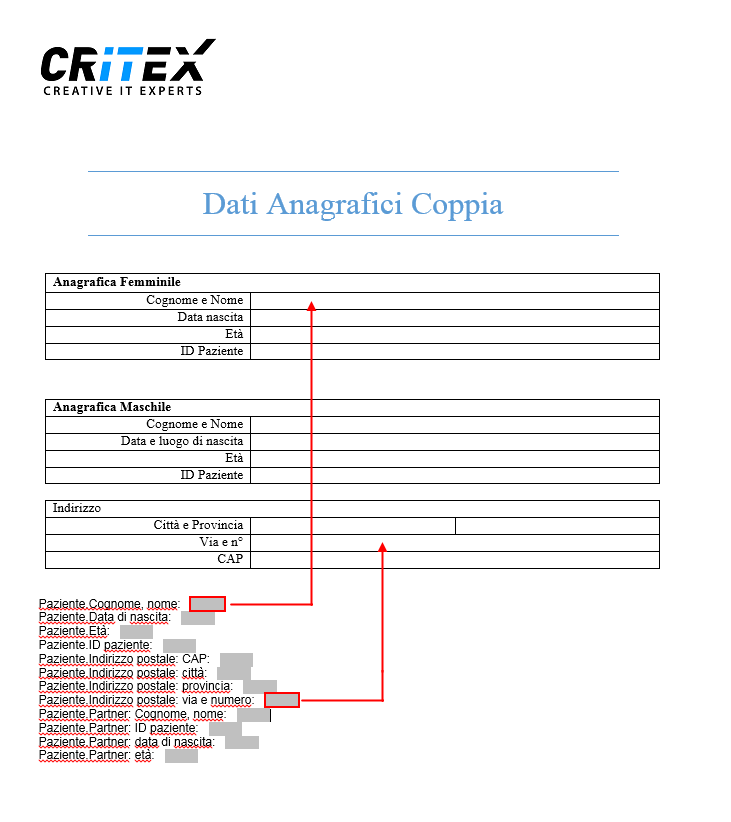
Per creare una lettera:
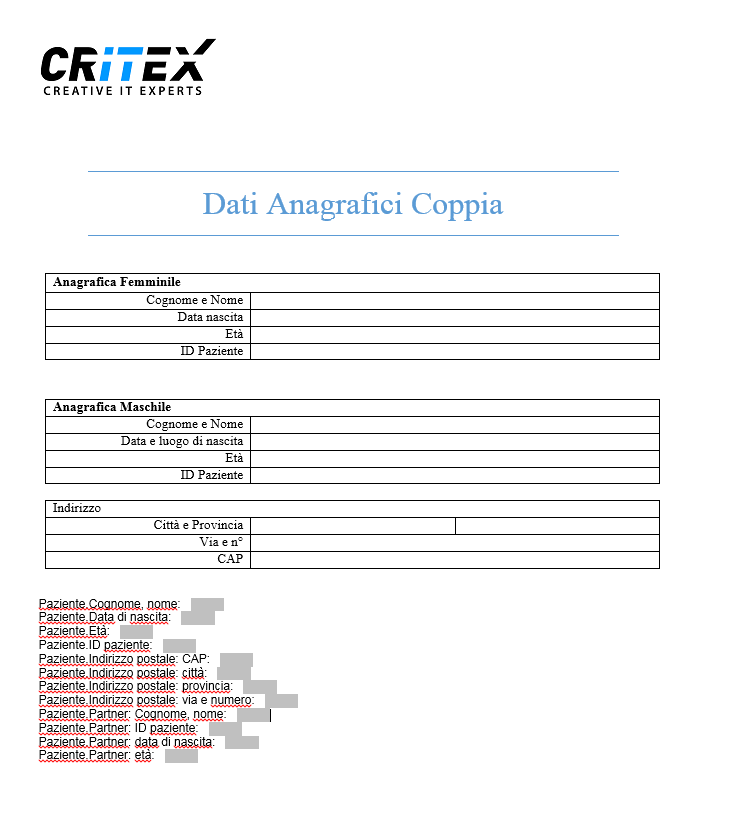 |
| 1. Scrivere il testo standard. |
 |
 |
|
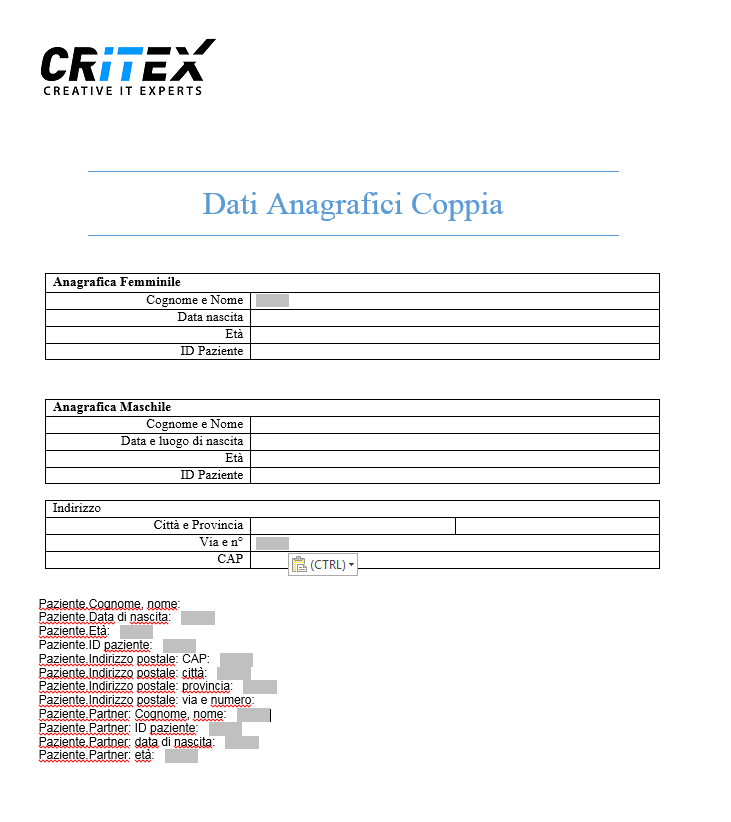
2. Tagliare e incollare i segnalibri nella posizione corretta. Una volta spostato il segnalibro, il suo segnaposto può essere eliminato dal fondo della pagina. |
|
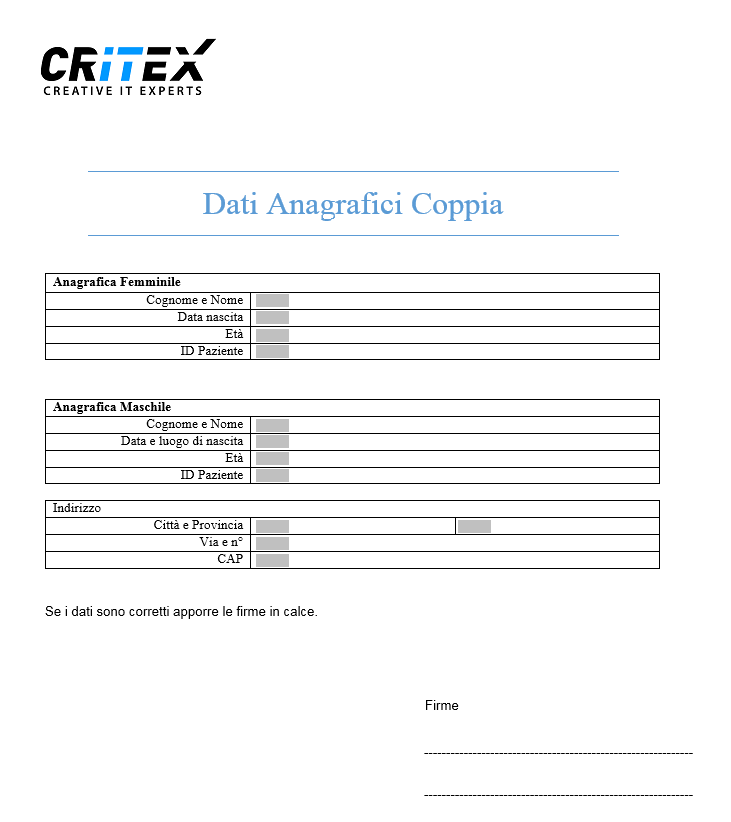 |
| 3. Una volta che tutti i segnalibri sono stati sistemati e i relativi segnaposti eliminati, la lettera può essere salvata. |
| <img src="/images/Gestione_Risultati_29_IT.PNG" alt="" width="150" height="105" /> | Il testo standard di lettere già salvate può essere modificate attraverso il pulsante Modifica template. |
| <img src="/images/Gestione_Risultati_30_IT.PNG" alt="" width="151" height="105" /> | Per visualizzare e stampare la lettera relativa al record selezionato premere Crea lettera. Una lettera con tutti i segnalibri riemtpiti si aprirà: |
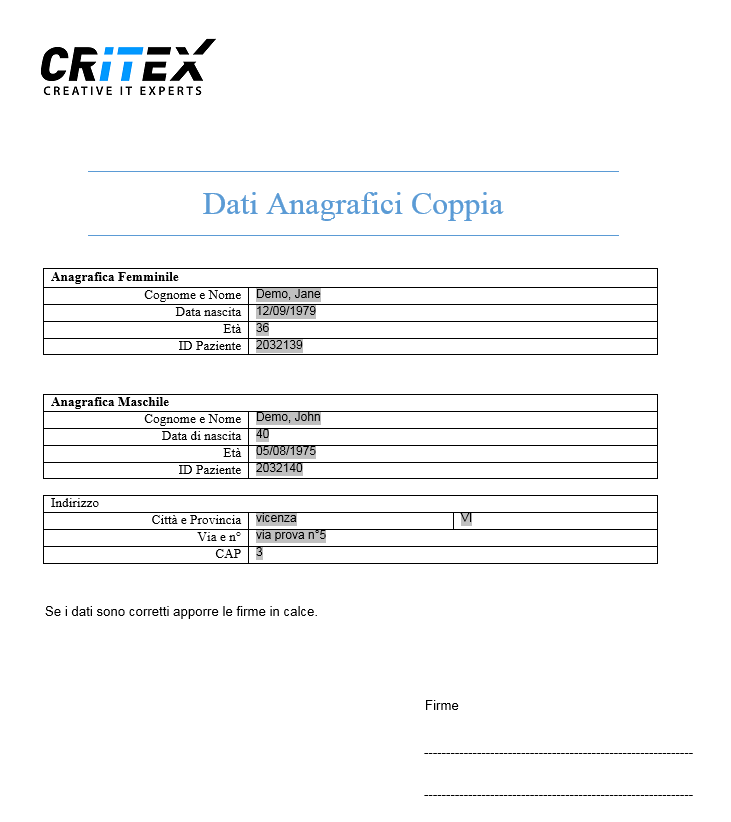 |
|
Utilizzare una lettera come template standard
Dopo aver creato la lettera è possibile renderla disponibile, nelle varie sezioni di MedITEX IVF, come lettera standard.
In base ai dati selezionati nella query, sezioni di MedITEX IVF si attiveranno nel menù a tendina.
|
Se la query contiene dati appartenenti a: |
|
|
|
Premendo la freccia alla destra del pulsante Usa come e selezionando Modello lettera la lista delle sezioni di MedITEX in cui la lettera può essere collegata saranno attive e selezionabili.
Per il nostro esempio, è attiva solo una sezione:
| <img src="/images/Gestione_Risultati_31_IT.PNG" alt="" width="463" height="232" /> |
Nel menù principale di MedITEX IVF cliccando su Lettere si troverà (in base alla mashera di input aperta) l'elenco delle query con lettere collegate (per il nostro esempio abbiamo scelto Lettera amministrazione, la lettera sarà visibile nella sezione anagrafica).
Cliccando sul nome della lettera nel menù, porterà alla stampa del documento solamente per il paziente o terapia corrente.
Un documento Word associato alla lettera verrà generato e automaticamente copiato nella cartella del paziente e nella lista dei documenti del paziente presenti nella sezione anagrafica. Il nuovo elemento nella lista dei documenti stampati sarà assegnato come descritto <a href="/index.php?title=Gestione_risultati#Gestione_lettere">qui</a>.
Stampare lettere
Per stampare lettere create da MedITEX IVF, è necessario essere nella finestra appropriata. Per esempio, per stampare una lettera Anamnesi è necessario selezionare il paziente desiderato, cliccare su Amannesi, cliccare una volta sola sull'elemento Anamnesi da cui si vogliono estrarre i dati e generare la lettera dal menù in cima alla pagina.
| <a href="/index.php?title=How_to_print_letters%3F"><img src="/images/howto48.png" alt="" width="48" height="48" /></a> | <a href="/index.php?title=Come_stampare_le_lettere%3F">Cliccare qui</a> per avere ulteriori informazioni sulla stampa di lettere. |
Lettere seriali
Report editor permette di stampare lettere in serie. Selezionare diverse righe dalla tab Risultati query (tenendo premuto il tasto Maiuscolo per selezionare record consecutivi selezionando il primo e l'ultimo, o il tasto CTRL per record non consecutivi), spostarsi sulla tab Modulo Word e cliccare su Stampa->lettere seriali. Le lettere saranno salvate in ogniuna delle cartelle dei pazienti selezionati e successivamente stampate.
| <a href="/index.php?title=How_to_print_letters%3F#Serial_letters"><img src="/images/howto48.png" alt="" width="48" height="48" /></a> | <a href="/index.php?title=Come_stampare_le_lettere%3F#Lettere_seriali">Cliccare qui</a> per avere ulteriori informazioni sulla stampa di lettere seriali. |
Modulo Rich text
Il tool Modulo rich text permette di creare documenti e lettere in maniera molto semplice. Un documento è diviso in tre sezioni: intestazione, testo e piè di pagina.
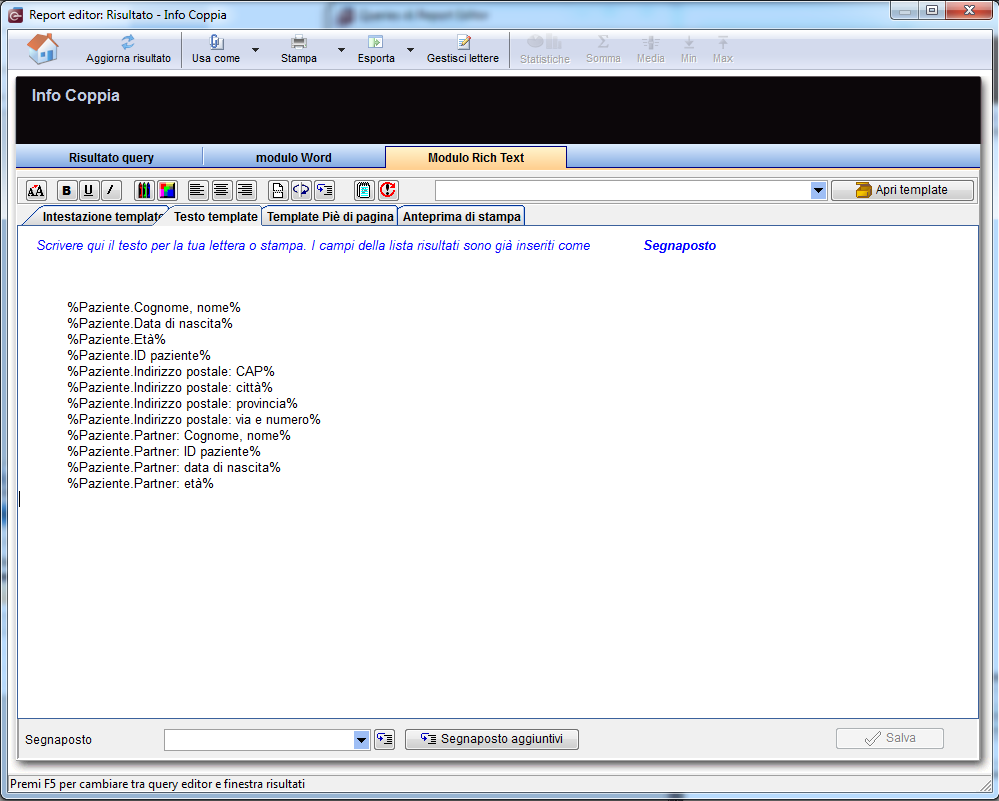 |
- Nell'intestazione è possibile inserire il logo, del testo e la data.
- Nel testo è possibile inserire il testo del documento che idealmente conterrà i segnalibri (il testo inserito tra due %%, es %Paziente.Nome%). Nella finestra di anteprima si può vedere come questi segnalibri veranno sostituiti con il valore presente nella tabella dei risultati. I segnalibri possono essere duplicati selezionandoli dal menù a tendina "Segnaposto" e cliccando <img src="/images/RichB.png" alt="" />. Inoltre, anche i segnaposti aggiuntivi possono essere utilizzati.
- Il piè di pagina potrà contenere saluti, data e firma.
In tutte e tre le sezioni può essere applicata la formattazione standard (dimensione carattere, allineamento, colore etc.).
Intestazione e piè di pagina possono essere salvati e importati in seguito in altri documenti.
 |
Gestione lettere
| <img style="display: block; margin-left: auto; margin-right: auto;" src="/images/Gestione_Risultati_34_IT.PNG" alt="" width="205" height="29" /> | <a href="/index.php?title=Gestione_risultati#Gestire_lettere"><img style="display: block; margin-left: auto; margin-right: auto;" src="/images/Gestione_Risultati_6_IT.PNG" alt="" width="91" height="37" /></a> |
|
Questo pulsante è presente nelle <a href="/index.php?title=MedITEX_IVF_Impostazioni#Report_editor">impostazioni</a>. |
Questo pulsante è presente nella sezione dei risultati in <a href="/index.php?title=Gestione risultati#Pulsanti">report editor</a>. |
|
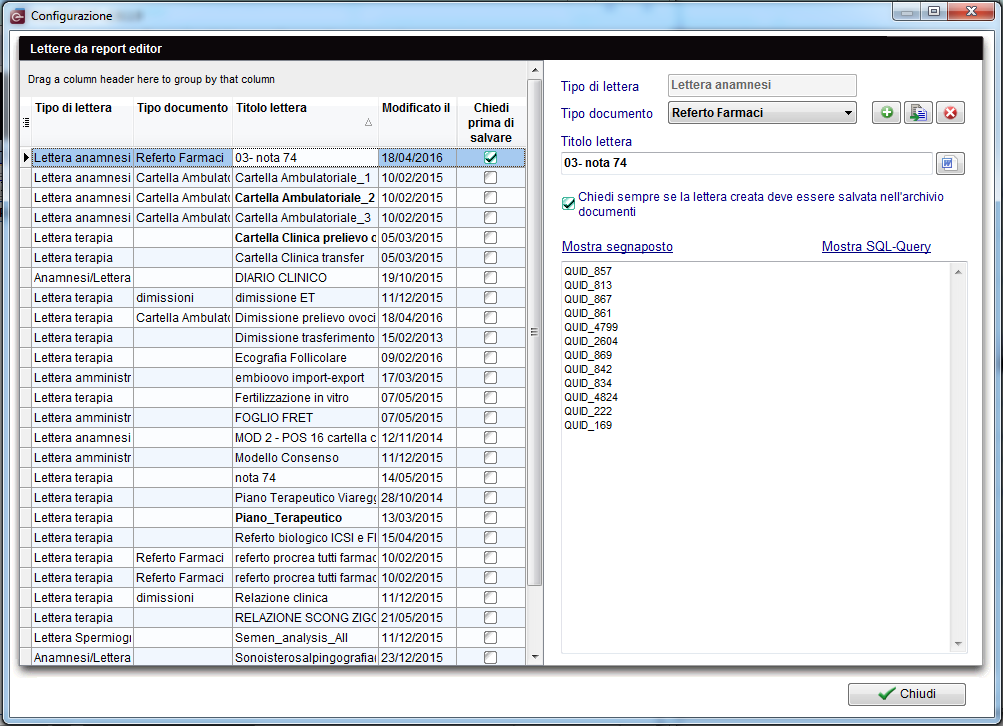
Premendo uno di questi pulsanti la finestra di Confiugurazione si apre: |
|
 |
| <a href="/index.php?title=Configure_letters"><img src="/images/plus48.png" alt="" width="48" height="48" /></a> | <a href="/index.php?title=Configurare_lettere">Cliccare qui</a> per avere ulteriori informazioni sulla finestra in questione. |
La lista a sinistra elenca le lettere rese disponibili nelle varie sezioni di MedITEX IVF. Per eliminare una lettera da questa lista, e quindi dal'elenco di lettere nella sezione di MedITEX in questione, è sufficiente selezionare la lettera dall'elenco e premere il tasto CANC.
Se l'utente seleziona il tipo di documento nel menù a tendina del campo tipo documento,la lettera sarà salvata nel sottomenù così denominato assieme ai documenti dello stesso genere.
| <img style="display: block; margin-left: auto; margin-right: auto;" src="/images/AdEdDelRE.png" alt="" width="97" height="30" /> |
Altri tipi di socumenti possono essere creati attraverso il pulsante Più. Al nuovo tipo di documento posstranno essere associate varie lettere di varie sezioni del programma. In ogniuna di queste sezioni si creerà il sottomenù. Attraveso il pulsante Modifica, sarà possibile modificare il nome del tipo di documento. Il tipo di documento può infine essere eliminato premendo il tasto X rosso. |
| <img src="/images/Gestione_Risultati_36_IT.PNG" alt="" width="402" height="44" /> | Attivare salvataggio lettera. |
| La finestra presente sotto le opzioni Mostra segnposto / Mostra SQL-Query è utile in caso di assistenza. | |
| <a href="/index.php?title=Manuale_MedITEX">Torna al manuale MedITEX IVF</a> | <a href="#top">Inizio pagina</a> |
|
<a href="/index.php?title=Configure_letters"><img src="/images/help.png" border="1" alt="" width="48" height="48" align="BOTTOM" /> </a><a href="/index.php?title=Configure_letters">Click here</a> to have more information about the content of this window. |