Documenting a new sample
From MedITEX - Wiki
Contents |
Documenting a new "single" sample
To document the findings of a single analisys just click on the arrow at the right of the "New sample" icon and choose one of the following types:
- Clinical chemistry
- Genetics
- Hormones
- Microbiology
- Other
- Semen analysis (only at the men samples)
- Serology
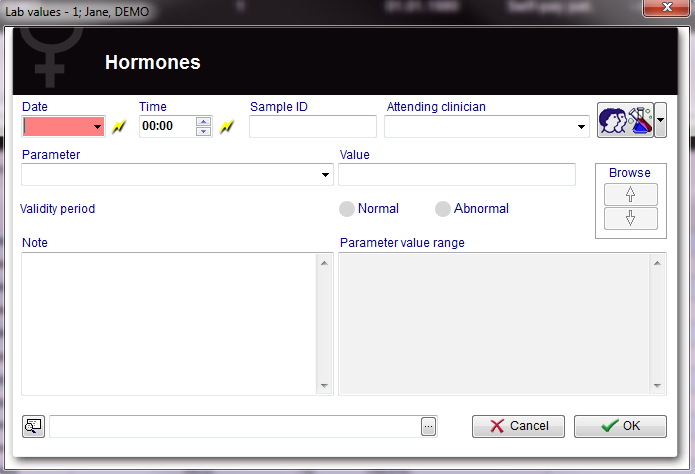
The following window will open (For example hormones):
 |
Buttons
| QM / free fields: QM field icon can be used to access the QM fields associated to this document.
|
|
 |
Browse: Clicking on the arrows will scroll the documents archived upwards or downwards. |
 |
Add document: Allows to browse the directories and to add a single document. |
| Cancel: | |
|
OK: Confirm your entries by clicking "OK". All lab results will be shown in the overview of the main window "Pathology results" (sorted by date). Ther respective statuses can be seen on the right side of the overview. |
Clickable areas
| Date | Date of the analisys. If the flash is clicked will be selected the current date. |
| Time | Time of analisys. If the flash is clicked will be selected the current time. |
| Sample ID | ID code of the sample. |
| Attending clinican | Attending physician of the patient. |
| Parameter |
Parameter tested. To choose the parameter just type its name in the field or click the black arrow on the right. Only parameters belonging to the selected type (eg. Hormones) will be shown. Tip: Enter the first letters of the parameter you are searching for in the respective field. The programm will then automatically display all matching entries. |
| Value | Fill this field with the value found with the analisys unless standard values are set in the Lab section in the settings. If standard values are set just click on the black arrow on the right and select the value. |
| Unit | Default units for the parameter. It is possible to select different units by clicking on the black arrow. To change the default units for the parameter go to the Lab section in the settings. |
| Validity period | Period of validity of the analisys. To change the period of validity go to the Lab section in the settings. |
| Status |
Choose between "Normal" and "Abnormal". Lab results that are particularly important, clinically relevant or that still need to be modified can be given the satus "Abnormal". |
| Note | An area that can be used to input a note. |
| Parameter value range | Here are shown, if set, the value ranges for the parameter. To change the parameters go to the Lab section in the settings. |
| Open document | Always to open the document added. |
| Add document | Allows to browse the directories and to add a single document. |
By clicking on "OK" the results of the analisys will be saved and published in the main window if the related box in the the Lab section in the settings was checked.
Note: If the parameter shown in the lab diagnostics list or in the main window is red it means that the lab test has reached the expiry date set by the user.
Documenting a new "multiple" entry
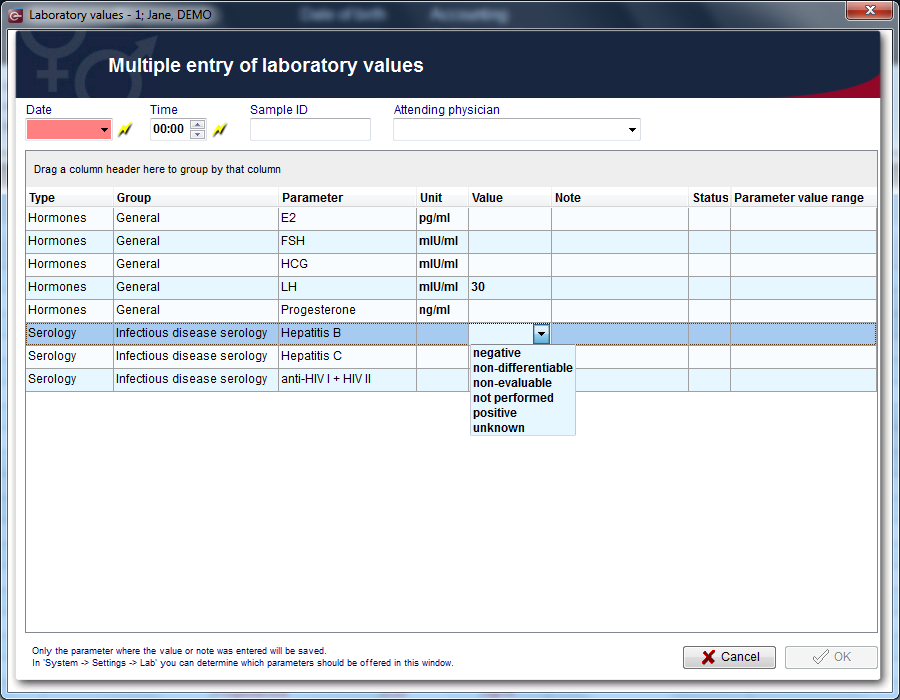
If the Multiple entry icon is clicked the following window will pop up:
 |
Clickable areas
| Date | Date of the analisys. The date selected is the same for all the analisys documented. If the flash is clicked will be selected the current date. |
| Time: Time of analisys. The time selected is the same for all the analisys documented. If the flash is clicked will be selected the current time. | |
| Sample ID: ID code of the sample. | |
| Attending clinican: Attending clinican of the patient. |
Lists
 |
|
| Type: | Family of analisys which the parameter belongs. |
| Group: | Group of analisys which the parameter belongs. To change the group go to the Lab section in the settings. To set a new group go to the System table section in the settings. |
| Parameter: | Parameter investigated. To add/remove parameters to/from the Multiple entry tool, go to the Lab section in the settings. |
| Unit: | Default units for the parameter. It is possible to select different units by clicking on the field and the on the black arrow. To change the default units for the parameter go to the Lab section in the settings. |
| Value: | Fill this field with the value found with the analisys unless standard values are set in the Lab section in the settings. If standard values are set a black arrow will appear on the right when the free field is clicked. Click on the black arrow and select the value. |
| Note: | This is a free field to be filled with notes. |
| Status: | Normal (OK icon) or abnormal (! icon) can be notified for the analisys. Just click on the free field and then on the black arrow to select the status. |
| Parameter value range: | Here are shown, if set, the value ranges for the parameter. To change the parameters go to the Lab section in the settings. |
By clicking on "OK" the results of all the analisys where the value or note was entered will be saved. They will be also published in the main window if the related box in the the Lab section in the settings was checked.
Note: If the parameter shown in the lab diagnostics list or in the homepage is red it means that the lab test has reached the expiry date set by the user.
Note 2: In the Lab section in the settings can be chosen which parameters should be offered in the multiple entry window.
Documenting a semen analysis
If you choose a new semen analysis the following window will pop up:
Buttons
Clickable areas
In the window “Semen analysis” you can document the findings.
- In the overview of the main window “Semen analysis”, all semen analysis will be displayed (sorted by date). Their respective statuses can be seen on the right side of the overview.
- Entries in the overview can be sorted or filtered by clicking the column headers. They can also be grouped by dragging them to the desired position. The changes will be saved and will not be lost.
- Semen analysis can be edited again by double-clicking them.
| Back to the MedITEX IVF menu | Back to top |