Cryo storage
From MedITEX - Wiki
| Line 134: | Line 134: | ||
</tbody> | </tbody> | ||
</table> | </table> | ||
| − | |||
| − | |||
| − | |||
| − | |||
| − | |||
| − | |||
| − | |||
| − | |||
| − | |||
| − | |||
| − | |||
| − | |||
| − | |||
| − | |||
| − | |||
| − | |||
| − | |||
| − | |||
| − | |||
<p> </p> | <p> </p> | ||
<h2>Cryostorage overview<em> </em></h2> | <h2>Cryostorage overview<em> </em></h2> | ||
Revision as of 12:35, 11 December 2012
 |
 |
Contents |
Buttons
| <a href="/index.php?title=Free / QM fields"><img style="display: block; margin-left: auto; margin-right: auto;" src="/images/QMsimple.jpg" alt="" width="25" height="30" /></a> | Click on this icon to access the QM field section related to this area. |
| <a href="/index.php?title=Freezing a new sample"><img style="display: block; margin-left: auto; margin-right: auto;" src="/images/plus.jpg" alt="" width="37" height="23" /></a> <a href="/index.php?title=Cryo_storage#Thawing_a_sample"><img style="display: block; margin-left: auto; margin-right: auto;" src="/images/minus.jpg" alt="" width="23" height="23" /></a> |
By clicking on the "+" button it is possible to freeze a new sample. When the right black arrow on the "+" button is clicked one more option is provided: to use the same values of the selected sample. Select samples (blue background) in the window "Cryo Gyn" and press the "-" button if you wish to delete these samples. |
| <img style="display: block; margin-left: auto; margin-right: auto;" src="/images/print2.jpg" alt="" width="93" height="23" /> | Click on this icon to print the list of current cryostorage content. |
| <a href="/index.php?title=Lab_diagnostics#Creating_a_spermiogram.C2.A0"><img style="display: block; margin-left: auto; margin-right: auto;" src="/images/spermiobutton.jpg" alt="" width="93" height="16" /></a> | Click on this icon to open the <a href="/index.php?title=Lab_diagnostics#Creating_a_spermiogram.C2.A0">semen analysis</a> related to the selected sample. |
| <img style="display: block; margin-left: auto; margin-right: auto;" src="/images/invoices.jpg" alt="" width="93" height="15" /> |
Click on this icon to open the status of the invoices related to the selected sample. By clicking on the right arrow will be possible to choose if open the invoices' status or the contract window. |
Lists
Oocyte / embryo cryo storage
Every row in in the cryo storage window represents one stored sample (straw, etc.). There are the following columns:
 |
- Follicle aspiration: Date of the ovarian puncture on which the frozen oocyte was obtained.
- Cryopreserved on: The conservation date of the sample.
- Storage date: The day of entered the sample at the storage place.
- Cryo technique: Method extending the freeze the sample.
- Cryopreserved by: The person who freeze the sample.
- #Days: The storage period of the samples in days.
- #Ooc: The number of oocytes that the sample contains.
- #Emb:The number of embryos that the sample contains.
- Ovarian tissue: See if the sample has the type ovarian tissue.
- Straw ID: The unique number (ID) for the respective sample.
- Storage location: Information on the storage location.
- Pos.: Optional entry of a position.
- Cl.1: Optional entry of the first color.
- Cl.2: Optional entry of the second color.
- Contract: If this box is checked, a contract is available.
- Contract number: The number of the cryo contract.
- QM field: Press the QM field to see or document further information on the sample, conservation process and origin.
→ Press the tab "History" to see the storage history for the patient.
→ Double-click on an entry to edit it. The window “Oocyte / embryo cryopreservation” will open.
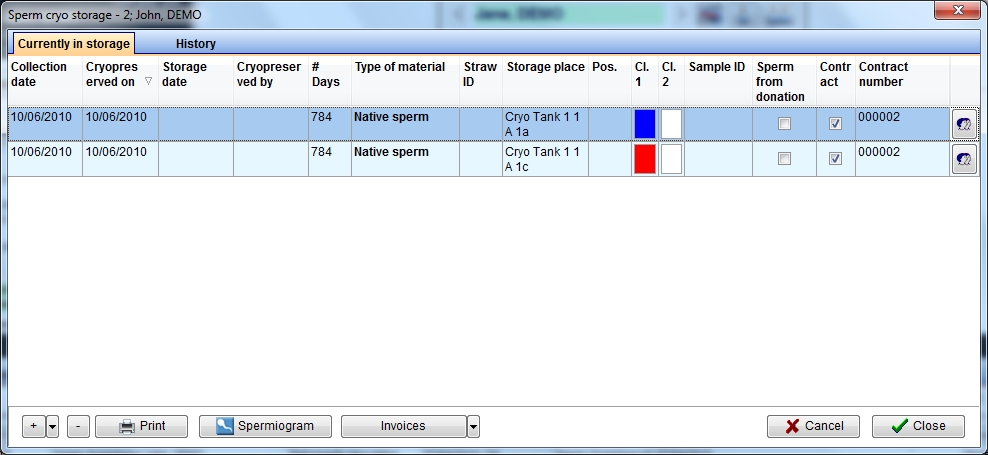
Sperm cryo storage
Every row in in the cryo storage window represents one stored sample (straw, etc.). There are the following columns:
 |
- Collection date: Date of the ovarian puncture on which the frozen egg cell was obtained.
- Cryopreserved on: The conservation date of the sample.
- Storage date: The day of entered the sample at the storage place.
- Cryopreserved by: The person who freeze the sample.
- #Days: The storage period of the samples in days.
- Type of material: Type of the cryopreserved sample material.
- Straw ID: The unique number (ID) for the respective sample.
- Storage location: Information on the storage location.
- Pos.: Optional entry of a position.
- Cl.1: Optional entry of the first color.
- Cl.2: Optional entry of the second color.
- Sample ID: The unique number (ID) for the sample.
- Contract: If this box is checked, a contract is available.
- Contract number: The number of the cryo contract.
- QM field: Press the QM field to see or document further information on the sample, conservation process and origin. (You need to define QM domains in the settings before you can use them.)
→ Press the tab "History" to see the storage history for the patient.
→ Double-click on an entry to edit it. The window “Sperm cryo preservation” will open.
Thawing a sample
Select samples (blue background) in the window "Cryo Gyn" and press the "-" button if you wish to delete these samples.
| <img src="/images/SelectS.png" alt="" width="363" height="123" /> | A safety dialog will be opened. |
| <img src="/images/SelectSa.png" alt="" width="366" height="202" /> |
After confirming a safety dialog, please indicate the reason for the removal of the sample. Just select the reason of thawing, the thawing date and confirm. The sample will be removed from the cryostorage and it will appear in the history section. Press the “OK” symbol to remove the sample from the cryo storage.
|
- MedITEX IVF will not delete removed samples completely but only filter them out. Removed samples will then be displayed in the "History" and can still be used for reports.
- If the reason selected is "Mistakenly documented" the sample won't appear in the history section.
 |
Cryostorage overview
In order to have an overview of all the materials stored in the cryo storage just select cryostorage overview in the system menu: <img style="border: 3px solid gainsboro; margin-bottom: 2px; margin-right: 40px; padding: 3px;" src="/images/cryostoverview.jpg" alt="" width="350" height="187" />
By selecting "Gyn" or "Andro" will be shown only the tank that are dedicated only to oocytes/embryo or sperm. If a tank is dedicated to both materials it will be shown either in the gyn or andro.
To select all the tank choose Gyn and andro.
Once made the choice will be opened the same window seen in the "Choosing a location in the cryo storage" paragraph. The only difference is that when the printing icon is clicked the user will be able to print a list related to all the patient that have material in the cryostorage.
Note: to dedicate a tank to Gyn, Andro or both material access the Cryo storage section in the settings.