Cicli
From MedITEX - Wiki
| Line 75: | Line 75: | ||
</table> | </table> | ||
<p> </p> | <p> </p> | ||
| − | <h2> | + | <h2>Menù</h2> |
<table style="margin-left: auto; margin-right: auto;" border="0"> | <table style="margin-left: auto; margin-right: auto;" border="0"> | ||
<tbody> | <tbody> | ||
| Line 84: | Line 84: | ||
</table> | </table> | ||
<p> </p> | <p> </p> | ||
| − | <p> | + | <p>Una volta che <strong>viene creato o selezionato un ciclo</strong> dalla pagina principale, la finestra è aggiornata per mostrare <strong>le informazioni relative al ciclo</strong>. </p> |
| − | <p> | + | <p> </p> |
| − | <h3> | + | <h3>Pulsanti</h3> |
| − | <p> | + | <p>I pulsanti circondati da puntini blu in questa Wiki hanno funzionalità speciali. Cliccare sopra per avere maggori informazioni su quella particolare sezione del programma.</p> |
<table style="margin-left: auto; margin-right: auto;" border="0"> | <table style="margin-left: auto; margin-right: auto;" border="0"> | ||
<tbody> | <tbody> | ||
<tr> | <tr> | ||
<td><span><a href="/index.php?title=MedITEX_IVF_main_page"><img style="display: block; margin-left: auto; margin-right: auto; border: 2px dotted blue;" src="/images/homeico.jpg" alt="" /></a></span></td> | <td><span><a href="/index.php?title=MedITEX_IVF_main_page"><img style="display: block; margin-left: auto; margin-right: auto; border: 2px dotted blue;" src="/images/homeico.jpg" alt="" /></a></span></td> | ||
| − | <td><span><strong>Home</strong>: | + | <td><span><strong>Home</strong>: cliccare per tornare alla pagina principale di MedITEX..</span></td> |
</tr> | </tr> | ||
<tr> | <tr> | ||
<td><a href="/index.php?title=Locking_of_data"><img style="display: block; margin-left: auto; margin-right: auto; border: 2px dotted blue;" src="/images/LockIco.png" alt="" width="48" height="36" /></a></td> | <td><a href="/index.php?title=Locking_of_data"><img style="display: block; margin-left: auto; margin-right: auto; border: 2px dotted blue;" src="/images/LockIco.png" alt="" width="48" height="36" /></a></td> | ||
| − | <td><strong> | + | <td><strong>Blocca ciclo</strong>: cliccare su quest'icona per bloccare questo ciclo e quindi impedirne ulteriori modifiche. </td> |
</tr> | </tr> | ||
<tr> | <tr> | ||
| Line 103: | Line 103: | ||
<a href="/index.php?title=Free_/_QM_fields"><img style="display: block; margin-left: auto; margin-right: auto; border: 2px dotted blue;" src="/images/QMIconContent.png" alt="" width="88" height="35" /></a></td> | <a href="/index.php?title=Free_/_QM_fields"><img style="display: block; margin-left: auto; margin-right: auto; border: 2px dotted blue;" src="/images/QMIconContent.png" alt="" width="88" height="35" /></a></td> | ||
<td> | <td> | ||
| − | <p><strong>QM | + | <p><strong>Campi liberi/QM</strong>: cliccare per accedere ai campi Qm relativi a quell'area. O cliccare sulla freccia sulla destra per bloccare la sezione o accedere al log delle modifiche.</p> |
<p> </p> | <p> </p> | ||
| − | <p> | + | <p>La <strong>stella </strong>nell'angolo sinistro dell'icona indica che ci sono informazioni nei <strong>campi QM.</strong> </p> |
</td> | </td> | ||
</tr> | </tr> | ||
<tr> | <tr> | ||
<td style="text-align: left;"><img style="display: block; margin-left: auto; margin-right: auto;" src="/images/LeftRightArrows.png" alt="" width="38" height="25" /></td> | <td style="text-align: left;"><img style="display: block; margin-left: auto; margin-right: auto;" src="/images/LeftRightArrows.png" alt="" width="38" height="25" /></td> | ||
| − | <td> | + | <td>Passare da un ciclo all'altro. </td> |
</tr> | </tr> | ||
<tr> | <tr> | ||
<td><a href="/index.php?title=Cycle_Details"><img style="display: block; margin-left: auto; margin-right: auto; border: 2px dotted blue;" src="/images/CycleDetailsBigger.png" alt="" width="77" height="35" /></a></td> | <td><a href="/index.php?title=Cycle_Details"><img style="display: block; margin-left: auto; margin-right: auto; border: 2px dotted blue;" src="/images/CycleDetailsBigger.png" alt="" width="77" height="35" /></a></td> | ||
| − | <td><strong> | + | <td><strong>Dettagli terapia: </strong>aprire la finestra che contiene le informazioni sul ciclo selezionato.</td> |
</tr> | </tr> | ||
<tr> | <tr> | ||
<td><img style="display: block; margin-left: auto; margin-right: auto;" src="/images/Anamnesi_6_IT.png" alt="" width="70" height="42" /></td> | <td><img style="display: block; margin-left: auto; margin-right: auto;" src="/images/Anamnesi_6_IT.png" alt="" width="70" height="42" /></td> | ||
| − | <td><strong> | + | <td><strong>Stampa</strong>: cliccare ques'icona per stampare il foglio trattamento o il calendario della terapia in questione. </td> |
</tr> | </tr> | ||
<tr> | <tr> | ||
<td><img style="display: block; margin-left: auto; margin-right: auto;" src="/images/Anagrafica_7_IT.png" alt="" width="90" height="44" /></td> | <td><img style="display: block; margin-left: auto; margin-right: auto;" src="/images/Anagrafica_7_IT.png" alt="" width="90" height="44" /></td> | ||
| − | <td><strong> | + | <td><strong>Messaggio</strong>: mandare un messaggio al paziente. Questo messaggio può essere un SMS, una mail o un messaggio tramite web portal.<br /></td> |
</tr> | </tr> | ||
<tr> | <tr> | ||
<td><a href="/index.php?title=Examinations#Examination_Overview"><img style="display: block; margin-left: auto; margin-right: auto; border: 2px dotted blue;" src="/images/ExamBigger.png" alt="" width="95" height="35" /></a></td> | <td><a href="/index.php?title=Examinations#Examination_Overview"><img style="display: block; margin-left: auto; margin-right: auto; border: 2px dotted blue;" src="/images/ExamBigger.png" alt="" width="95" height="35" /></a></td> | ||
| − | <td><strong> | + | <td><strong>Esami: </strong>opens the last examination. Click on the arrow to see all past evaluations.<br /></td> |
</tr> | </tr> | ||
<tr> | <tr> | ||
<td><a href="/index.php?title=Create_a_new_entry_in_medical_history#Creating_a_Medical_History"><img style="display: block; margin-left: auto; margin-right: auto; border: 2px dotted blue;" src="/images/MedicalHistoryBigger.png" alt="" width="104" height="35" /></a></td> | <td><a href="/index.php?title=Create_a_new_entry_in_medical_history#Creating_a_Medical_History"><img style="display: block; margin-left: auto; margin-right: auto; border: 2px dotted blue;" src="/images/MedicalHistoryBigger.png" alt="" width="104" height="35" /></a></td> | ||
| − | <td><strong> | + | <td><strong>Anamnesi: </strong> by default this button opens the female patient medical history. Click on the arrow to select the male.</td> |
</tr> | </tr> | ||
</tbody> | </tbody> | ||
Revision as of 13:23, 18 April 2016
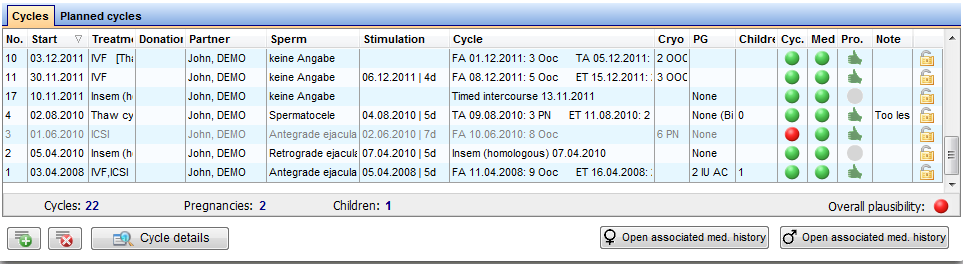
In fondo alla <a href="/index.php?title=MedITEX_IVF_main_page">pagina iniziale</a>, sono visualizzati tutti i cicli relativi al paziente selezionato.
 |
Contents |
Funzionalità nell'area relativa ai cicli
I pulsanti circondati da puntini blu in questa Wiki hanno funzionalità speciali. Cliccare sopra per avere maggori informazioni su quella particolare sezione del programma.
| <a href="/index.php?title=Cycle_Details"><img style="display: block; margin-left: auto; margin-right: auto; border: 2px dotted blue;" src="/images/Plus.png" alt="" /></a> | Crea/ Pianifica un nuovo ciclo: aggiungere un nuovo ciclo. |
| <img style="display: block; margin-left: auto; margin-right: auto;" src="/images/DeleteX.png" alt="" width="26" height="24" /> | Cancella ciclo/pianificazione selezionato/a: cancellare il ciclo selezionato dalla lista. L'operazione non è sempre possibile, alcuni fattori possono impedire la cancellazione del ciclo. Saranno visualizzati dei messaggi con le operazioni aggiuntive da fare per la cancellazione. |
| <a href="/index.php?title=Cycle_Details"><img style="border: 2px dotted blue;" src="/images/CycleDetails.png" alt="" /></a> | Dettagli terapia: si aprirà una finestra con i dettagli della terapia selezionata. |
| <a href="/index.php?title=Create_a_new_entry_in_medical_history#Creating_a_male_Medical_History"><img style="border: 2px dotted blue; display: block; margin-left: auto; margin-right: auto;" src="/images/Pag_princ_8_IT.png" alt="" width="187" height="34" /></a> | Apri anamnesi associata: si apre l'anamnesi della donna associata alla terapia. |
| <a href="/index.php?title=Create_a_new_entry_in_medical_history#Creating_a_female_Medical_History"><img style="border: 2px dotted blue; display: block; margin-left: auto; margin-right: auto;" src="/images/Pag_princ_9_IT.png" alt="" width="186" height="33" /></a> | Apri anamnesi associata: si apre l'anamnesi del uomo associata alla terapia. |
| <img style="display: block; margin-left: auto; margin-right: auto;" src="/images/hint48.png" alt="" width="48" height="48" /> | Per aprire un ciclo, fare doppio-click sulla voce relativa nella lista. |
| <a href="/index.php?title=How_to_create_a_new_cycle%3F"><img style="display: block; margin-left: auto; margin-right: auto;" src="/images/howto48.png" alt="" width="48" height="48" /></a> | <a href="/index.php?title=How_to_create_a_new_cycle%3F">Cliccare qui</a> per saperne di più su come aggiungere un nuovo ciclo. |
Tipi di ciclo
La voce più importante relativa alla creazione di un ciclo è il tipo di Trattamento.
Questi sono i Trattamenti disponibili:
| <img src="/images/newtreat1.png" alt="" width="316" height="281" /> |
Cliccare sul singolo trattamento per avere maggiori informazioni sulla sua struttura, i processi e i campi da inserire.
|
Menù
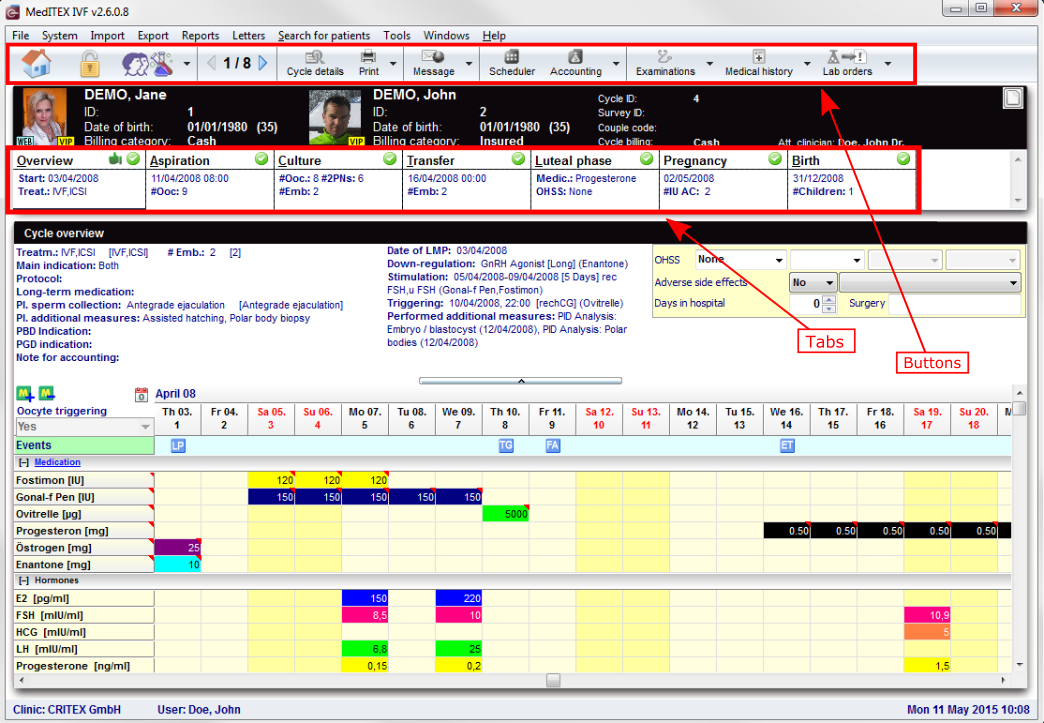 |
Una volta che viene creato o selezionato un ciclo dalla pagina principale, la finestra è aggiornata per mostrare le informazioni relative al ciclo.
Pulsanti
I pulsanti circondati da puntini blu in questa Wiki hanno funzionalità speciali. Cliccare sopra per avere maggori informazioni su quella particolare sezione del programma.
| <a href="/index.php?title=MedITEX_IVF_main_page"><img style="display: block; margin-left: auto; margin-right: auto; border: 2px dotted blue;" src="/images/homeico.jpg" alt="" /></a> | Home: cliccare per tornare alla pagina principale di MedITEX.. |
| <a href="/index.php?title=Locking_of_data"><img style="display: block; margin-left: auto; margin-right: auto; border: 2px dotted blue;" src="/images/LockIco.png" alt="" width="48" height="36" /></a> | Blocca ciclo: cliccare su quest'icona per bloccare questo ciclo e quindi impedirne ulteriori modifiche. |
| <a href="/index.php?title=Free_/_QM_fields"><img style="display: block; margin-left: auto; margin-right: auto; border: 2px dotted blue;" src="/images/QMIcon.png" alt="" width="88" height="36" /></a>
<a href="/index.php?title=Free_/_QM_fields"><img style="display: block; margin-left: auto; margin-right: auto; border: 2px dotted blue;" src="/images/QMIconContent.png" alt="" width="88" height="35" /></a> |
Campi liberi/QM: cliccare per accedere ai campi Qm relativi a quell'area. O cliccare sulla freccia sulla destra per bloccare la sezione o accedere al log delle modifiche.
La stella nell'angolo sinistro dell'icona indica che ci sono informazioni nei campi QM. |
| <img style="display: block; margin-left: auto; margin-right: auto;" src="/images/LeftRightArrows.png" alt="" width="38" height="25" /> | Passare da un ciclo all'altro. |
| <a href="/index.php?title=Cycle_Details"><img style="display: block; margin-left: auto; margin-right: auto; border: 2px dotted blue;" src="/images/CycleDetailsBigger.png" alt="" width="77" height="35" /></a> | Dettagli terapia: aprire la finestra che contiene le informazioni sul ciclo selezionato. |
| <img style="display: block; margin-left: auto; margin-right: auto;" src="/images/Anamnesi_6_IT.png" alt="" width="70" height="42" /> | Stampa: cliccare ques'icona per stampare il foglio trattamento o il calendario della terapia in questione. |
| <img style="display: block; margin-left: auto; margin-right: auto;" src="/images/Anagrafica_7_IT.png" alt="" width="90" height="44" /> | Messaggio: mandare un messaggio al paziente. Questo messaggio può essere un SMS, una mail o un messaggio tramite web portal. |
| <a href="/index.php?title=Examinations#Examination_Overview"><img style="display: block; margin-left: auto; margin-right: auto; border: 2px dotted blue;" src="/images/ExamBigger.png" alt="" width="95" height="35" /></a> | Esami: opens the last examination. Click on the arrow to see all past evaluations. |
| <a href="/index.php?title=Create_a_new_entry_in_medical_history#Creating_a_Medical_History"><img style="display: block; margin-left: auto; margin-right: auto; border: 2px dotted blue;" src="/images/MedicalHistoryBigger.png" alt="" width="104" height="35" /></a> | Anamnesi: by default this button opens the female patient medical history. Click on the arrow to select the male. |
Tabs
The top section of this screen does not change. You will always see the buttons displayed on top, the patient's information and tabs. These tabs (image below), work similar to a time-line. They are specially positioned to recreate the normal work-flow of a particular cycle. They are also referred to as summaries and will change according to the cycle created.
| <a href="/index.php?title=Cycles#Overview"><img src="/images/CycleTimeline.png" alt="" width="765" height="52" /></a> |
|
The summaries show the different treatment steps and have the following functions:
|
More information about tabs can be accessed from the Types of cycles above. Alternatively, here is full list of all cycle tabs:
| <img src="/images/plus129.png" alt="" width="129" height="129" /> |
|
| <img src="/images/plus48.png" alt="" width="48" height="48" /> |
Press the QM button to add staff, material, times or free fields. You need to define QM domains in the <a href="/index.php?title=MedITEX_IVF_Settings#Free_.2F_QM_fields">settings</a> before you can use them. More informations about using QM fields can be found <a href="/index.php?title=Free_/_QM_fields">here</a>. |
| <a href="/index.php?title=MedITEX_IVF_manual">Back to the MedITEX IVF menu </a> | <a href="#top">Back to top</a> |