MedITEX Connect
From MedITEX - Wiki
| Line 80: | Line 80: | ||
<td> | <td> | ||
<p><strong>Create the app treatment.</strong> Every treatment shown in the portal needs an app treatment, so create it first.</p> | <p><strong>Create the app treatment.</strong> Every treatment shown in the portal needs an app treatment, so create it first.</p> | ||
| − | <p>[[Image:Treatment2-Connect.png|none| | + | <p>[[Image:Treatment2-Connect.png|none|600px|thumb|middle|link=http://wiki.meditex-software.com/images/Treatment2-Connect.png]]</p> |
</td> | </td> | ||
</tr> | </tr> | ||
| Line 88: | Line 88: | ||
<p><strong>Link the treatment to a resource and to its app treatment.</strong> Both links are set on the same page.</p> | <p><strong>Link the treatment to a resource and to its app treatment.</strong> Both links are set on the same page.</p> | ||
<p>A treatment without a resource is not visible in the Connect portal. A treatment without an app treatment does not work.</p> | <p>A treatment without a resource is not visible in the Connect portal. A treatment without an app treatment does not work.</p> | ||
| − | <p>[[Image:Treatment1-Connect.png|none| | + | <p>[[Image:Treatment1-Connect.png|none|600px|thumb|middle|link=http://wiki.meditex-software.com/images/Treatment1-Connect.png]]</p> |
</td> | </td> | ||
</tr> | </tr> | ||
Latest revision as of 12:18, 26 October 2026
MedITEX Connect is your clinic's secure patient portal. Existing patients sign in at your clinic's own web address to see their appointments, exchange messages and documents, and book or cancel appointments. MedITEX stays your source of truth.
Contents |
Before a patient can register
There are two settings in the patient's record that must be checked before inviting the patient to register.
|
Setting no. 1: |
The patient's email address is entered in the demographics section. 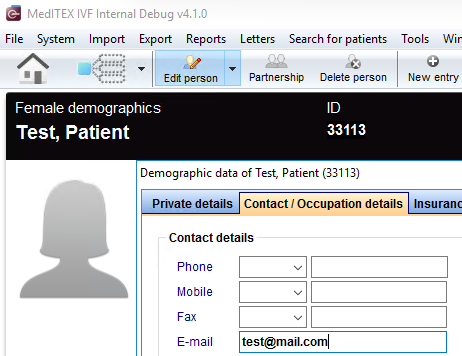  |
| Setting no. 2: |
In Applications, Active is ticked. 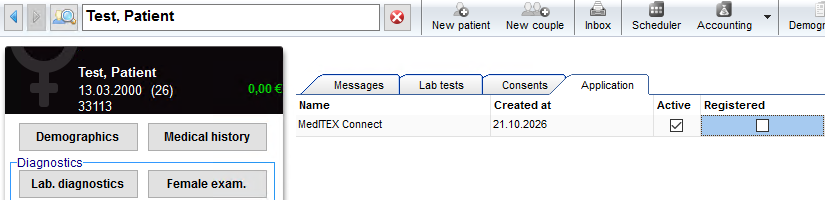  |
| <img src="/images/hint129.png" alt="" width="129" height="129" /> |
When the patient registers, MedITEX Connect checks the email the patient enters against the email stored in MedITEX. The two must match exactly. If the email is missing or different, or if Active is not ticked, the patient will see the message "Unable to connect / email not found". |
How a patient registers
Give the patient your clinic's Connect address (for example https://yourclinic.meditex-connect.com). The patient opens the address and selects Register, then:
| Step no. 1: |
Account and security: chooses a language, enters their name and a strong password, and accepts the privacy policy. The portal shows a generated username, which the patient must note down. The patient sets up two-factor authentication by scanning the QR code with an authenticator app and entering the 6-digit code, then downloads the recovery key (PDF) and keeps it safe. |
| Step no. 2: |
Email: enters the email address stored in MedITEX and confirms it with the code sent to that inbox. |
| Step no. 3: |
Connect: selects Connect to <your clinic>. The portal checks the record in MedITEX. On success the patient lands on the dashboard. |
Tell patients that the email in step 2 must be exactly the one you hold for them.
| <img src="/images/hint48.png" alt="" width="48" height="48" /> | The recovery key PDF is the only way for the patient to sign in again after losing the authenticator app. Ask patients to keep it safe. |
Setting up appointments so patients can see them
Patients only see appointment types that the portal received from MedITEX. Whenever you create a new treatment, follow both steps, or the treatment will not show up or work in the portal.
| Setting no. 1: |
Create the app treatment. Every treatment shown in the portal needs an app treatment, so create it first. 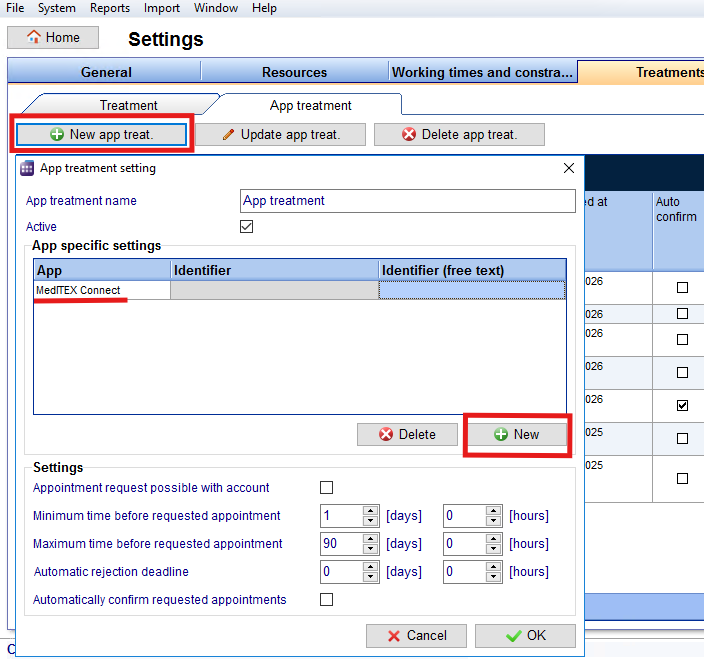  |
| Setting no. 2: |
Link the treatment to a resource and to its app treatment. Both links are set on the same page. A treatment without a resource is not visible in the Connect portal. A treatment without an app treatment does not work. 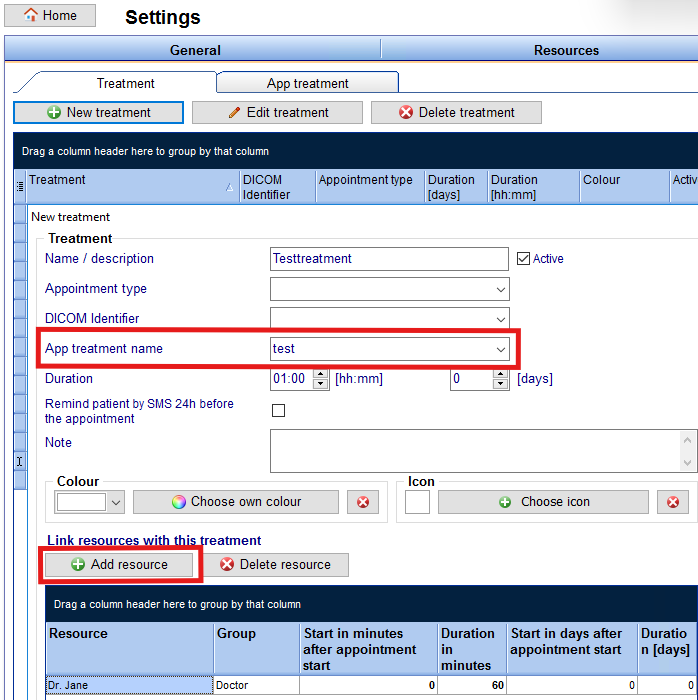  |
Treatments are shared with the portal automatically. A new treatment can take a short while to appear.
| <img src="/images/hint129.png" alt="" width="129" height="129" /> |
Whether a patient can only view a treatment, book it directly or send a request depends on the appointment type settings. Requests stay Requested until you confirm or decline them in MedITEX. |
Messages and documents
There are several ways to send a message or document to a patient through MedITEX Connect.
| From a patient entry: |
In an entry of the patient, click on the dropdown on the Send button and select MedITEX Connect. 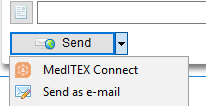  |
| From the patient's record: |
In the toolbar, click on the arrow next to Send data and select MedITEX Connect. 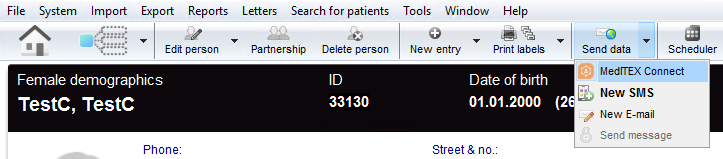  |
| Receive from a patient: |
Messages and attachments arrive in the MedITEX inbox. Open the message to read it and download the attachment. They are also shown on the Messages tab in the patient's overview. |
| Patient downloads: |
Patients download documents from the Documents page of the portal. |
| <img src="/images/hint48.png" alt="" width="48" height="48" /> |
Each message can carry one file of type PDF, PNG, JPEG, HEIC, HEIF or GIF, up to 20 MB. Rejected files show E1001 (file type), E1002 (size) or E1003 (virus scan). |
Pausing or ending a connection
The connection between a patient and the portal can be paused or ended at any time.
| Deactivate: | The patient keeps earlier data but cannot send messages or book appointments. A banner in the portal explains why. |
| Reactivate: | Everything works again. |
| Remove: | The patient loses access and their portal data is deleted. |
| <img src="/images/hint48.png" alt="" width="48" height="48" /> | Your MedITEX records are never affected by any of these actions. |
Troubleshooting
| Problem | Check |
| "Unable to connect / email not found" | Email and Active (see <a href="#Before_a_patient_can_register">Before a patient can register</a>) |
| Treatment not visible | Is a resource linked? |
| Treatment visible but not working | Is an app treatment linked? |
| No free slots | Booking window of the appointment type and resource availability |
| Attachment rejected | Allowed file type, under 20 MB |
| Lost authenticator app | Use the recovery key PDF, or contact support |
Need help? Contact CRITEX Support: <a href="mailto:support@nexus.meditex.de">support@nexus.meditex.de</a>
| <a href="/index.php?title=MedITEX_IVF_manual">Back to the MedITEX IVF menu</a> | <a href="#top">Back to top</a> |