How to add a new resource?
From MedITEX - Wiki
(Difference between revisions)
| (16 intermediate revisions by 2 users not shown) | |||
| Line 1: | Line 1: | ||
| − | <table border="0"> | + | <p><span id="result_box" class="short_text" lang="en"><span class="hps"><strong>New resources</strong> can</span> <span class="hps">be added</span> <span class="hps">in the settings.</span></span><span id="result_box" lang="en"> </span></p> |
| + | <table style="margin-left: auto; margin-right: auto;" border="0"> | ||
<tbody> | <tbody> | ||
<tr> | <tr> | ||
| − | <td> | + | <td><img src="/images/Setting.png" alt="" width="483" height="148" /><br /></td> |
| − | < | + | |
| − | </td> | + | |
</tr> | </tr> | ||
</tbody> | </tbody> | ||
</table> | </table> | ||
| − | <p> | + | <p> </p> |
| + | <p><span id="result_box" lang="en"><span class="hps"> G</span><span class="hps">o to</span> <strong><span class="hps">System -></span> <span class="hps">Settings</span> <span class="hps">-</span>> <span class="hps">Resources -</span>> Resource</strong>.</span></p> | ||
<table style="margin-left: auto; margin-right: auto;" border="0"> | <table style="margin-left: auto; margin-right: auto;" border="0"> | ||
<tbody> | <tbody> | ||
<tr> | <tr> | ||
<td> | <td> | ||
| − | <p> | + | <p>[[Image:NewResourceRed.png|none|740px|thumb|left|link=http://wiki.meditex-software.com/images/NewResourceRed.png]]</p> |
</td> | </td> | ||
</tr> | </tr> | ||
</tbody> | </tbody> | ||
</table> | </table> | ||
| − | <p> | + | <p> </p> |
| − | <table border="0"> | + | <p>Add a new resource clicking on <strong>New resource</strong>.</p> |
| + | <table style="margin-left: auto; margin-right: auto;" border="0"> | ||
| + | <tbody> | ||
| + | <tr> | ||
| + | <td><img src="/images/NewResource2+3Red.png" alt="" width="748" height="463" /><br /></td> | ||
| + | </tr> | ||
| + | </tbody> | ||
| + | </table> | ||
| + | <p> </p> | ||
| + | <p>In a new window, the resource can be edited. Then information provided will appear in the resource list.<br />Also, the newly added resource is automatically added to the schedule.</p> | ||
| + | <p><em>Hint: Every user can reorder the resources individually by dragging them around.</em></p> | ||
| + | <table style="margin-left: auto; margin-right: auto;" border="0"> | ||
<tbody> | <tbody> | ||
<tr> | <tr> | ||
<td> | <td> | ||
| − | <p> [[Image: | + | <p> [[Image:NewResource4.png|none|740px|thumb|left|link=http://wiki.meditex-software.com/images/NewResource4.png]]</p> |
</td> | </td> | ||
</tr> | </tr> | ||
| Line 29: | Line 40: | ||
</table> | </table> | ||
<p> </p> | <p> </p> | ||
| − | < | + | <table border="0"> |
| − | < | + | <tbody> |
| − | < | + | <tr> |
| − | + | <td><img src="/images/plus48.png" alt="" width="48" height="48" /></td> | |
| − | < | + | <td><a href="/index.php?title=Welcome_to_MedITEX_Scheduler#Resources">Click here</a> to obtain more information about resources.</td> |
| + | </tr> | ||
| + | </tbody> | ||
| + | </table> | ||
| + | <table style="float: right;" border="0"> | ||
| + | <tbody> | ||
| + | <tr> | ||
| + | <td style="text-align: right;"><a href="/index.php?title=MedITEX_Scheduler_how_to">Back to How to</a></td> | ||
| + | <td style="text-align: right;"><a href="#top">Back to top</a></td> | ||
| + | </tr> | ||
| + | </tbody> | ||
| + | </table> | ||
| + | <p><span class="mw-headline"><br /></span></p> | ||
Latest revision as of 16:35, 12 February 2013
New resources can be added in the settings.
| <img src="/images/Setting.png" alt="" width="483" height="148" /> |
Go to System -> Settings -> Resources -> Resource.
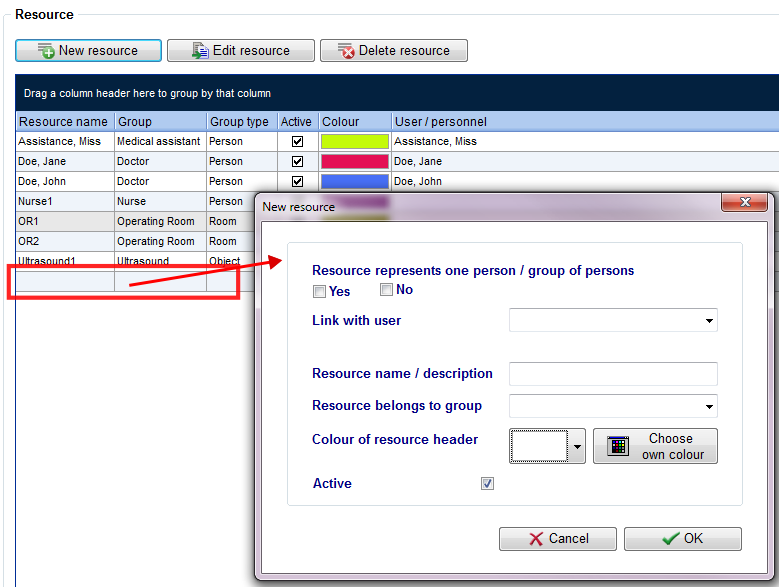 |
Add a new resource clicking on New resource.
| <img src="/images/NewResource2+3Red.png" alt="" width="748" height="463" /> |
In a new window, the resource can be edited. Then information provided will appear in the resource list.
Also, the newly added resource is automatically added to the schedule.
Hint: Every user can reorder the resources individually by dragging them around.
|
 |
| <img src="/images/plus48.png" alt="" width="48" height="48" /> | <a href="/index.php?title=Welcome_to_MedITEX_Scheduler#Resources">Click here</a> to obtain more information about resources. |
| <a href="/index.php?title=MedITEX_Scheduler_how_to">Back to How to</a> | <a href="#top">Back to top</a> |