How to sort appointments grouping it by resources?
From MedITEX - Wiki
| (5 intermediate revisions by 2 users not shown) | |||
| Line 1: | Line 1: | ||
| − | + | <p>Click on the link <strong>Appointment list / print</strong> at the top left corner of the main window to open a list with all appointments from the current date.</p> | |
| + | <table style="margin-left: auto; margin-right: auto;" border="0" width="125" height="24"> | ||
| + | <tbody> | ||
| + | <tr> | ||
| + | <td><img src="/images/fig56.png" alt="" width="259" height="139" /></td> | ||
| + | <td><img src="/images/fig57.png" alt="" width="358" height="188" /></td> | ||
| + | </tr> | ||
| + | </tbody> | ||
| + | </table> | ||
| + | <p style="text-align: justify;"> </p> | ||
| + | <p style="text-align: justify;">By default the appointment list can be viewed for all resources, but you can also filter the appointments by certain resources. The time period for the selection can also be adjusted.</p> | ||
| + | <table style="margin-left: auto; margin-right: auto;" border="0"> | ||
| + | <tbody> | ||
| + | <tr> | ||
| + | <td>[[Image:fig58.png|none|740px|thumb|left|link=http://wiki.meditex-software.com/images/fig58.png]]</td> | ||
| + | </tr> | ||
| + | </tbody> | ||
| + | </table> | ||
| + | <p style="text-align: justify;"> </p> | ||
| + | <p style="text-align: justify;">The first column gives you the opportunity to show or hide columns. Therefore, just click on the column header and check the boxes of the required columns that you want to see.</p> | ||
| + | <table style="margin-left: auto; margin-right: auto;" border="0" width="576" height="297"> | ||
| + | <tbody> | ||
| + | <tr> | ||
| + | <td> | ||
| + | <p style="text-align: justify;">The values shown in each column can be sorted with a click on the column header. You can also group the table content by moving column headers into the dark blue area on the top. For example: you want to see how many appointments were scheduled with a specific treatment. You drag the column <strong>Treatment</strong> and drop it in the blue area, and all appointments will be grouped by treatment. Every header of the group now contains the treatment and the number of appointments.</p> | ||
| + | </td> | ||
| + | <td><img src="/images/fig59.png" alt="" width="285" height="288" /></td> | ||
| + | </tr> | ||
| + | </tbody> | ||
| + | </table> | ||
| + | <p> </p> | ||
| + | <table style="margin-left: auto; margin-right: auto;" border="0"> | ||
| + | <tbody> | ||
| + | <tr> | ||
| + | <td>[[Image:fig60.png|none|740px|thumb|left|link=http://wiki.meditex-software.com/images/fig60.png]]</td> | ||
| + | </tr> | ||
| + | </tbody> | ||
| + | </table> | ||
| + | <p style="text-align: justify;">Use the button <strong>Print</strong> at the right bottom of the window in order to print the list as you have defined it.</p> | ||
| + | <p style="text-align: justify;">By <strong>double-clicking</strong> a row, you open that appointment in the editor.</p> | ||
| + | <table border="0"> | ||
| + | <tbody> | ||
| + | <tr> | ||
| + | <td><img src="/images/plus48.png" alt="" width="48" height="48" /></td> | ||
| + | <td><span lang="en"><span>To learn more about managing lists, <a href="/index.php?title=Welcome_to_MedITEX_Scheduler#Managing_Lists">click here</a>.</span></span></td> | ||
| + | </tr> | ||
| + | </tbody> | ||
| + | </table> | ||
| + | <p style="text-align: justify;"><span lang="en"><span> </span></span></p> | ||
| + | <table style="float: right;" border="0"> | ||
| + | <tbody> | ||
| + | <tr> | ||
| + | <td style="text-align: right;"><a href="/index.php?title=MedITEX_Scheduler_how_to">Back to How to</a></td> | ||
| + | <td style="text-align: right;"><a href="#top">Back to top</a></td> | ||
| + | </tr> | ||
| + | </tbody> | ||
| + | </table> | ||
| + | <p><span class="mw-headline"><br /></span></p> | ||
Latest revision as of 16:25, 12 February 2013
Click on the link Appointment list / print at the top left corner of the main window to open a list with all appointments from the current date.
| <img src="/images/fig56.png" alt="" width="259" height="139" /> | <img src="/images/fig57.png" alt="" width="358" height="188" /> |
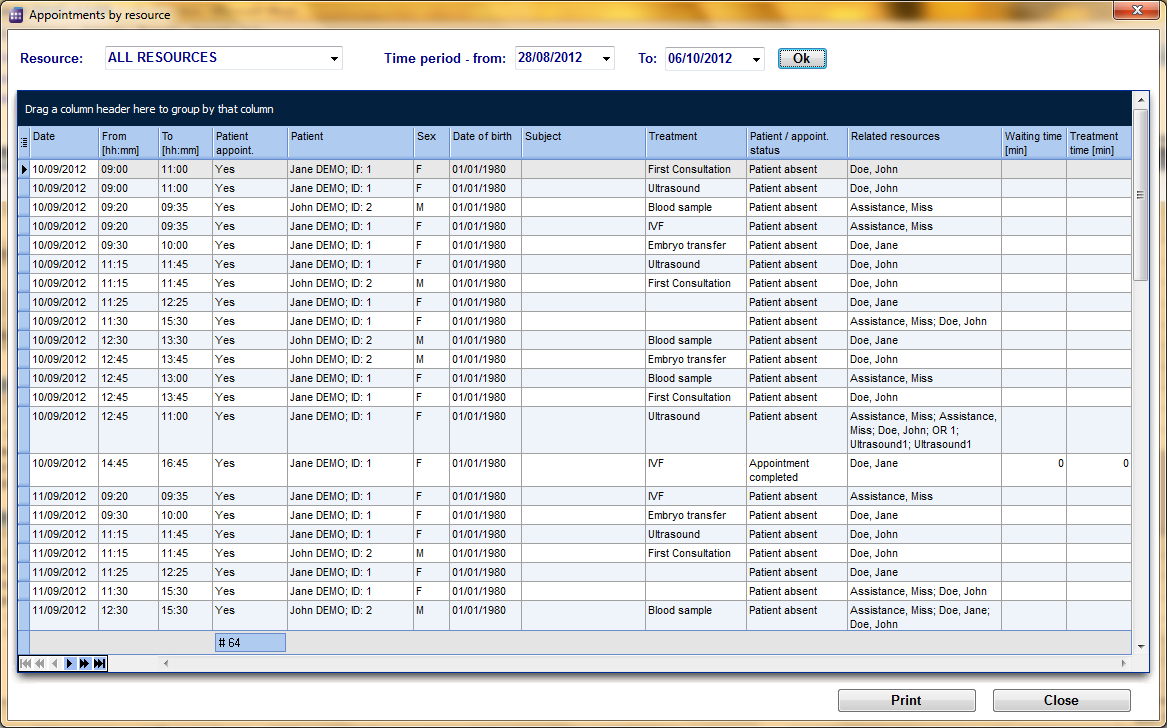
By default the appointment list can be viewed for all resources, but you can also filter the appointments by certain resources. The time period for the selection can also be adjusted.
The first column gives you the opportunity to show or hide columns. Therefore, just click on the column header and check the boxes of the required columns that you want to see.
|
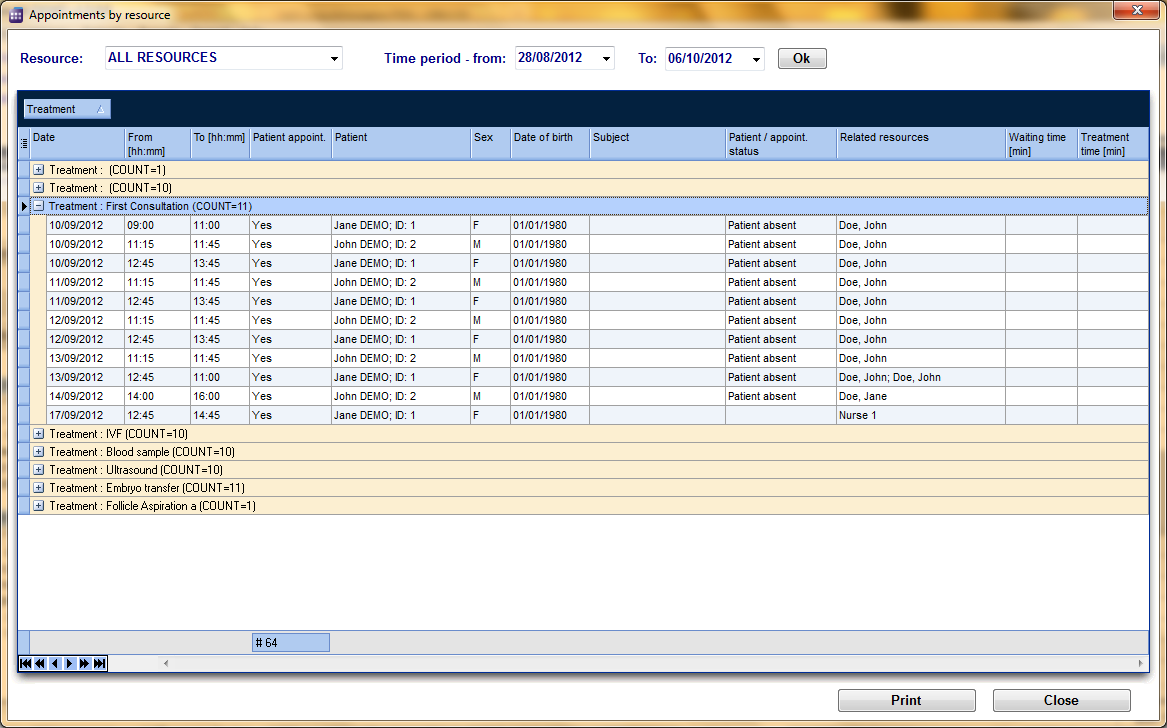
The values shown in each column can be sorted with a click on the column header. You can also group the table content by moving column headers into the dark blue area on the top. For example: you want to see how many appointments were scheduled with a specific treatment. You drag the column Treatment and drop it in the blue area, and all appointments will be grouped by treatment. Every header of the group now contains the treatment and the number of appointments. |
<img src="/images/fig59.png" alt="" width="285" height="288" /> |
Use the button Print at the right bottom of the window in order to print the list as you have defined it.
By double-clicking a row, you open that appointment in the editor.
| <img src="/images/plus48.png" alt="" width="48" height="48" /> | To learn more about managing lists, <a href="/index.php?title=Welcome_to_MedITEX_Scheduler#Managing_Lists">click here</a>. |
| <a href="/index.php?title=MedITEX_Scheduler_how_to">Back to How to</a> | <a href="#top">Back to top</a> |

