Riassunto terapia
From MedITEX - Wiki
| (One intermediate revision by one user not shown) | |||
| Line 6: | Line 6: | ||
</tbody> | </tbody> | ||
</table> | </table> | ||
| − | <p><strong> | + | <p><strong>Riassunto Terapia </strong>riporta in un solo posto tutte le informazioni relative alle terapie del paziente. E' una funzionalità implementata per generare in maniera facile e veloce un riassunto completto di un particolare trattamento effettuato. </p> |
| − | <p> | + | <p>Una delle caratteristiche principali di questa fun zionalità è la sua <a href="/index.php?title=Come_personalizzare_il_Riassunto_del_ciclo%3F">personalizzazione</a>. La visualizzazione delle informazioni può essere completamente riorganizzato in base alle proprie necessità.</p> |
<p>__TOC__</p> | <p>__TOC__</p> | ||
<p> </p> | <p> </p> | ||
| − | <h2> | + | <h2>Comprimi ed Espandi</h2> |
<table style="margin-left: auto; margin-right: auto;" border="0"> | <table style="margin-left: auto; margin-right: auto;" border="0"> | ||
<tbody> | <tbody> | ||
<tr> | <tr> | ||
<td><img style="display: block; margin-left: auto; margin-right: auto;" src="/images/CS2.png" alt="" width="16" height="16" /></td> | <td><img style="display: block; margin-left: auto; margin-right: auto;" src="/images/CS2.png" alt="" width="16" height="16" /></td> | ||
| − | <td><strong> | + | <td><strong>Comprimi</strong>: nasconde il contenuto visualizzato.<br /></td> |
</tr> | </tr> | ||
<tr> | <tr> | ||
<td><img style="display: block; margin-left: auto; margin-right: auto;" src="/images/CS3.png" alt="" /></td> | <td><img style="display: block; margin-left: auto; margin-right: auto;" src="/images/CS3.png" alt="" /></td> | ||
| − | <td><strong> | + | <td><strong>Espandi</strong>: mostra il contenuto che era nascosto. <br /></td> |
</tr> | </tr> | ||
</tbody> | </tbody> | ||
| Line 25: | Line 25: | ||
<p> </p> | <p> </p> | ||
<p> </p> | <p> </p> | ||
| − | <h2> | + | <h2>Funzionalità utili</h2> |
<table border="0"> | <table border="0"> | ||
<tbody> | <tbody> | ||
| Line 31: | Line 31: | ||
<td style="text-align: center;"><img src="/images/CS90.png" alt="" width="435" height="161" /></td> | <td style="text-align: center;"><img src="/images/CS90.png" alt="" width="435" height="161" /></td> | ||
<td style="text-align: justify;"> | <td style="text-align: justify;"> | ||
| − | <p> | + | <p>E' possibile modificare<strong> la visualizzazione della tabella</strong> con un click nell'intestazione della colonna oppure <strong>filtrando</strong> i risultati cliccando sulla freccia a lato dell'intestazione. </p> |
</td> | </td> | ||
</tr> | </tr> | ||
<tr> | <tr> | ||
<td style="text-align: center;"><img src="/images/CS91.png" alt="" width="500" height="206" /><br /></td> | <td style="text-align: center;"><img src="/images/CS91.png" alt="" width="500" height="206" /><br /></td> | ||
| − | <td style="text-align: justify;"> | + | <td style="text-align: justify;">Con i pulsanti <img src="/images/CS2.png" alt="" width="16" height="16" /> (Comprimi) and <img src="/images/CS3.png" alt="" /> (Espandi) è possibile nascondere o mostrare il contentuto dell'area in questione. </td> |
</tr> | </tr> | ||
</tbody> | </tbody> | ||
| Line 43: | Line 43: | ||
<p> </p> | <p> </p> | ||
<h2>Layout</h2> | <h2>Layout</h2> | ||
| − | <p> | + | <p>E' possibile accedere all'interfaccia di personalizzazione nella barra menù <strong>Layout -> Customize layout</strong>.</p> |
<p> </p> | <p> </p> | ||
<table border="0"> | <table border="0"> | ||
| Line 52: | Line 52: | ||
<tr> | <tr> | ||
<td><img src="/images/howto48.png" alt="" width="48" height="48" /></td> | <td><img src="/images/howto48.png" alt="" width="48" height="48" /></td> | ||
| − | <td> | + | <td>Se si desidera sapere come personalizzare, <a href="/index.php?title=Come_personalizzare_il_Riassunto_del_ciclo%3F">cliccare qui</a>.</td> |
</tr> | </tr> | ||
</tbody> | </tbody> | ||
| Line 59: | Line 59: | ||
<p> </p> | <p> </p> | ||
<p> </p> | <p> </p> | ||
| − | <p> | + | <p>Questa è l'<strong>interfaccia di personalizzazione</strong>. </p> |
<table border="0"> | <table border="0"> | ||
<tbody> | <tbody> | ||
<tr> | <tr> | ||
<td style="text-align: justify;"> | <td style="text-align: justify;"> | ||
| − | <p> | + | <p>La visualizzazione ad albero del layout (<strong>Layout Tree View) </strong>mostra tutte le voci presenti nel Riassunto mentre la sezione Voci disponibili (<strong>Available Items)</strong> contiene tutte le voci non utilizzate. </p> |
</td> | </td> | ||
<td> | <td> | ||
| − | <p style="text-align: justify;"> | + | <p style="text-align: justify;">Cliccando sull'opzione a fondo pagina <strong>Tabbed View</strong> (evidenziata nell'immagine sotto)), si modifica la finestra di Personalizzazione e mostra le voci utilizzate e quelle non utilizzate nel Riassunto in due tab separate. </p> |
</td> | </td> | ||
</tr> | </tr> | ||
| Line 77: | Line 77: | ||
</table> | </table> | ||
<p> </p> | <p> </p> | ||
| − | <p> | + | <p>Spiegazione dei pulsanti/icone:</p> |
<table style="margin-left: auto; margin-right: auto;" border="0"> | <table style="margin-left: auto; margin-right: auto;" border="0"> | ||
<tbody> | <tbody> | ||
<tr> | <tr> | ||
<td><img style="display: block; margin-left: auto; margin-right: auto;" src="/images/CS7.png" alt="" width="15" height="13" /></td> | <td><img style="display: block; margin-left: auto; margin-right: auto;" src="/images/CS7.png" alt="" width="15" height="13" /></td> | ||
| − | <td style="text-align: left;"><strong>Undo</strong>: | + | <td style="text-align: left;"><strong>Undo</strong>: annulla l'ultima procedura effettuata.<br /></td> |
</tr> | </tr> | ||
<tr> | <tr> | ||
<td><img style="display: block; margin-left: auto; margin-right: auto;" src="/images/CS8.png" alt="" width="15" height="13" /></td> | <td><img style="display: block; margin-left: auto; margin-right: auto;" src="/images/CS8.png" alt="" width="15" height="13" /></td> | ||
| − | <td><strong>Redo</strong>: | + | <td><strong>Redo</strong>: esegue l'ultima procedura effettuata.<br /></td> |
</tr> | </tr> | ||
<tr> | <tr> | ||
<td><img style="display: block; margin-left: auto; margin-right: auto;" src="/images/CS9.png" alt="" width="16" height="16" /></td> | <td><img style="display: block; margin-left: auto; margin-right: auto;" src="/images/CS9.png" alt="" width="16" height="16" /></td> | ||
| − | <td><strong>Store Layout</strong>: | + | <td><strong>Store Layout</strong>: salva il layout dopo la personalizzazione.<br /></td> |
</tr> | </tr> | ||
<tr> | <tr> | ||
<td><img style="display: block; margin-left: auto; margin-right: auto;" src="/images/CS10.png" alt="" width="16" height="16" /></td> | <td><img style="display: block; margin-left: auto; margin-right: auto;" src="/images/CS10.png" alt="" width="16" height="16" /></td> | ||
| − | <td><strong>Restore Layout</strong>: | + | <td><strong>Restore Layout</strong>: Dopo che è stato salvato l'ultimo layout, riporta il layout allo stato precedente.<br /></td> |
</tr> | </tr> | ||
<tr> | <tr> | ||
<td><img style="display: block; margin-left: auto; margin-right: auto;" src="/images/CS12.png" alt="" width="16" height="16" /></td> | <td><img style="display: block; margin-left: auto; margin-right: auto;" src="/images/CS12.png" alt="" width="16" height="16" /></td> | ||
| − | <td><strong>Collapse </strong><strong> All</strong>: | + | <td><strong>Collapse </strong><strong> All</strong>: nasconde la gerarchia dell'albero.<br /></td> |
</tr> | </tr> | ||
<tr> | <tr> | ||
<td><img style="display: block; margin-left: auto; margin-right: auto;" src="/images/CS11.png" alt="" width="16" height="16" /></td> | <td><img style="display: block; margin-left: auto; margin-right: auto;" src="/images/CS11.png" alt="" width="16" height="16" /></td> | ||
| − | <td><strong>Expand </strong><strong>All</strong>: | + | <td><strong>Expand </strong><strong>All</strong>: mostra la gerarchia dell'albero.<br /></td> |
</tr> | </tr> | ||
<tr> | <tr> | ||
<td><img style="display: block; margin-left: auto; margin-right: auto;" src="/images/CS13.png" alt="" width="16" height="16" /></td> | <td><img style="display: block; margin-left: auto; margin-right: auto;" src="/images/CS13.png" alt="" width="16" height="16" /></td> | ||
| − | <td><strong>Delete</strong>: | + | <td><strong>Delete</strong>: questo pulsante è attivo solo nel caso in cui sia stato creato un nuovo gruppo o una voce ausiliaria. Cancella questo gruppo/voci appena create.<br /></td> |
</tr> | </tr> | ||
<tr> | <tr> | ||
<td><img style="display: block; margin-left: auto; margin-right: auto;" src="/images/CS15.png" alt="" width="16" height="16" /></td> | <td><img style="display: block; margin-left: auto; margin-right: auto;" src="/images/CS15.png" alt="" width="16" height="16" /></td> | ||
| − | <td><strong>Add Group</strong>: | + | <td><strong>Add Group</strong>: aggiunge un nuovo gruppo. <br /></td> |
</tr> | </tr> | ||
<tr> | <tr> | ||
<td><img style="display: block; margin-left: auto; margin-right: auto;" src="/images/CS14.png" alt="" width="16" height="16" /></td> | <td><img style="display: block; margin-left: auto; margin-right: auto;" src="/images/CS14.png" alt="" width="16" height="16" /></td> | ||
| − | <td><strong>Add Auxiliary Item</strong>: | + | <td><strong>Add Auxiliary Item</strong>: aggiunge una nuova voce ausiliaria.</td> |
</tr> | </tr> | ||
<tr> | <tr> | ||
<td><img style="display: block; margin-left: auto; margin-right: auto;" src="/images/CS16.png" alt="" width="23" height="20" /></td> | <td><img style="display: block; margin-left: auto; margin-right: auto;" src="/images/CS16.png" alt="" width="23" height="20" /></td> | ||
| − | <td><strong>View as Tree / Plain List</strong>: | + | <td><strong>View as Tree / Plain List</strong>: modifica il layout delle Voci disponibili (<strong>Available Items)</strong>.<br /></td> |
</tr> | </tr> | ||
</tbody> | </tbody> | ||
| Line 127: | Line 127: | ||
<tr> | <tr> | ||
<td><img src="/images/howto48.png" alt="" width="48" height="48" /></td> | <td><img src="/images/howto48.png" alt="" width="48" height="48" /></td> | ||
| − | <td> | + | <td>Se si desidera sapere come personalizzare, <a href="/index.php?title=Come_personalizzare_il_Riassunto_del_ciclo%3F">cliccare qui</a>.</td> |
</tr> | </tr> | ||
</tbody> | </tbody> | ||
</table> | </table> | ||
<p> </p> | <p> </p> | ||
| − | <h2> | + | <h2>Stampa</h2> |
<p>Printing is accessible on the menu under <strong>Print</strong>. Here, we have an <strong>option to configure the page</strong>, <strong>show a print preview </strong>and the <strong>actual printing command</strong>.</p> | <p>Printing is accessible on the menu under <strong>Print</strong>. Here, we have an <strong>option to configure the page</strong>, <strong>show a print preview </strong>and the <strong>actual printing command</strong>.</p> | ||
<table style="margin-left: auto; margin-right: auto;" border="0"> | <table style="margin-left: auto; margin-right: auto;" border="0"> | ||
| Line 142: | Line 142: | ||
</table> | </table> | ||
<p> </p> | <p> </p> | ||
| − | <h2> | + | <h2>Ciclo</h2> |
| − | <p> | + | <p>E' possibile scegliere quali cicli mostrare nel riassunto cliccando nella barrea Menù-> <strong>Cycle</strong>.</p> |
| − | <p> | + | <p>Il ciclo visualizzato sarà evidenziato in <strong>Grassetto</strong>.</p> |
<table style="margin-left: auto; margin-right: auto;" border="0"> | <table style="margin-left: auto; margin-right: auto;" border="0"> | ||
<tbody> | <tbody> | ||
| Line 153: | Line 153: | ||
</table> | </table> | ||
<p> </p> | <p> </p> | ||
| − | <h2> | + | <h2>Come fare...</h2> |
<table border="0"> | <table border="0"> | ||
<tbody> | <tbody> | ||
| Line 159: | Line 159: | ||
<td style="text-align: center;"><img src="/images/howto48.png" alt="" width="48" height="48" /></td> | <td style="text-align: center;"><img src="/images/howto48.png" alt="" width="48" height="48" /></td> | ||
<td> | <td> | ||
| − | <p> | + | <p>E' possibile trovare maggiori informazioni sull'utilizzo del <strong>Riassunto terapia</strong> nella pagina <a href="/index.php?title=MedITEX_IVF_come_fare#Riassunto_terapia">Come fare...</a></p> |
</td> | </td> | ||
</tr> | </tr> | ||
| Line 167: | Line 167: | ||
<tbody> | <tbody> | ||
<tr> | <tr> | ||
| − | <td style="text-align: right;"><a href="/index.php?title= | + | <td style="text-align: right;"><a href="/index.php?title=Manuale_MedITEX">Torna al manuale di MedITEX IVF</a></td> |
| − | <td style="text-align: right;"><a href="#top"> | + | <td style="text-align: right;"><a href="#top">Inizio Pagina</a></td> |
</tr> | </tr> | ||
</tbody> | </tbody> | ||
</table> | </table> | ||
Latest revision as of 08:16, 4 May 2016
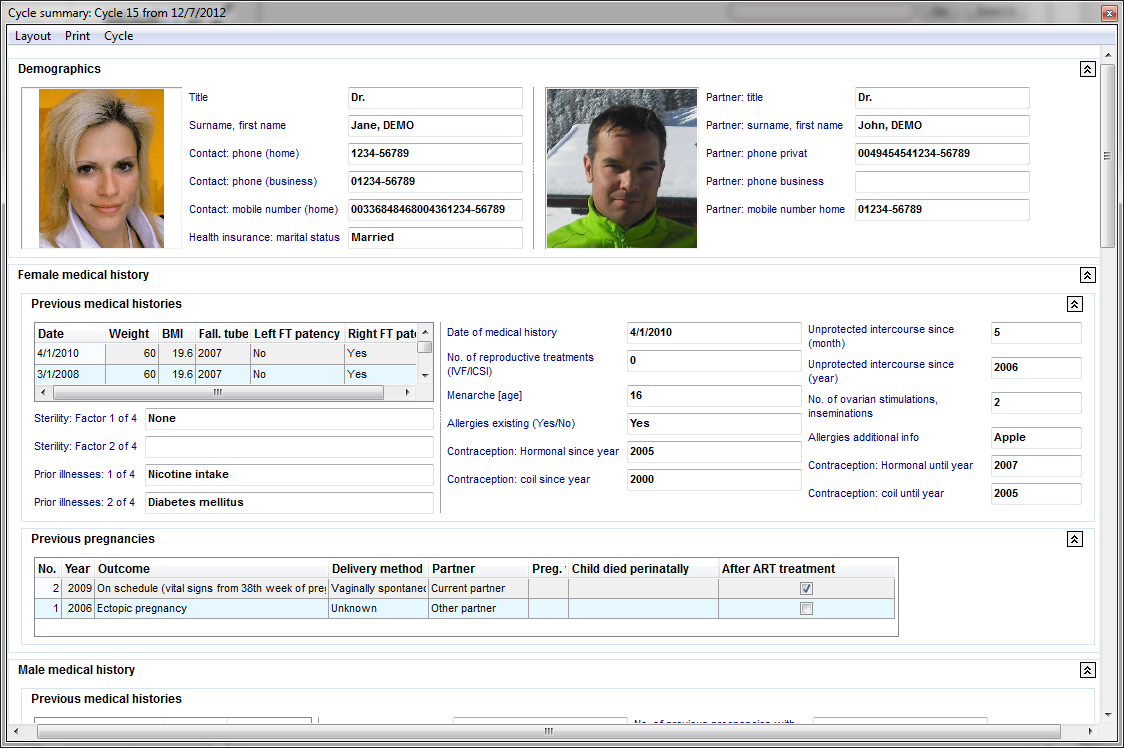 |
Riassunto Terapia riporta in un solo posto tutte le informazioni relative alle terapie del paziente. E' una funzionalità implementata per generare in maniera facile e veloce un riassunto completto di un particolare trattamento effettuato.
Una delle caratteristiche principali di questa fun zionalità è la sua <a href="/index.php?title=Come_personalizzare_il_Riassunto_del_ciclo%3F">personalizzazione</a>. La visualizzazione delle informazioni può essere completamente riorganizzato in base alle proprie necessità.
Contents |
Comprimi ed Espandi
| <img style="display: block; margin-left: auto; margin-right: auto;" src="/images/CS2.png" alt="" width="16" height="16" /> | Comprimi: nasconde il contenuto visualizzato. |
| <img style="display: block; margin-left: auto; margin-right: auto;" src="/images/CS3.png" alt="" /> | Espandi: mostra il contenuto che era nascosto. |
Funzionalità utili
| <img src="/images/CS90.png" alt="" width="435" height="161" /> |
E' possibile modificare la visualizzazione della tabella con un click nell'intestazione della colonna oppure filtrando i risultati cliccando sulla freccia a lato dell'intestazione. |
| <img src="/images/CS91.png" alt="" width="500" height="206" /> |
Con i pulsanti <img src="/images/CS2.png" alt="" width="16" height="16" /> (Comprimi) and <img src="/images/CS3.png" alt="" /> (Espandi) è possibile nascondere o mostrare il contentuto dell'area in questione. |
Layout
E' possibile accedere all'interfaccia di personalizzazione nella barra menù Layout -> Customize layout.
| <img src="/images/CS4.png" alt="" width="304" height="149" /> | |
| <img src="/images/howto48.png" alt="" width="48" height="48" /> | Se si desidera sapere come personalizzare, <a href="/index.php?title=Come_personalizzare_il_Riassunto_del_ciclo%3F">cliccare qui</a>. |
Questa è l'interfaccia di personalizzazione.
|
La visualizzazione ad albero del layout (Layout Tree View) mostra tutte le voci presenti nel Riassunto mentre la sezione Voci disponibili (Available Items) contiene tutte le voci non utilizzate. |
Cliccando sull'opzione a fondo pagina Tabbed View (evidenziata nell'immagine sotto)), si modifica la finestra di Personalizzazione e mostra le voci utilizzate e quelle non utilizzate nel Riassunto in due tab separate. |
| <img style="display: block; margin-left: auto; margin-right: auto;" src="/images/CS5.png" alt="" width="360" height="386" /> | <img style="display: block; margin-left: auto; margin-right: auto;" src="/images/CS6.png" alt="" width="360" height="386" /> |
Spiegazione dei pulsanti/icone:
| <img style="display: block; margin-left: auto; margin-right: auto;" src="/images/CS7.png" alt="" width="15" height="13" /> | Undo: annulla l'ultima procedura effettuata. |
| <img style="display: block; margin-left: auto; margin-right: auto;" src="/images/CS8.png" alt="" width="15" height="13" /> | Redo: esegue l'ultima procedura effettuata. |
| <img style="display: block; margin-left: auto; margin-right: auto;" src="/images/CS9.png" alt="" width="16" height="16" /> | Store Layout: salva il layout dopo la personalizzazione. |
| <img style="display: block; margin-left: auto; margin-right: auto;" src="/images/CS10.png" alt="" width="16" height="16" /> | Restore Layout: Dopo che è stato salvato l'ultimo layout, riporta il layout allo stato precedente. |
| <img style="display: block; margin-left: auto; margin-right: auto;" src="/images/CS12.png" alt="" width="16" height="16" /> | Collapse All: nasconde la gerarchia dell'albero. |
| <img style="display: block; margin-left: auto; margin-right: auto;" src="/images/CS11.png" alt="" width="16" height="16" /> | Expand All: mostra la gerarchia dell'albero. |
| <img style="display: block; margin-left: auto; margin-right: auto;" src="/images/CS13.png" alt="" width="16" height="16" /> | Delete: questo pulsante è attivo solo nel caso in cui sia stato creato un nuovo gruppo o una voce ausiliaria. Cancella questo gruppo/voci appena create. |
| <img style="display: block; margin-left: auto; margin-right: auto;" src="/images/CS15.png" alt="" width="16" height="16" /> | Add Group: aggiunge un nuovo gruppo. |
| <img style="display: block; margin-left: auto; margin-right: auto;" src="/images/CS14.png" alt="" width="16" height="16" /> | Add Auxiliary Item: aggiunge una nuova voce ausiliaria. |
| <img style="display: block; margin-left: auto; margin-right: auto;" src="/images/CS16.png" alt="" width="23" height="20" /> | View as Tree / Plain List: modifica il layout delle Voci disponibili (Available Items). |
| <img src="/images/howto48.png" alt="" width="48" height="48" /> | Se si desidera sapere come personalizzare, <a href="/index.php?title=Come_personalizzare_il_Riassunto_del_ciclo%3F">cliccare qui</a>. |
Stampa
Printing is accessible on the menu under Print. Here, we have an option to configure the page, show a print preview and the actual printing command.
| <img style="display: block; margin-left: auto; margin-right: auto;" src="/images/CS17.png" alt="" width="477" height="289" /> |
Ciclo
E' possibile scegliere quali cicli mostrare nel riassunto cliccando nella barrea Menù-> Cycle.
Il ciclo visualizzato sarà evidenziato in Grassetto.
| <img style="display: block; margin-left: auto; margin-right: auto;" src="/images/CS18.png" alt="" width="455" height="404" /> |
Come fare...
| <img src="/images/howto48.png" alt="" width="48" height="48" /> |
E' possibile trovare maggiori informazioni sull'utilizzo del Riassunto terapia nella pagina <a href="/index.php?title=MedITEX_IVF_come_fare#Riassunto_terapia">Come fare...</a> |
| <a href="/index.php?title=Manuale_MedITEX">Torna al manuale di MedITEX IVF</a> | <a href="#top">Inizio Pagina</a> |